Covigent - User Guide
- Introduction
-
About this Guide
2.1. What’s in Covigent
2.2. Formatting in the Guide
-
Getting Started
3.1. Setting Up
3.2. Parts of the Graphical User Interface
3.2.1. Patients Tab
3.2.2. Rooms Tab
3.2.3. Tasks Tab
3.3. Tutorial on How to Use Covigent
- Glossary
-
Features
5.1. Command Format
5.2. Patient
5.2.1. Add a Patient:addpatient
5.2.2 Delete a Patient:deletepatient
5.2.3 Edit Patient Details:editpatient
5.2.4 Search Patients by Information:searchpatient
5.2.5 List all Patients:listpatient
5.3. Room
5.3.1 Initialise Rooms in Hotel:initroom
5.3.2 Allocate Patient to Room:allocateroom
5.3.3 Search by Room Number:searchroom
5.3.4 Search for Room with Patient:searchroom
5.3.5 List the Current Rooms:listroom
5.3.6 Find the first free room:findemptyroom
5.4 Task
5.4.1 Add a Task to a Room:addtask
5.4.2 Delete a Task from a Room:deletetask
5.4.3 Edit Task Description or Due Date:edittask
5.4.4 Remove Due Date from a Task:edittask
5.4.5 Search all Tasks before the Given Date:searchtask
5.4.6 List all Tasks:listtask
5.5 View Help:help
5.6 Exit Covigent:exit
5.7 Autosave
-
Command Summary
6.1 Patient
6.2 Room
6.3 Task
6.4 General
- FAQ
1. Introduction
Welcome to User Guide for our application, Covigent! Has Covid-19 hit your boutique hotel hard and left you scrambling to search for an application that can ease your transition from a boutique hotel to a quarantine facility? Your search ends here!
Covigent is a desktop management application to ease boutique hotels’ transitions into quarantine facilities. Covigent aims to help boutique hotel managers
keep track of the information of quarantined individuals (i.e. patients) and the tasks to be done by their staff. The main features include:
1. Managing patient information - Period of Stay, temperature, phone number etc.
2. Managing the rooms of the quarantine facility - Allocate patients to rooms, search for a room, etc.
3. Managing the tasks to be done by each room - Add a task to a room, editing a task to the room, etc.
As an application optimized for use with a keyboard rather than the mouse, you operate Covigent mainly by typing commands into a Command Box. If you can type quickly, Covigent can improve your efficiency in managing your patients and tasks instead of using traditional apps. But wait! Don’t forget our beautiful Graphical User Interface (GUI) too! With our easy to navigate GUI, it has served it’s purpose well as an interface that facilitates interaction with our application through graphical icons.
Getting interested? Jump to Section 3, “Getting Started” to get started.
This is what Covigent looks like:
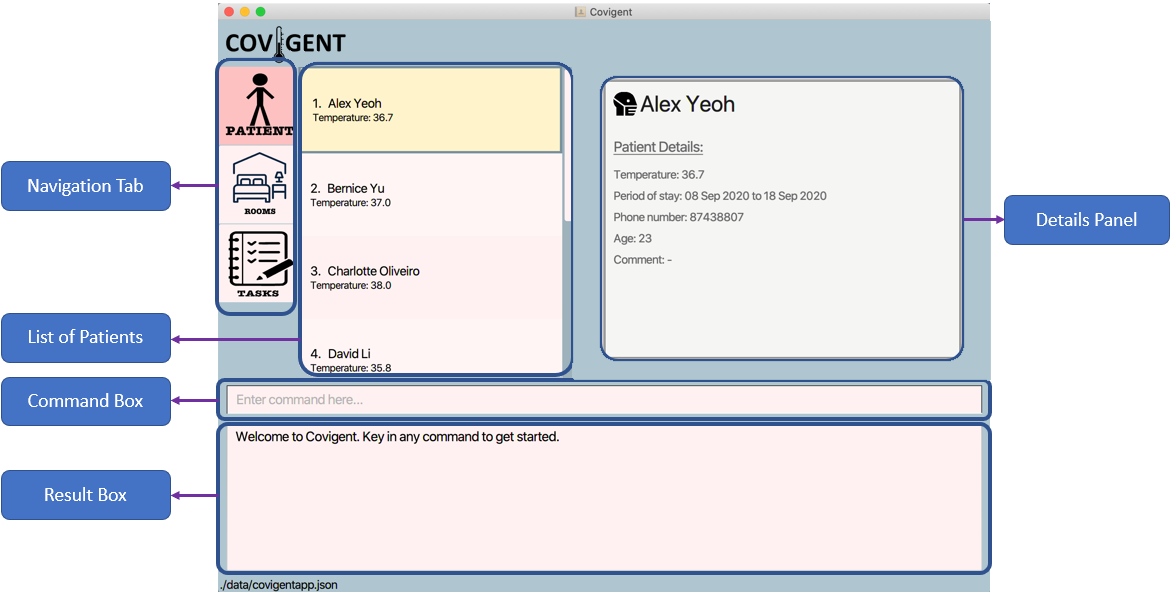
Figure 1. The Graphical User Interface for Covigent
Written by: Ming De
2. About this Guide
This guide gives you an overview of the features in Covigent and shows you how to get started using Covigent. Choose a link in the Feature section to get a step-by-step instruction, and understand how to use Covigent.
2.1 What is in Covigent
In our patient features, you can add, delete, edit, search for a patient, or you can list out all the patients in Covigent.
Moving on to our room features, you can initialise, allocate, search and find the rooms which you need. If you want an overview of the rooms, you can list out all the rooms in Covigent.
Next, for our task features, you can add, delete, edit and search for a task and see it be displayed on our amazing GUI. If you want to see all the tasks, you can list out all the tasks in Covigent.
Lastly, our miscellaneous features will ensure that you can seek help if you are lost, or exit the program when you are done with it. Our app also has an autosave feature that allows you to save the data without manual command.
2.2 Formatting in the Guide
Note the following formatting used in this document:
-
 This symbol indicates important information.
 -
 A grey highlight (called a mark-up) indicates a keyword. It denotes either i) a field or command that can be typed into the Command Box and executed by Covigent; or ii) the name of a file.
 -
 Italicised words indicate text that is displayed on the Graphical User Interface.
 -
 A light blue font color indicates that this is a Hyperlink that you can click on
and be transferred to the corresponding section in Covigent.
Written by: Wai Lok
3. Getting Started
If you are tired of lengthy and problematic installation processes, Covigent is perfect for you. The setup is minimal and can be completed in 4 simple steps. Follow the instructions below to try it out!
3.1 Setting Up
The following steps to set up Covigent are applicable to Windows, Mac OS X, and Linux.
-
Install Java 11 or a later version. The latest version of Java can be found here.
- Download the latest version of Covigent from here. To do so, look for the file
covigent.jarand click on it. Please refer to Figure 2 if you require assistance with locating the file. Figure 2 shows how to download version 1.3 of Covigent.covigent.jarhas been highlighted in red for your convenience.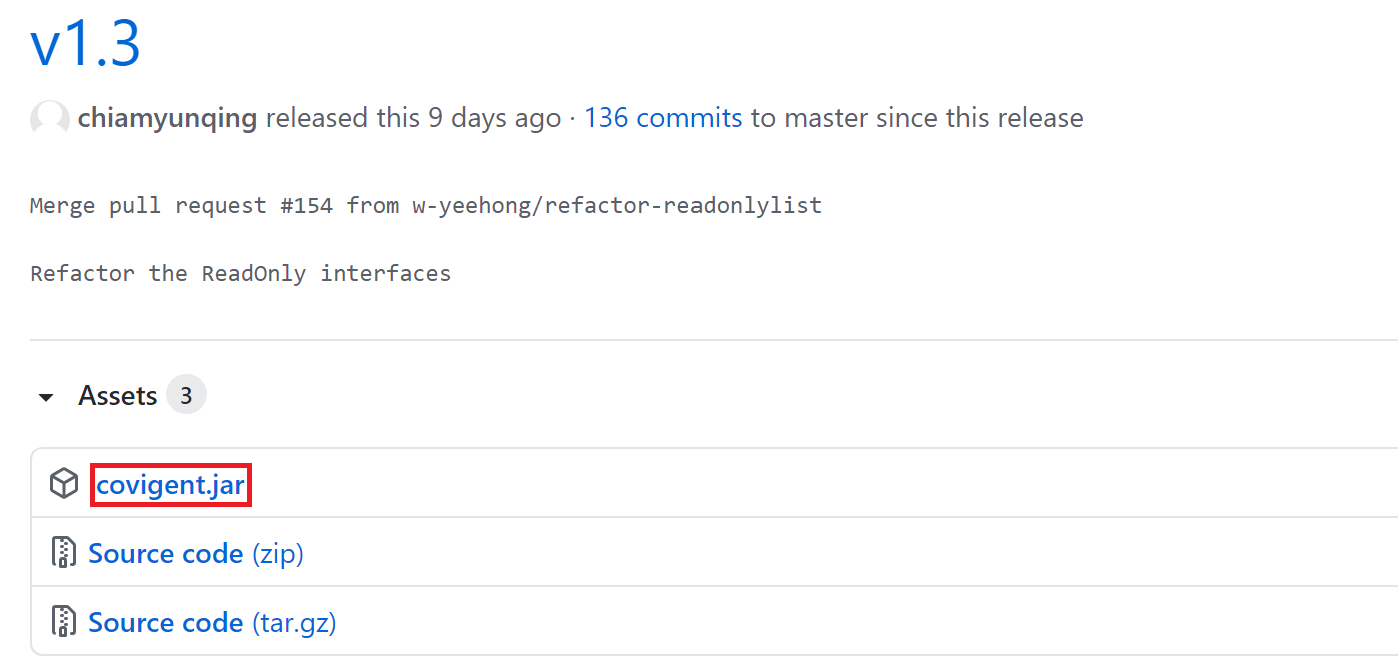
Figure 2. How to Download Covigent -
You may move
covigent.jarto any other folder. Your save data and preferences for Covigent will be saved to the same folder. - Double-click on
covigent.jarto start Covigent. Here is what you will see if everything goes right:
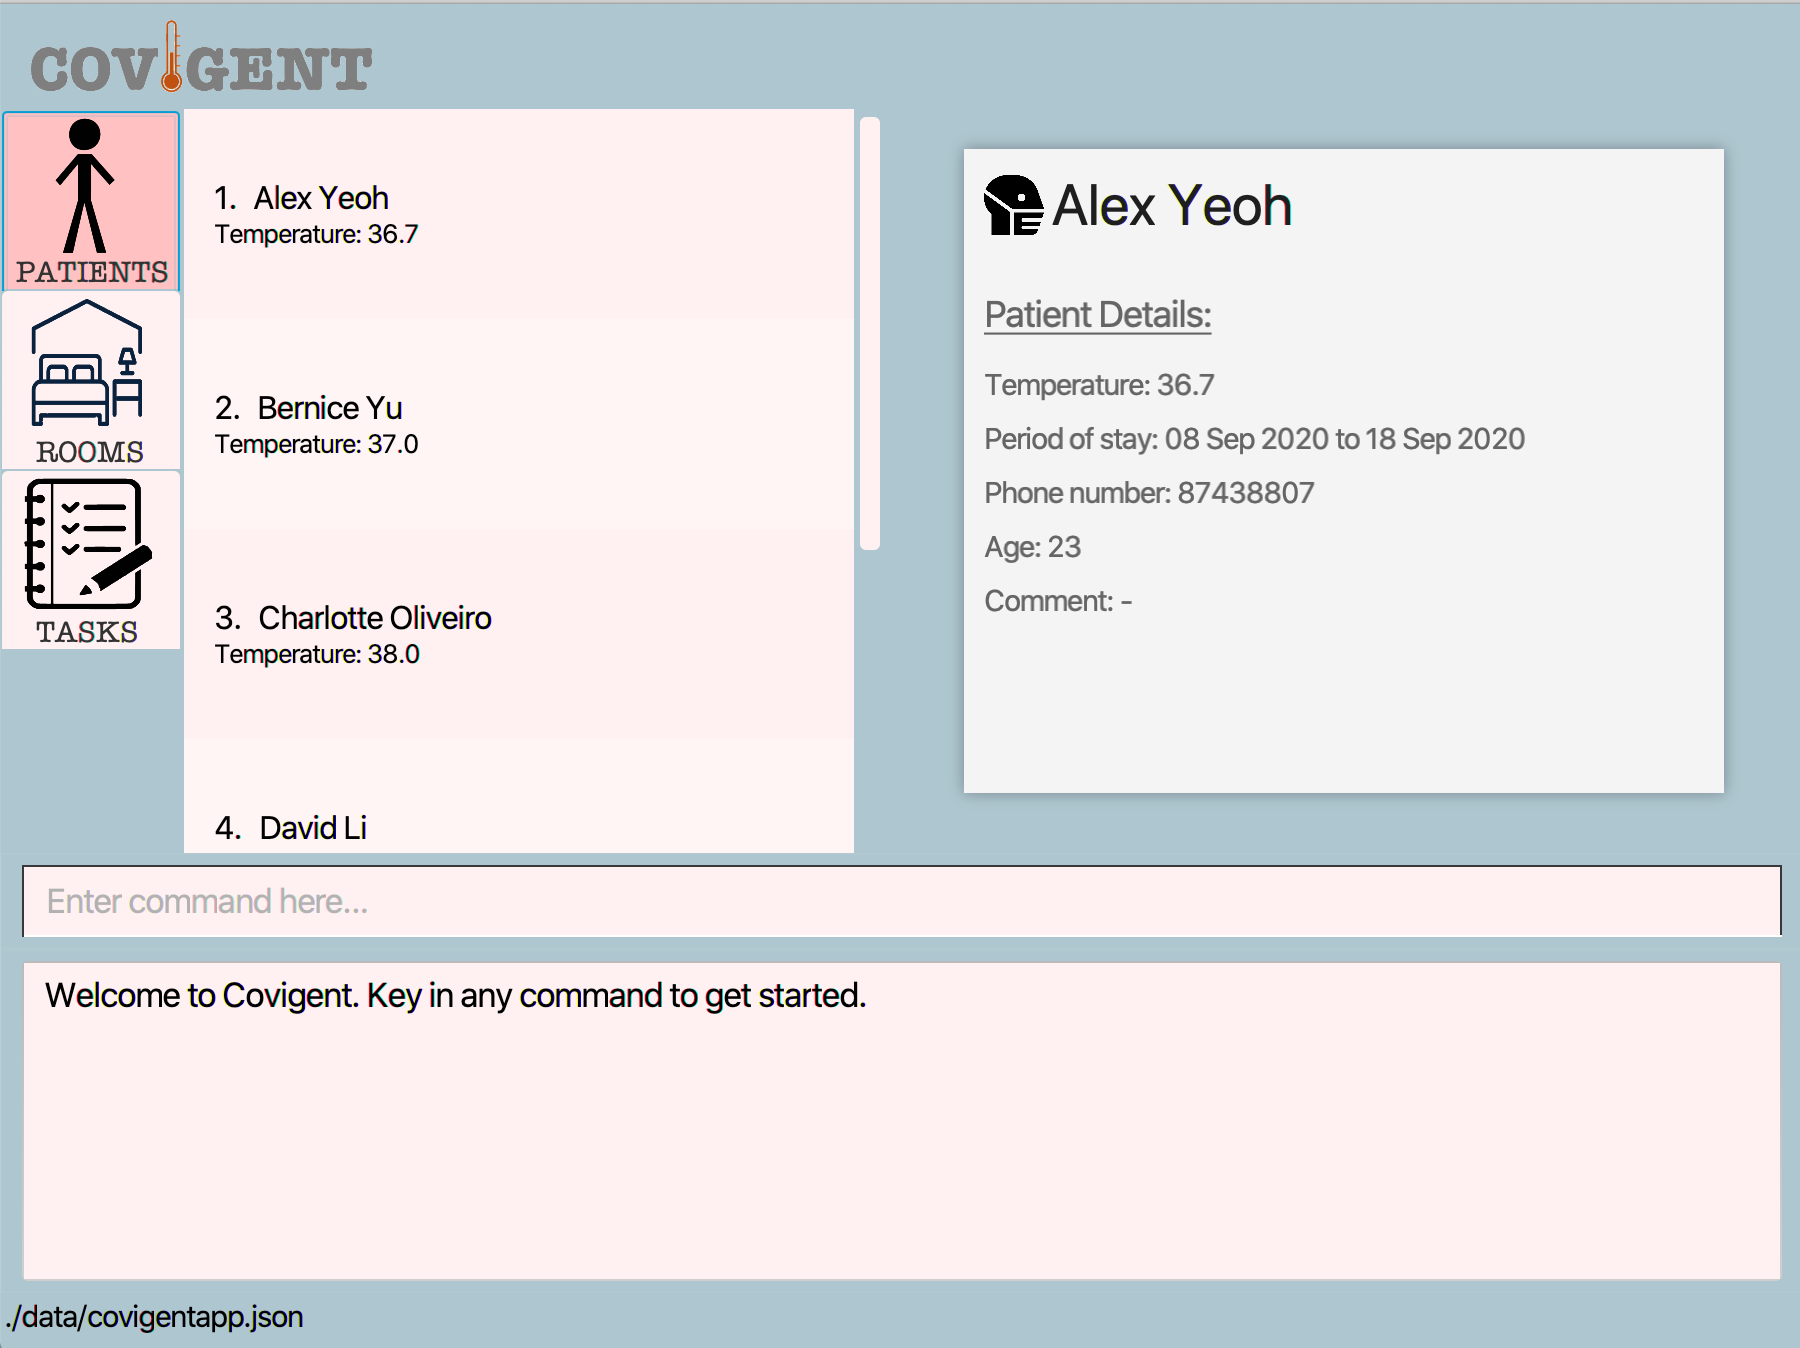
Figure 3. Covigent after Starting Up
In case there are any problems during setup, please refer to Section 7, “FAQ” for instructions to resolve them.
3.2 Parts of the Graphical User Interface
The user interface of Covigent comprises 3 main tabs: Patients, Rooms, and Tasks. The tabs respectively display information on the patients, the rooms in the quarantine facility, and the tasks assigned to the rooms. A tab turns a deeper shade of pink when you click on it to indicate that you are currently in the tab. For example, Figure 4 shows how the Tasks tab changes colours when you click on it.

Figure 4. User Interface of Covigent when a Tab is Clicked
3.2.1 Patients Tab
The main purpose of the Patients tab is to display information about the patients.
When you first start Covigent, you will find yourself in the Patients tab. You may notice that there is already some sample data for quarantined individuals. There is no need to worry! The data can be edited or deleted to suit your needs later. If you urgently need to change the data, please proceed to Section 5.2.3, “Edit Patient Details” for the relevant instructions.
Using the Patients tab is easy. Click on any of the patients. This will highlight that individual and display her information. Figure 5 illustrates what happens when you click on a patient David Li. Observe that his details appear on the right of the user interface, in the Details Panel.
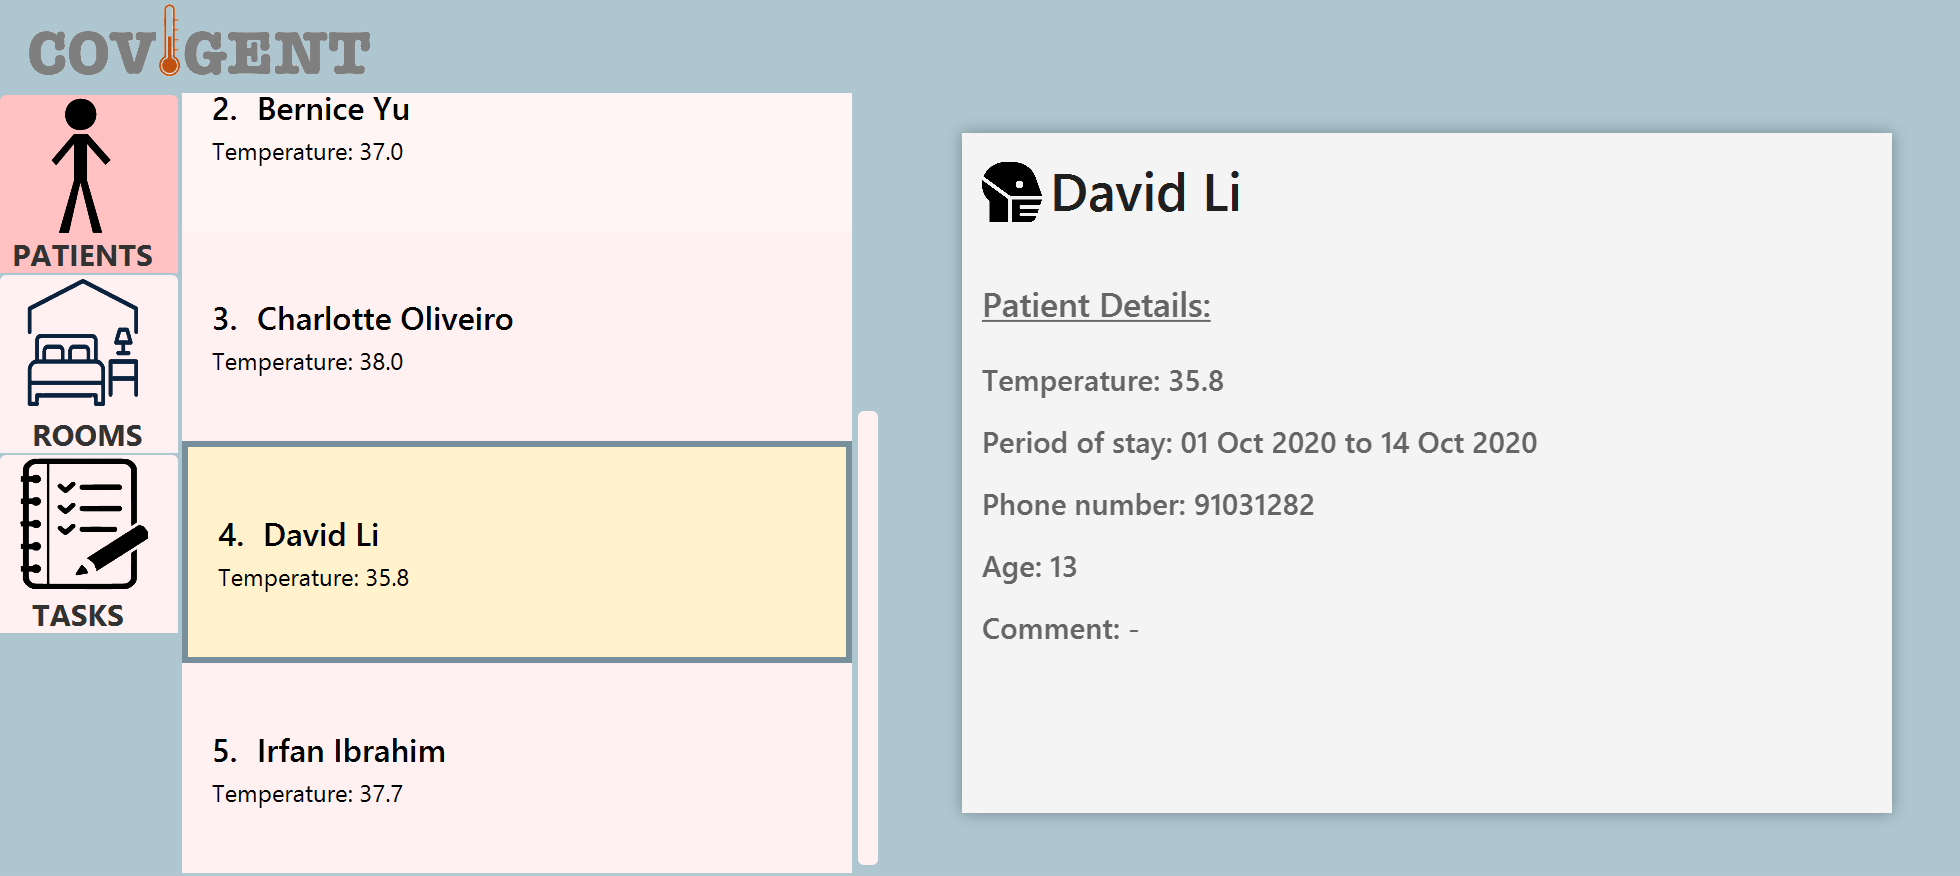
Figure 5. Highlighted Individual in Patients Tab
3.2.2 Rooms Tab
The main purpose of the Rooms tab is to display information about the rooms in the quarantine facility. Each room contains 1 quarantined individual and multiple tasks.
When you first start Covigent and click into the Rooms tab, it will be empty. Rest assured that this is normal. Once you learn how to add rooms to Covigent, the Rooms tab will be populated in no time. You may refer to Section 3.3, “Tutorial on How to Use Covigent” for step-by-step guidance or Section 5.3.1, “Initialise Rooms in Hotel” if you prefer a more hands-on approach.
Using the Rooms tab is easy. Click on any of the rooms. This will highlight that room and display the patient and tasks allocated to the room. Figure 6 shows what happens when you click on Room #2. The details of the patient Alex Yeoh and task Sanitise the room are displayed on the right of the user interface, in the Details Panel.
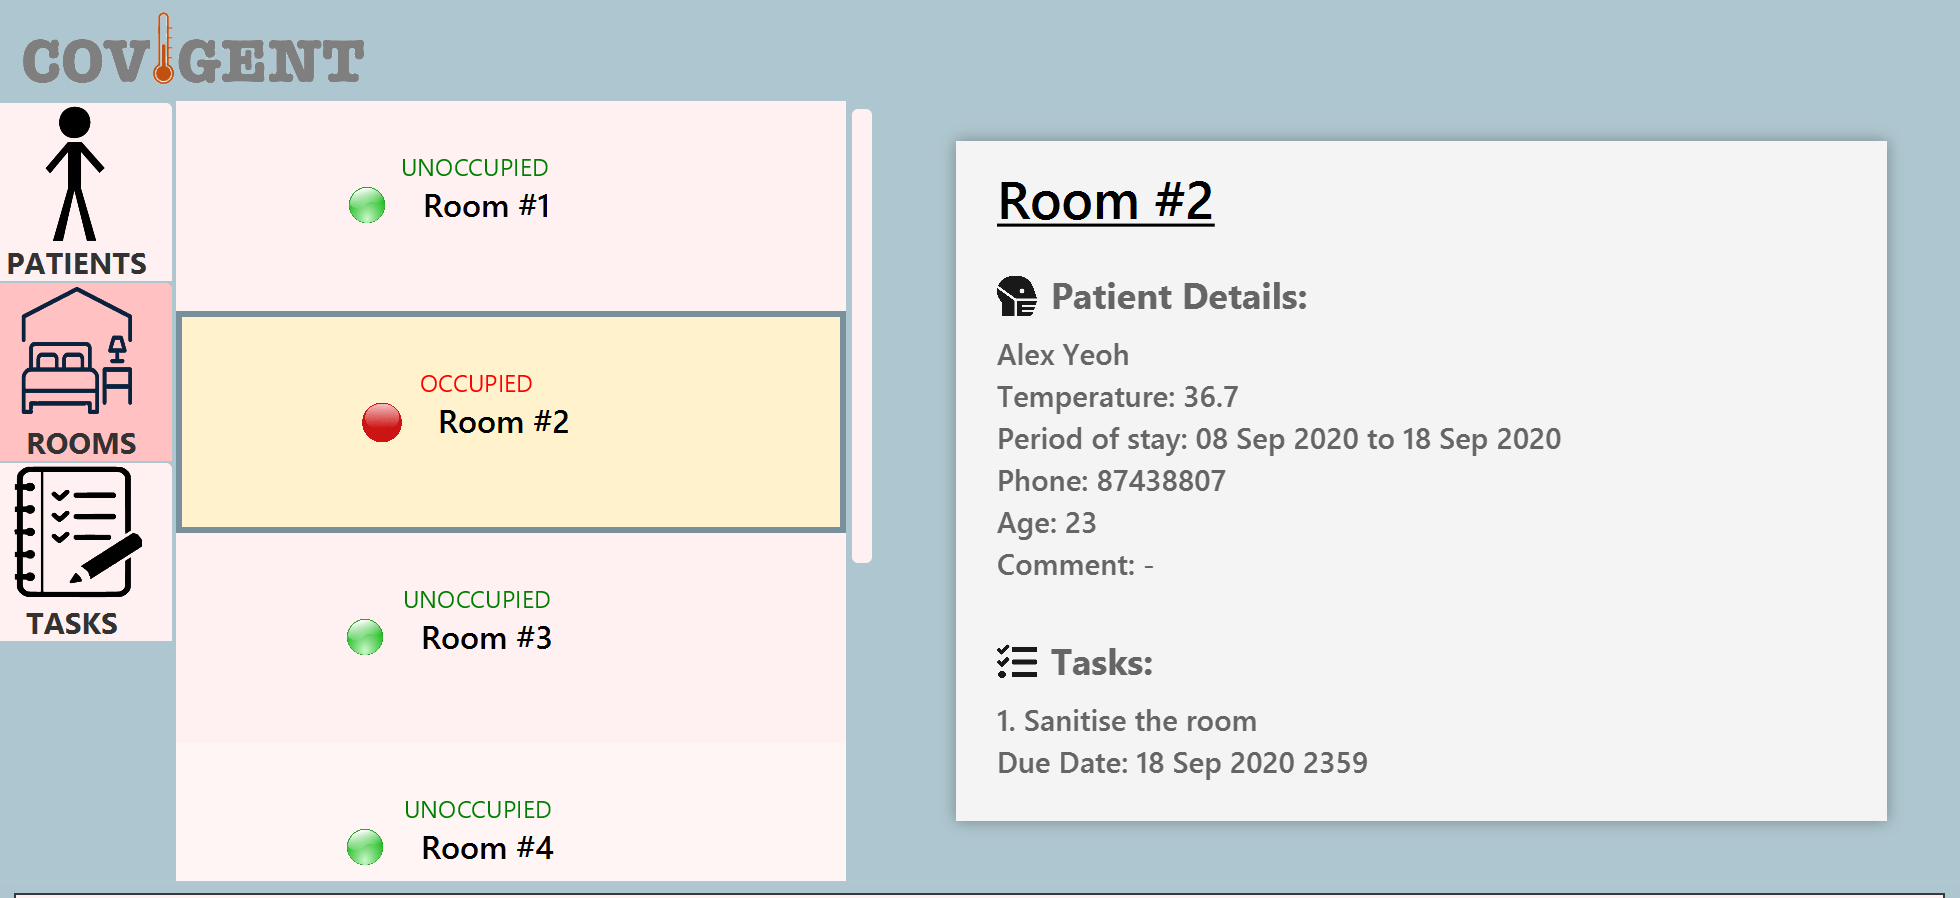
Figure 6. Highlighted Room in Rooms Tab
3.2.3 Tasks Tab
The main purpose of the Tasks tab is to display information about the tasks assigned to the rooms. When you have too many tasks, it is common to forget which room you have allocated a certain task to. The Tasks tab provides a quick overview of all the tasks in Covigent such that you do not have to look through each room to find a specific task.
When you first start Covigent and click into the Tasks tab, it will be empty. Do not panic! This is the default behaviour. As you add more tasks to the rooms, those tasks will start to appear in the Tasks tab. You may refer to Section 3.3, “Tutorial on How to Use Covigent” for step-by-step guidance or Section 5.4.1, “Add a Task to a Room” if you prefer a more hands-on approach.
Using the Tasks tab is easy. Simply read the description and due date of the tasks directly from the user interface. For tasks with very long descriptions, the user interface is unable to fully display them. In those cases, you may highlight the descriptions with your cursor and drag right to scroll through them. Alternatively, you may triple-click on the descriptions, followed by a right click to copy them. Refer to Figure 7 for an example of the latter method.
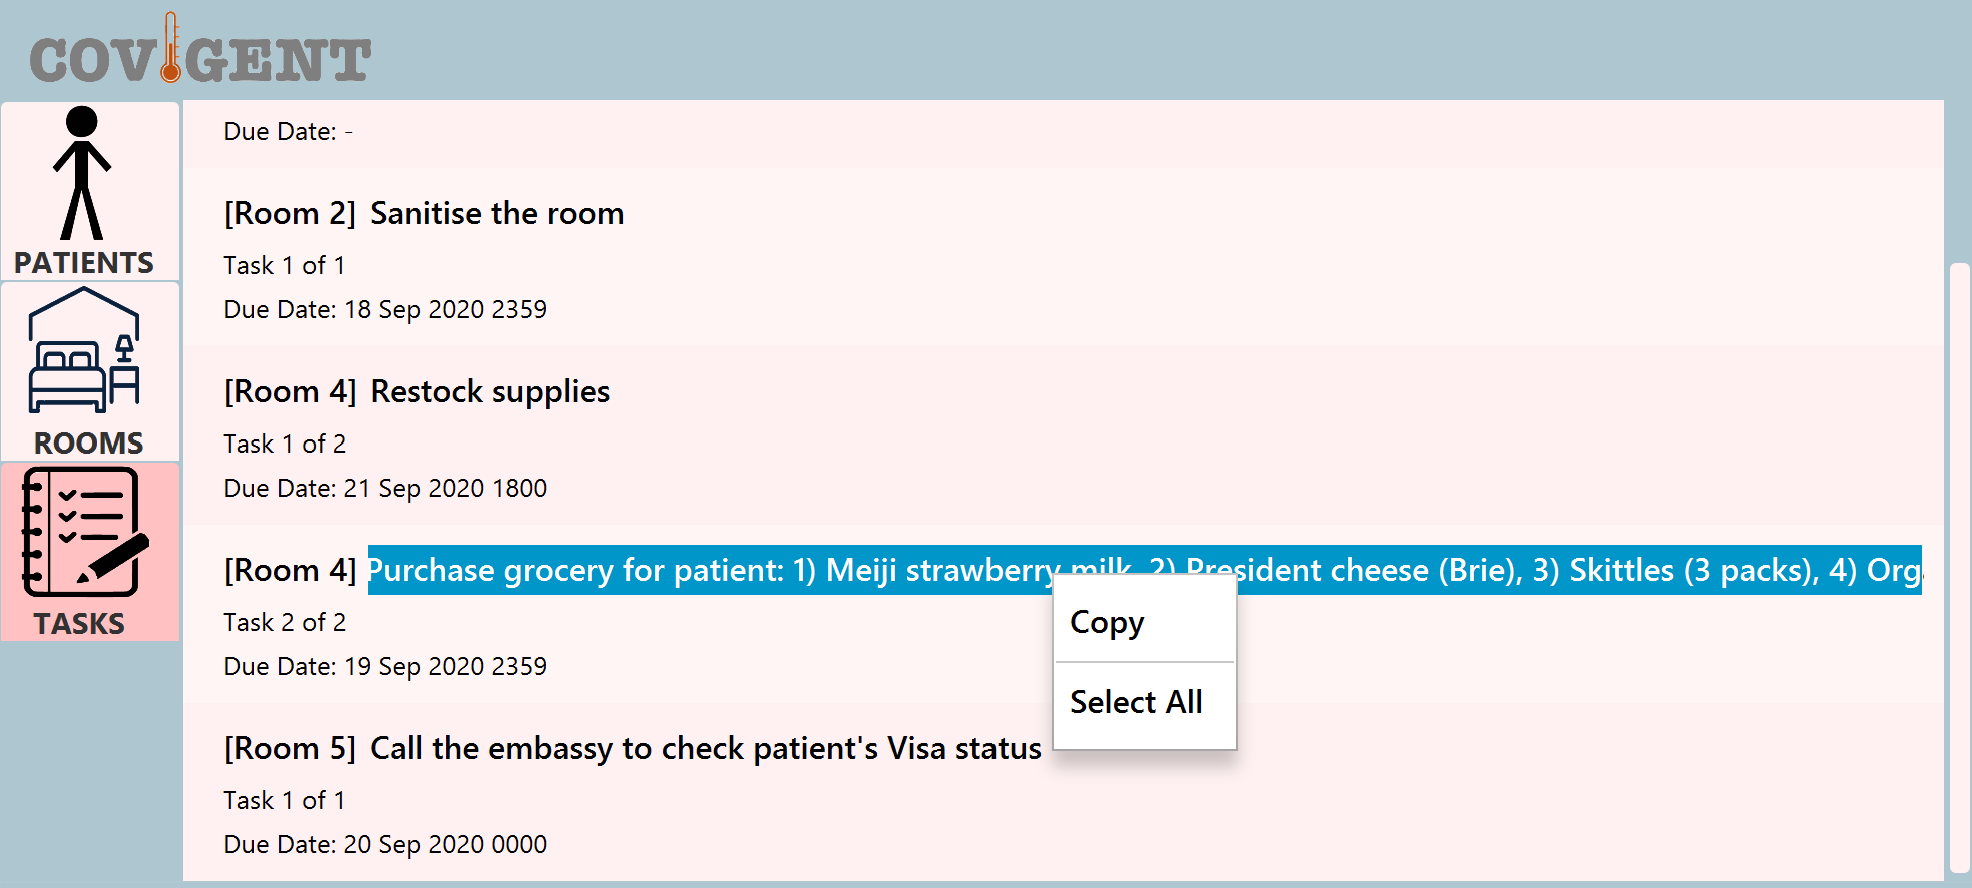
Figure 7. Copying a Long Description in Tasks Tab
3.3 Tutorial on How to Use Covigent
Covigent has numerous features, including adding patients, creating rooms, assigning tasks to rooms, and more. Every feature has a corresponding command. Using a feature is as simple as typing a command in the Command Box (see Figure 8) and pressing Enter to execute it.

Figure 8. Command Box of Covigent
You have heard so much about the potential of Covigent. Excited? Without further ado, let’s give these features a try! We will role-play the following scenario to get you acquainted with a few common commands: your hotel has 10 rooms; a guest is arriving today and will quarantine with your hotel for 14 days; and you must not forget to sanitise the room the day after he leaves.
You may copy-and-paste the following commands (bold and in grey highlights) into the Command Box. Do not forget to press Enter, or the command will not execute!
-
initroom 10: Let’s set up the hotel room first. This command creates 10 rooms in Covigent. If you proceed to the Rooms tab, you will see that 10 rooms have been created (see Figure 9).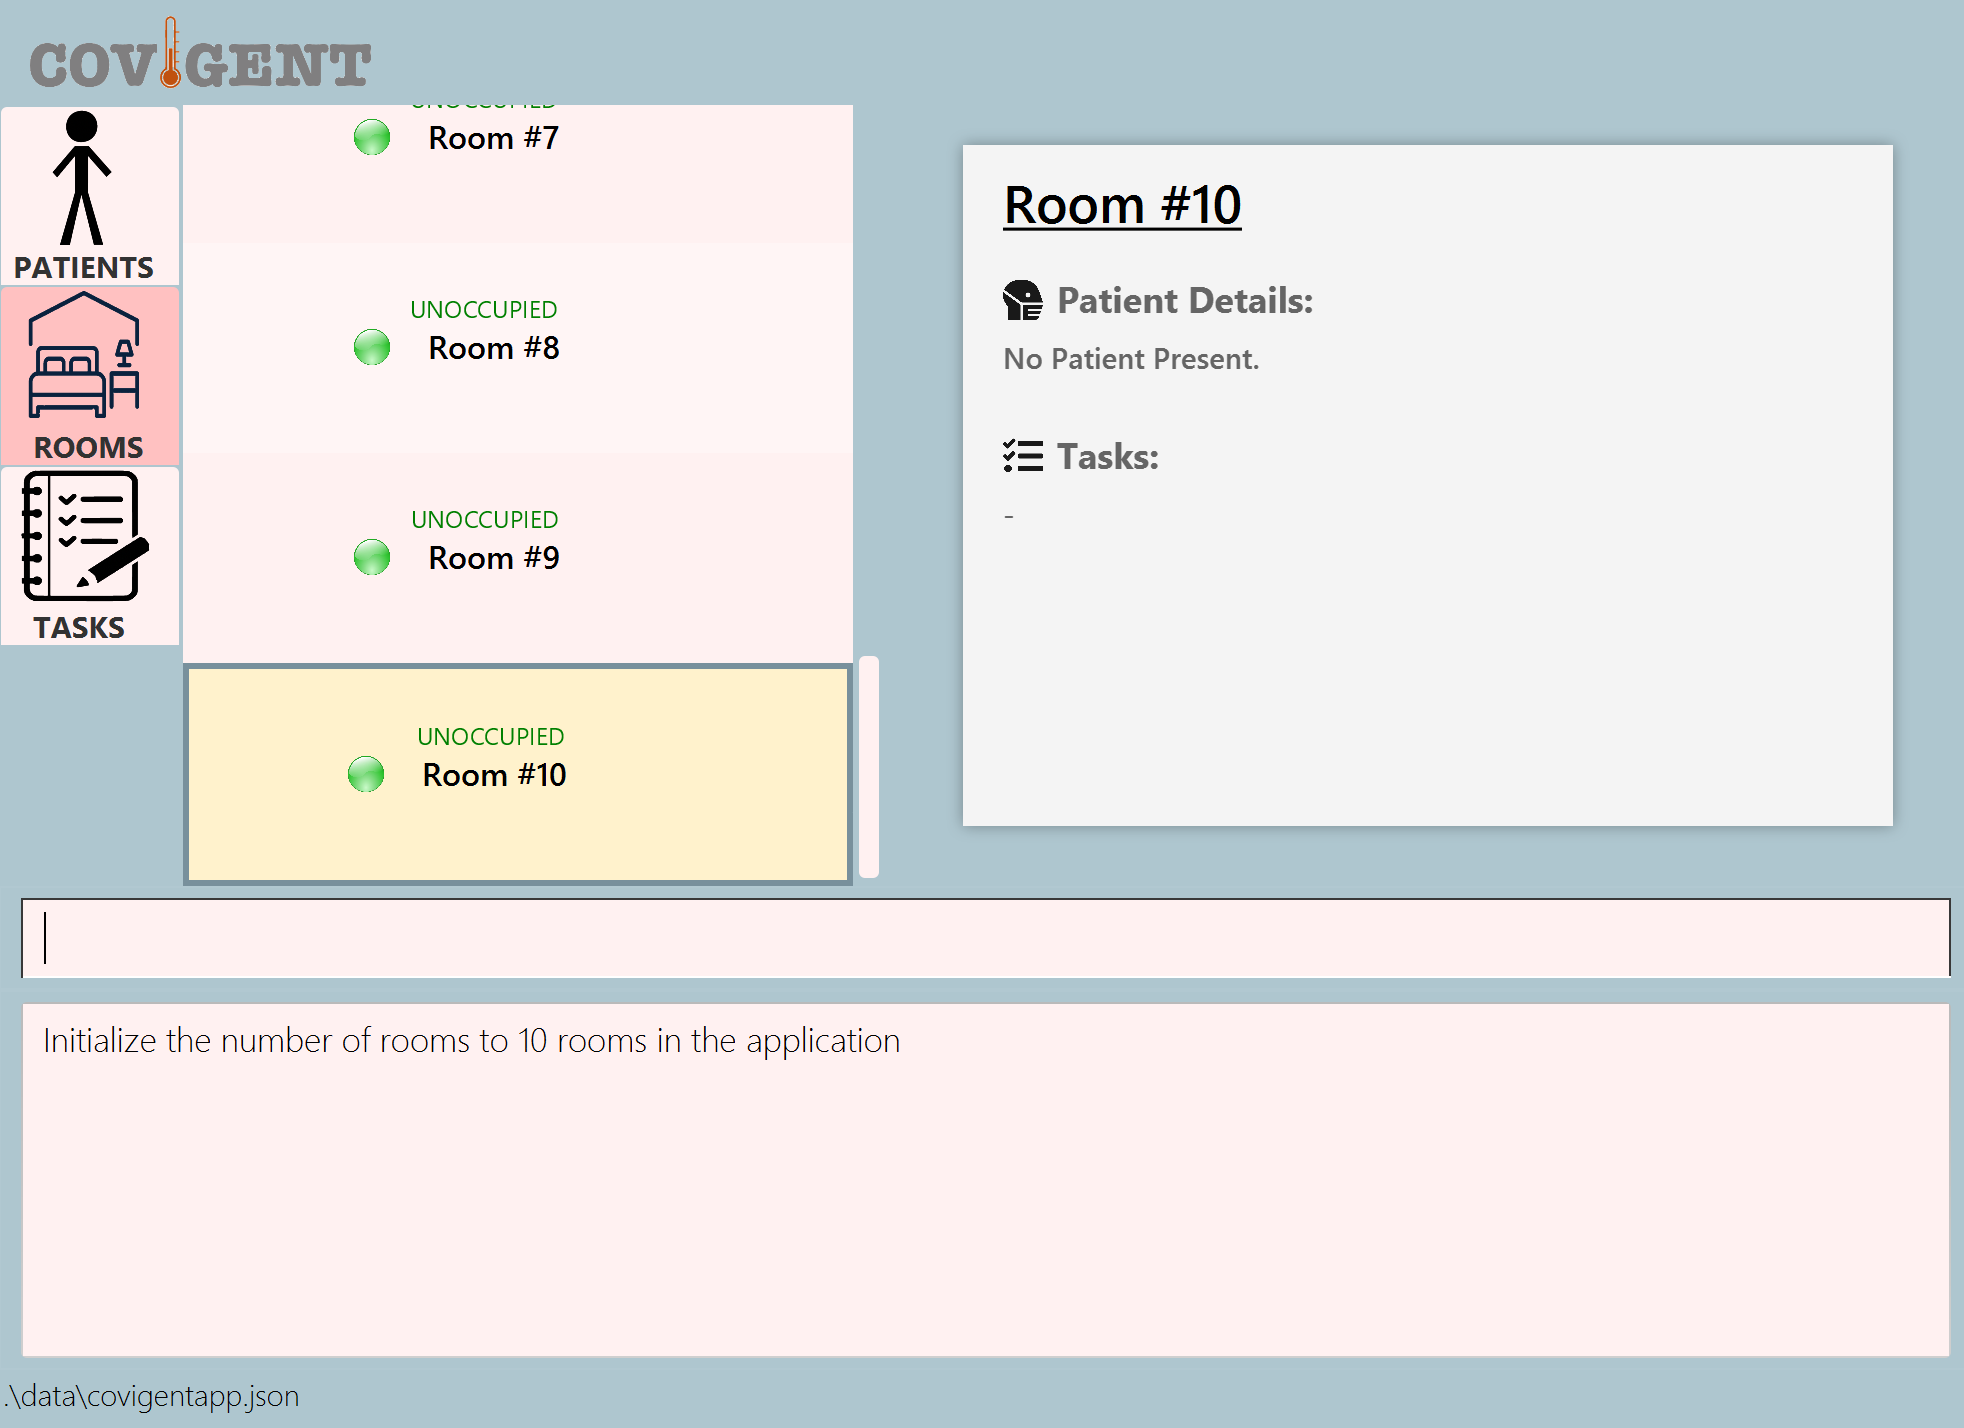
Figure 9. Creating Hotel Rooms in Covigent -
addpatient n/John Doe t/37.4 d/20200910-20200924 p/98765432 a/35 c/Vegan: The guest has arrived. You have taken his temperature and need to enter his details into Covigent. This command adds a new patient named John Doe with age 35, phone number 98765432, period of stay 10 Sep 2020 to 24 Sep 2020, temperature 37.4, and a comment that he is Vegan. If you proceed to the Patients tab, you will see that John Doe’s entry has been added.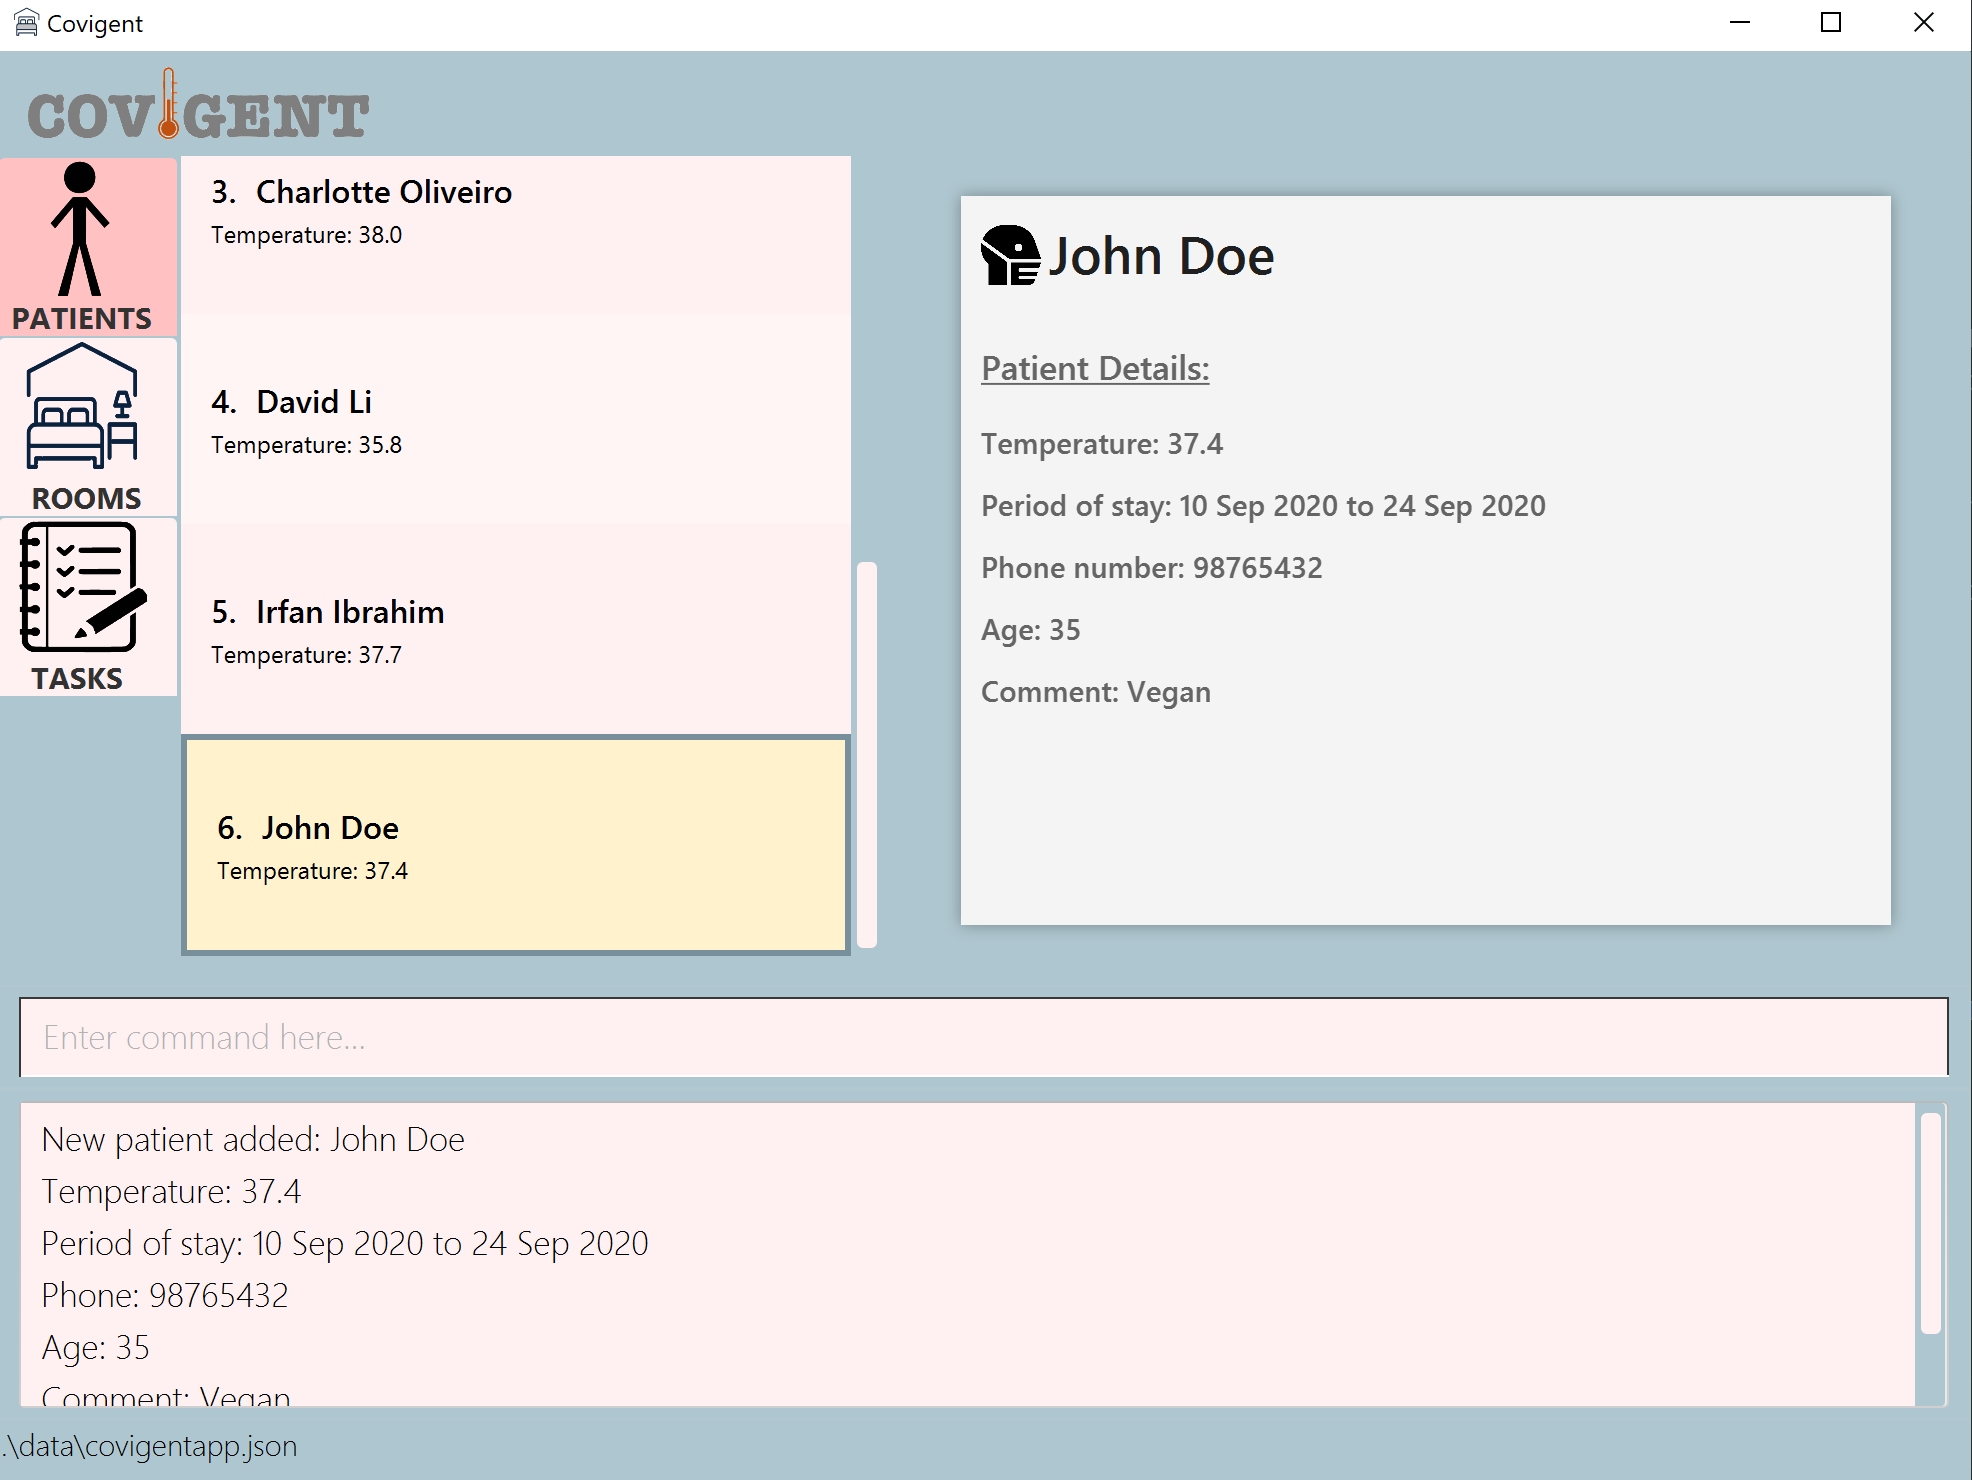
Figure 10. Adding a Patient to Covigent -
findemptyroom: You would like to assign John Doe a room but are unsure which rooms are empty. This command will search for an empty room. Proceed to the Rooms tab. The result can be seen in Figure 11.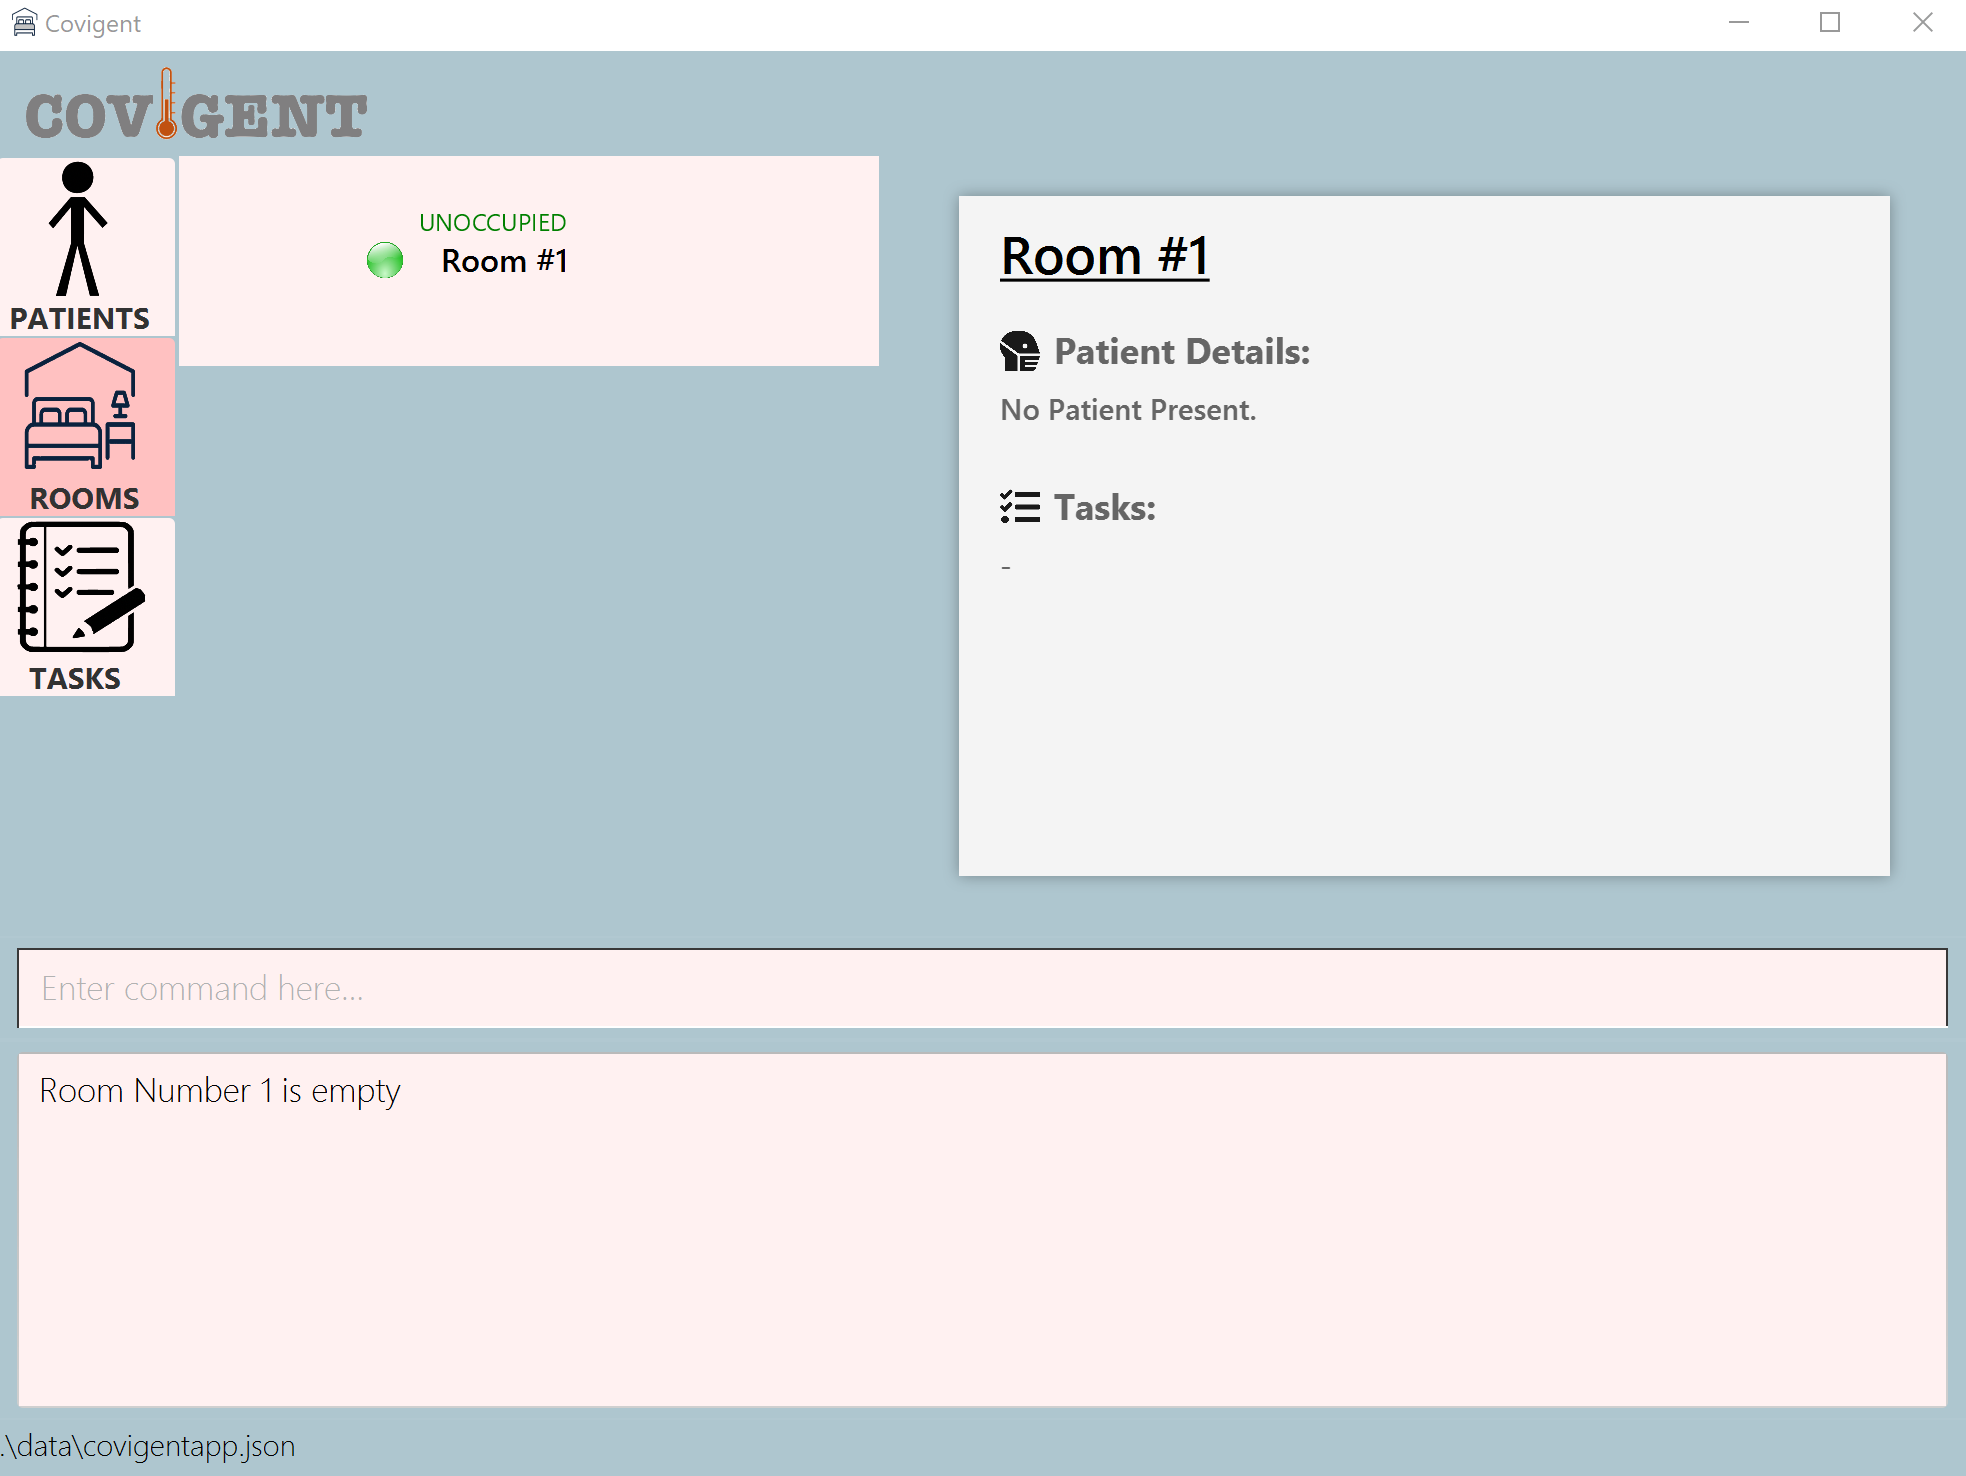
Figure 11. Finding an Empty Room in Covigent -
allocateroom 1 n/John Doe: Now that you know Room #1 is empty, let’s assign Room #1 to John Doe. This command will do exactly that. Notice that Room #1 is now occupied and John Doe’s details are reflected in the Details Panel on the right of the user interface.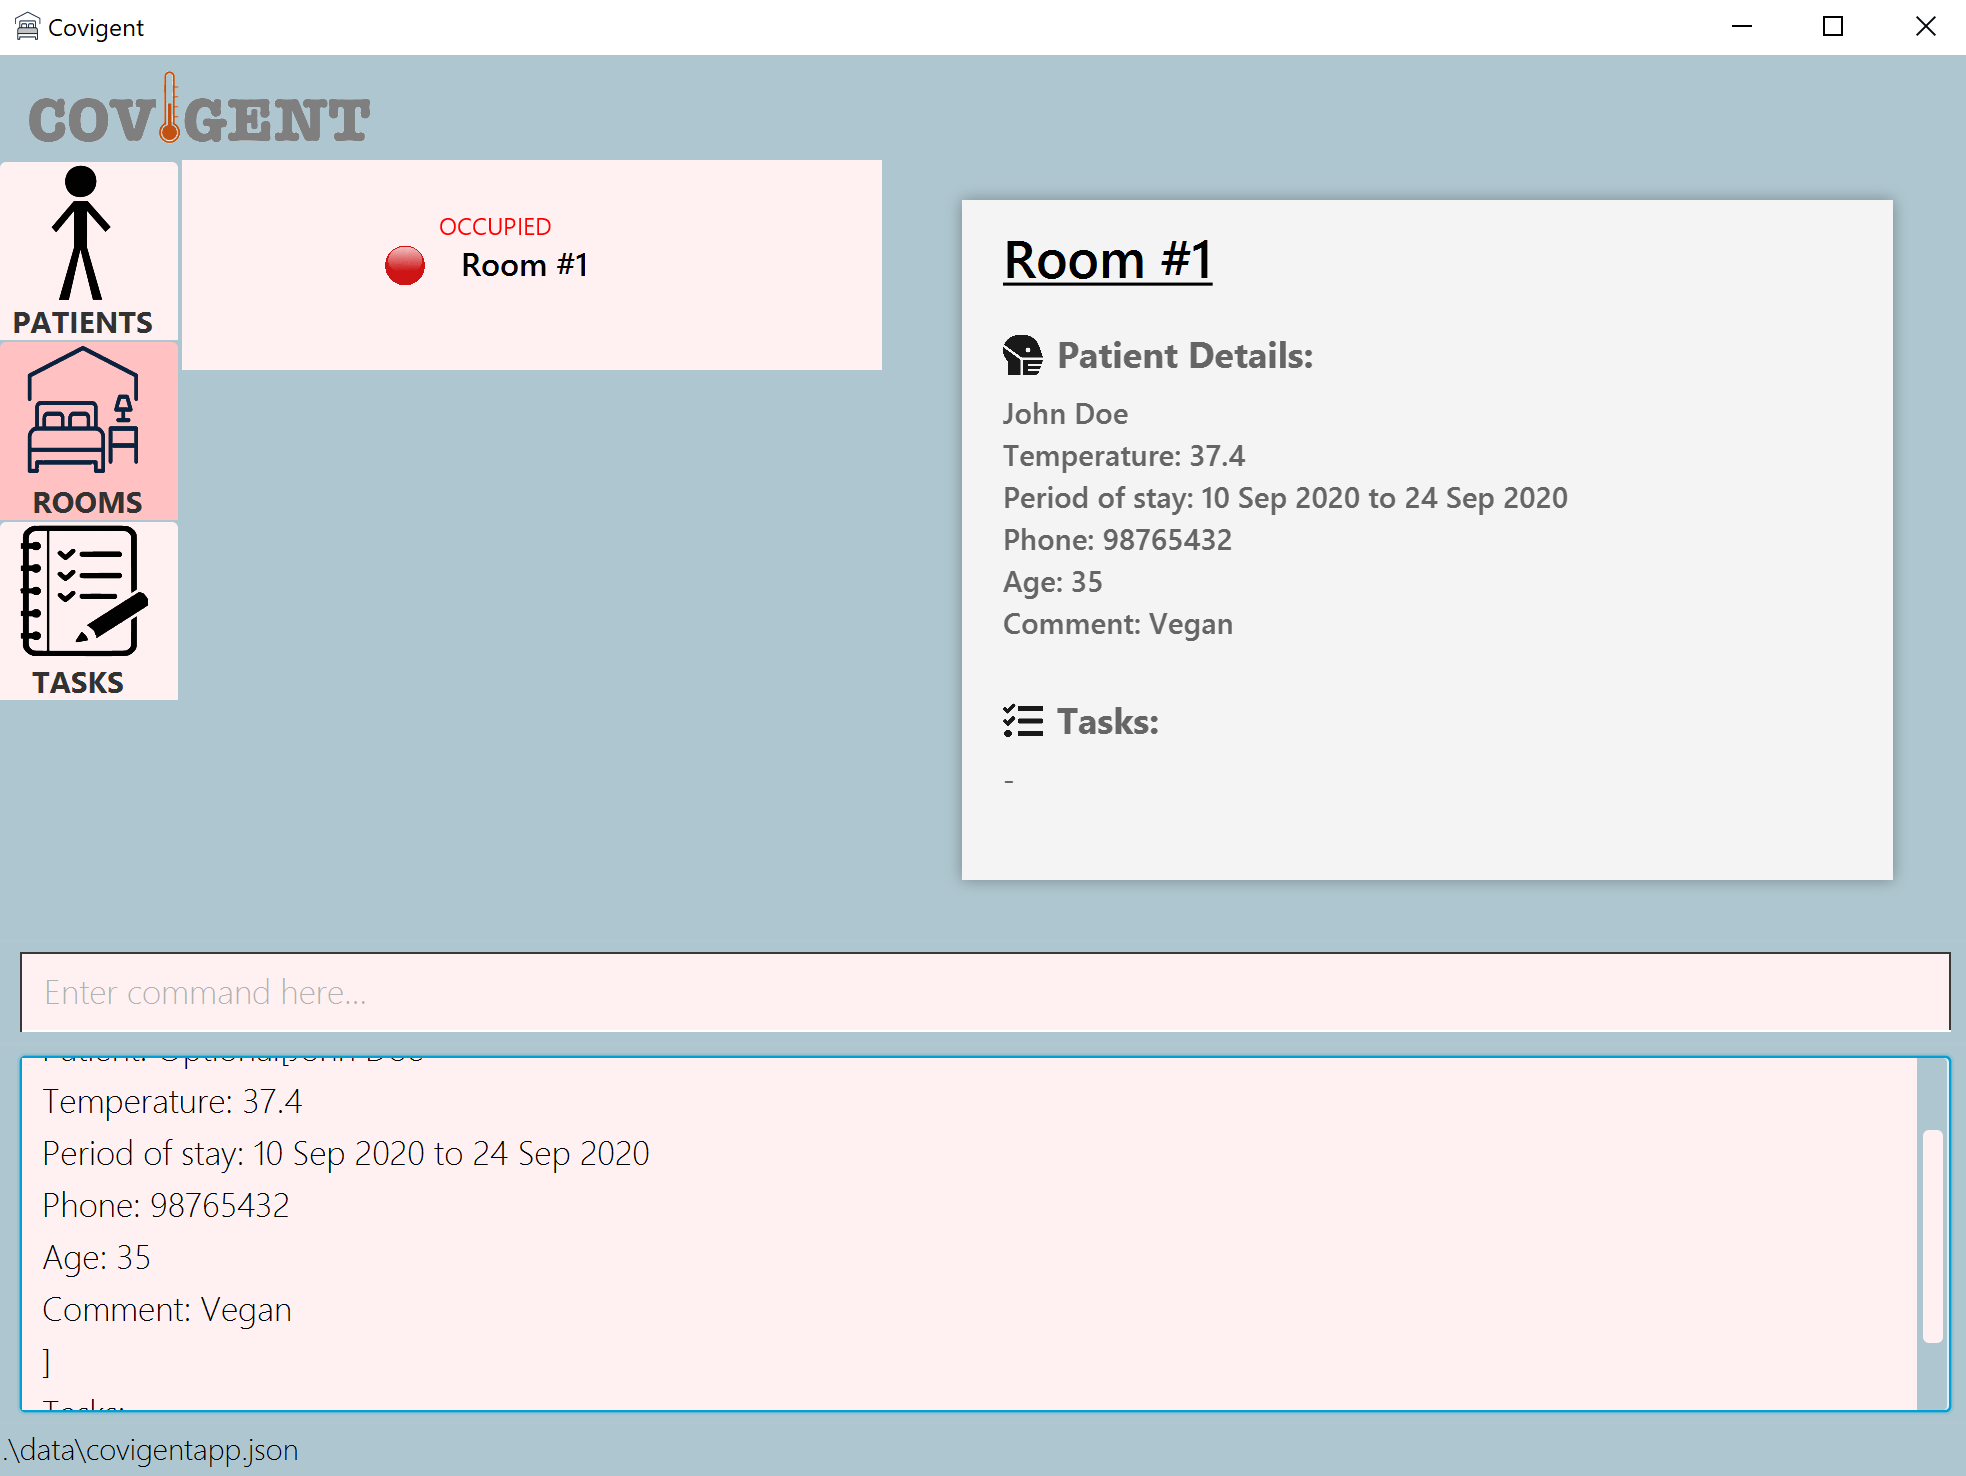
Figure 12. Allocating a Room to a Patient in Covigent -
addtask r/1 d/Sanitise the room dd/20200925 1800: Finally, we would like a reminder to sanitise the room after John Doe leaves. This command adds a task to Room #1 with description Sanitise the room and due date 25 Sep 2020 1800. Notice that the Details Panel reflects the task now (see Figure 12). You may also click on the Tasks tab to view the newly added task.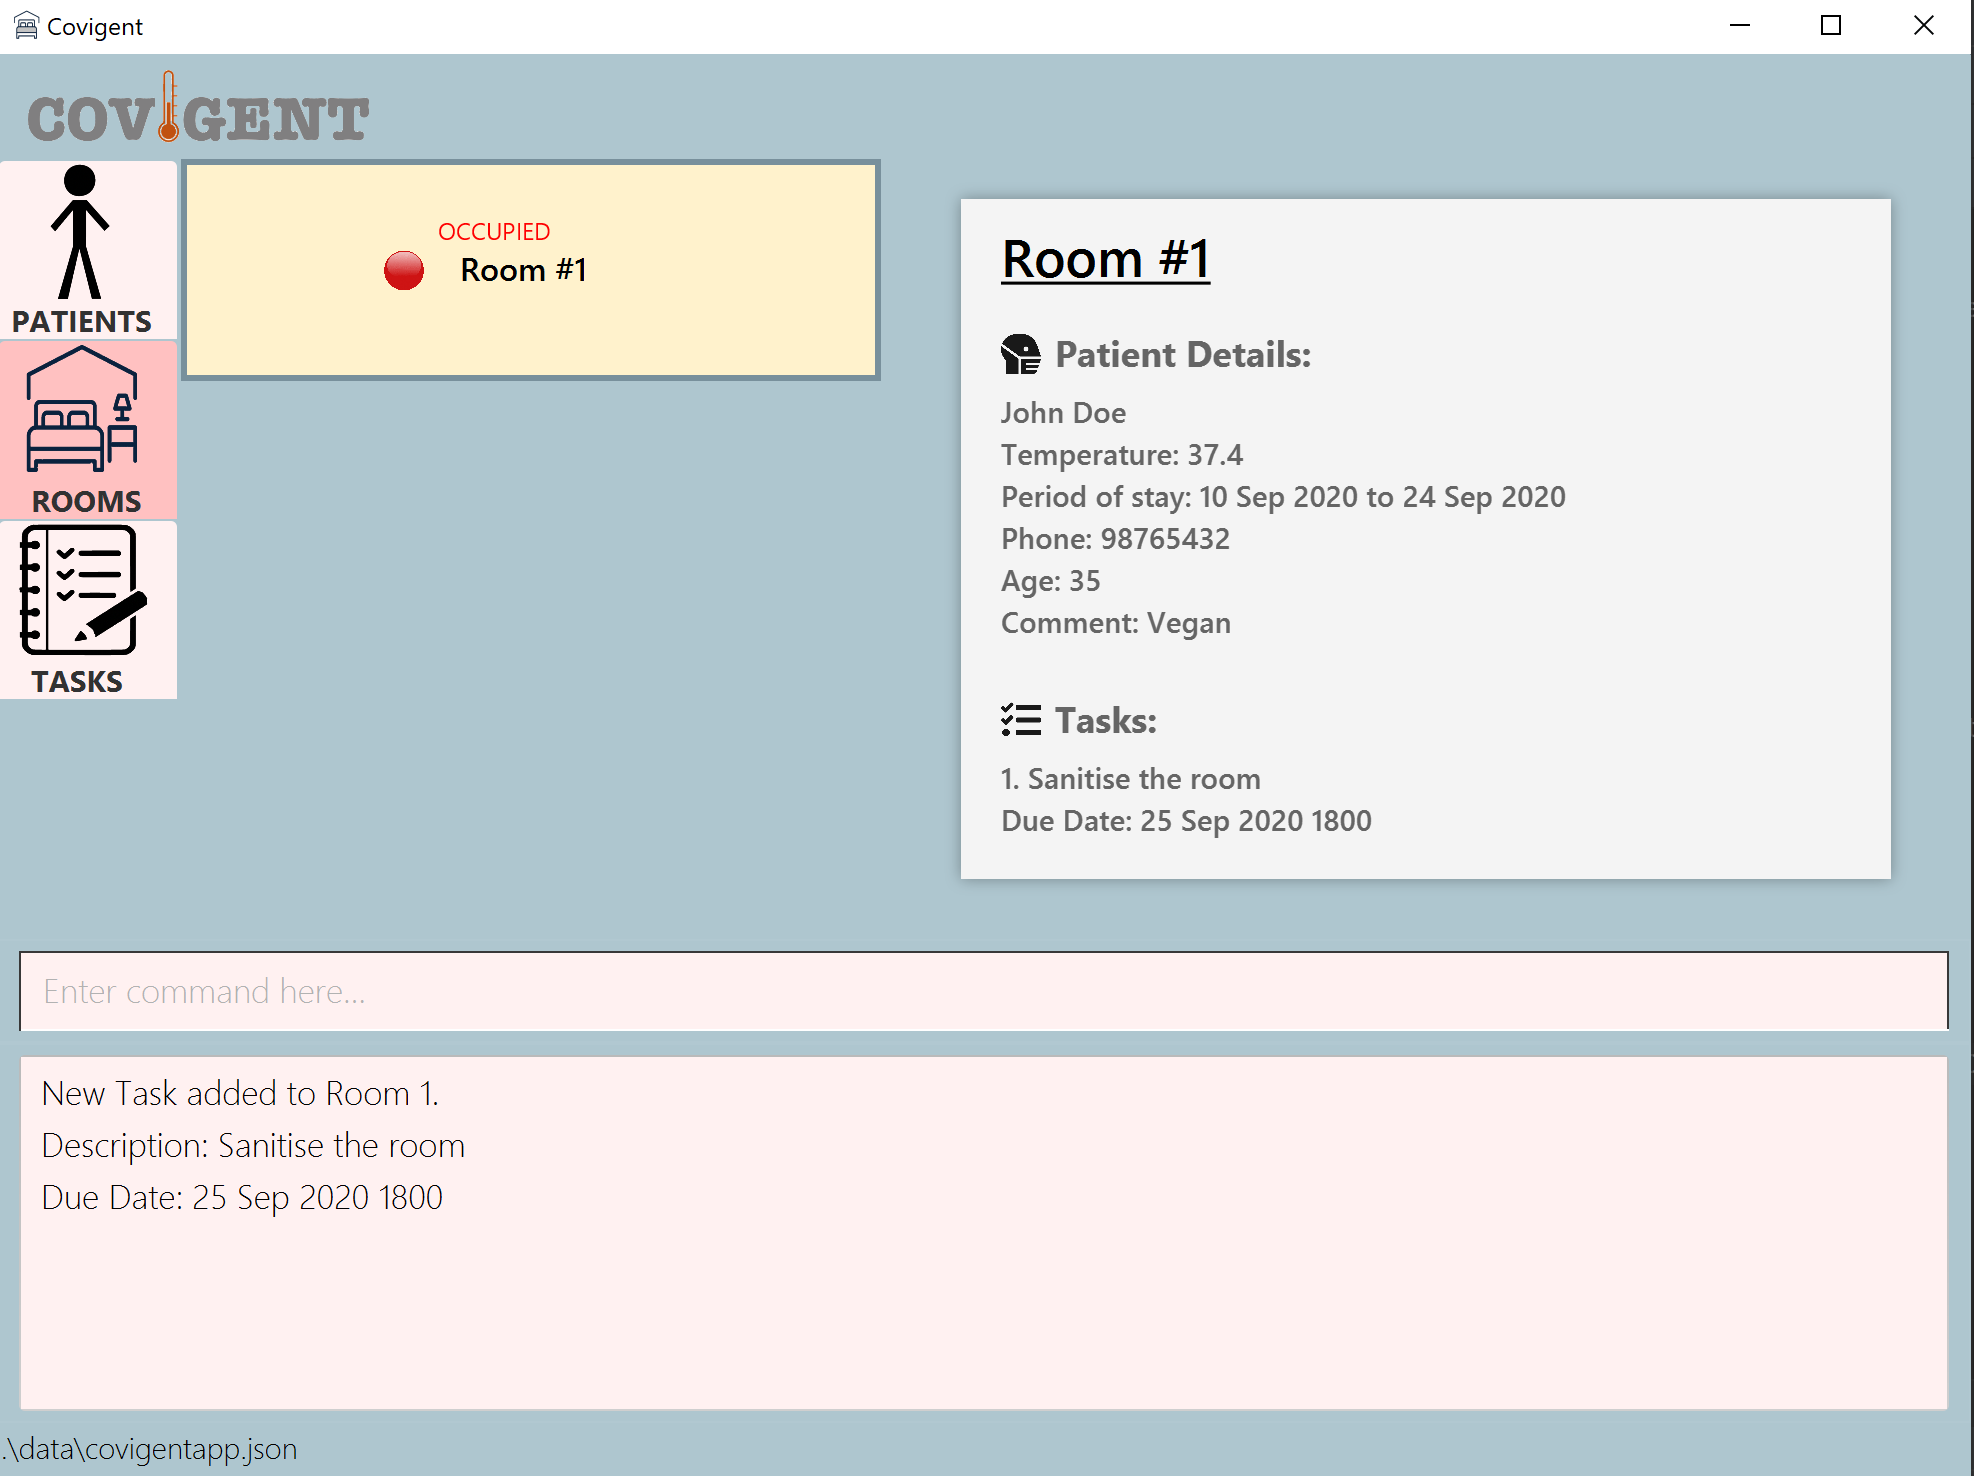
Figure 13. Adding a Task to Covigent
If you are curious about what other features are available in Covigent, please visit Section 5, Features.
Written by: Yee Hong
4. Glossary
-
Graphical User Interface: A form of user interface that allows users to interact with electronic devices through graphical icons.
-
Patient: An individual who resides in the quarantine facility.
-
Task: A task to be completed by staff of the quarantine facility.
Written by: Yun Qing
5. Features
This section covers all the commands that you can type into the Command Box of Covigent. The commands are categorised into patient features, room features and task features. If it is the first time that you are using the command, we recommend that you refer to Command Format to find out how to interpret the format of the commands.
Written by: Yun Qing
5.1 Command Format
![]() Notes about the command format:
Notes about the command format:
-
Words in
UPPER_CASEare the fields to be supplied by the user.
e.g. inaddpatient n/NAME,NAMEis a field which can be used asaddpatient n/John Doe. -
Fields in square brackets are optional.
e.gn/NAME [c/COMMENT]can be used asn/John Doe c/Is veganor asn/John Doe. -
Fields can be in any order.
e.g. if the command specifiesn/NAME p/PHONE_NUMBER,p/PHONE_NUMBER n/NAMEis also acceptable. -
If the same field is provided multiple times, only the last input for that field will be processed.
e.g. if you inputn/John Doe n/Mary Doe, Covigent will only processn/Mary Doeand ignoren/John Doe. Similarly, if you inputn/John Doe t/37.4 n/Mary Doe t/36.5, Covigent will interpret the fields provided as simplyn/Mary Doe t/36.5.
5.2 Patient
This section contains all the commands related to patients. You can add, delete, edit, search for a patient, or you can list out all the patients in Covigent. If you are unsure of how to interpret the command format, head back to Command Format before executing the commands!
5.2.1 Add a Patient: addpatient
You can use this command to add a patient with the following details: name, temperature, period of stay, phone number, age and comment.
Format: addpatient n/NAME t/TEMPERATURE d/PERIOD_OF_STAY p/PHONE_NUMBER a/AGE [c/COMMENT]
| Field | Description |
|---|---|
NAME |
The name of the patient. It should preferably be the full name of the patient. The maximum number of characters allowed is 150. |
TEMPERATURE |
The temperature of the patient. It must be keyed in to 1 decimal place (e.g. 37.0 instead of 37) and must be within the range 32.0 to 41.0 degree celsius, both inclusive. |
PERIOD_OF_STAY |
The period of stay of the patient in the facility. It must be in the format YYYYMMDD-YYYYMMDD. Both dates must be valid and the start date must be before or equals to the end date. |
PHONE_NUMBER |
The phone number of the patient that the patient wishes to be contacted by. The maximum number of digits allowed is 20. |
AGE |
The age of the patient, which is between 0 (inclusive) and 120 (exclusive). |
COMMENT |
An optional field that is used to indicate any special details of the patient such as dietary preferences or health conditions. |
![]() Important Information:
Important Information:
- Duplicate names are not allowed. If an entry of name John Doe is recorded in Covigent, you should not add a patient of the name John Doe again.
Example(s):
-
addpatient n/Betsy Crowe t/36.5 d/20201001-20201014 p/91234567 a/19 c/Is asthmaticA patient named Betsy Crowe with temperature 36.5, period of stay from 1 October 2020 to 14 October 2020, phone number 91234567, age 19 and comment Is asthmatic is added to Covigent.
Step By Step Usage:
- Navigate to the Patients tab under the navigation bar as shown in Figure 14.
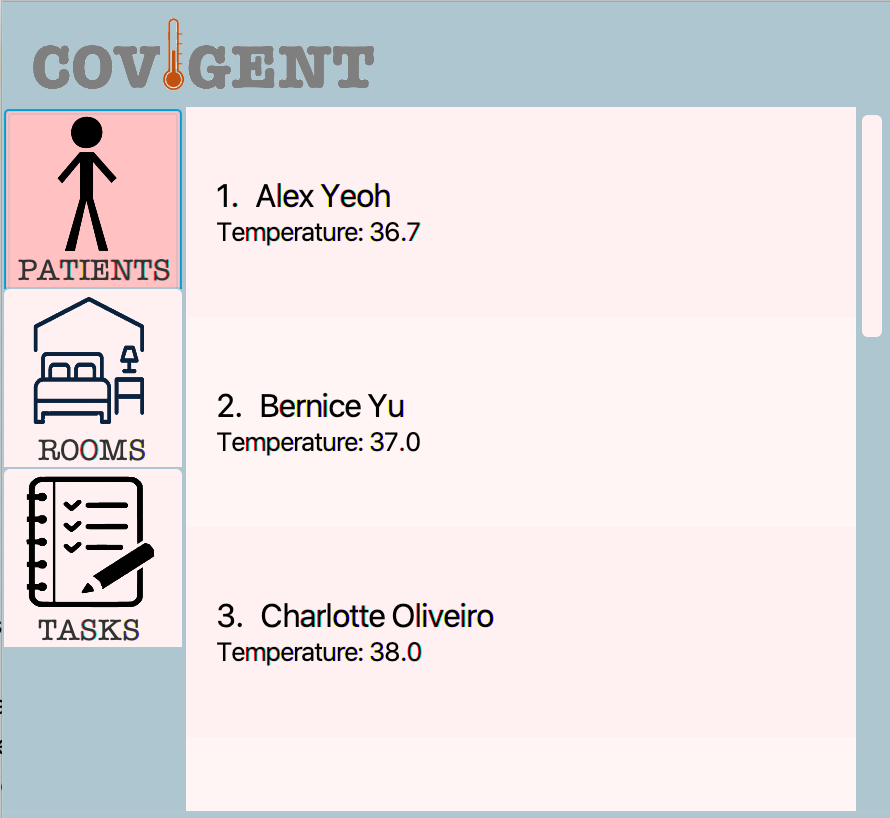
Figure 14. Navigation to Patients Tab - Using the first example, key in the command into the Command Box as shown below.

Figure 15.addpatientCommand in Command Box - Press Enter to run the command.
- The Result Box displays the sucess message shown in Figure 16. The Details Panel now reflects the information of the newly added patient and the patient is selected in the Patient List.
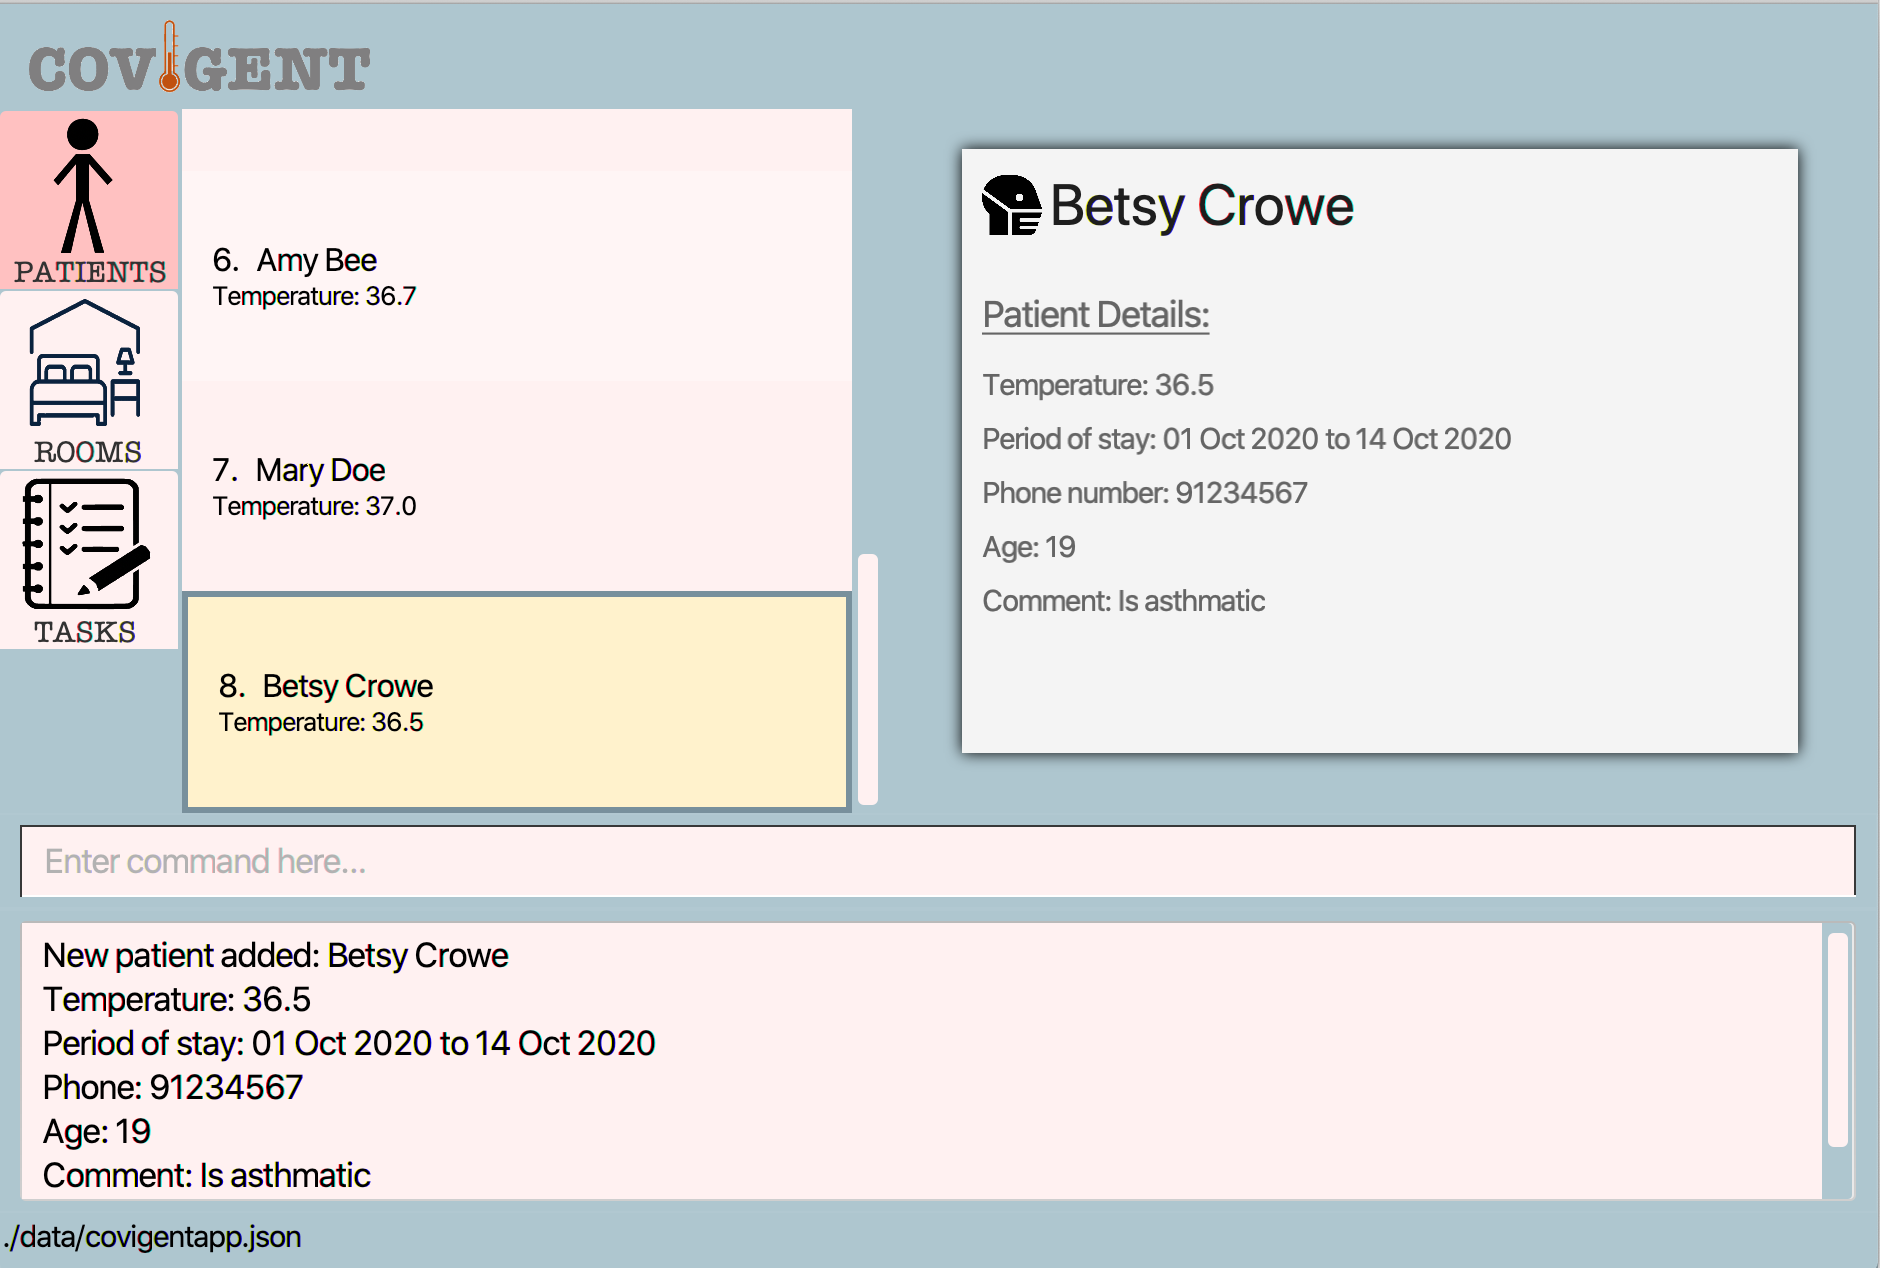
Figure 16. A Successful Execution ofaddpatientCommand - If you do not see the success message as shown in Figure 16, please repeat step 2 onwards.
Written by: Yun Qing
5.2.2 Delete a Patient: deletepatient
You can use this command to delete the details of the existing patient identified by his/her name from Covigent.
Format: deletepatient NAME
| Field | Description |
|---|---|
NAME |
The name of the patient to be deleted. It is case-insensitive and must match exactly with the name of the patient that was input into Covigent previously. |
![]() Important Information:
Important Information:
- If the patient to be deleted was allocated a room previously, the room will be updated to unoccupied in Covigent but the tasks (if any) in that room will remain unchanged.
Example(s):
-
deletepatient Mary DoeThe patient details of Mary Doe will be deleted from Covigent.
Step By Step Usage:
- Navigate to the Patients tab under the navigation bar as shown in Figure 17.

Figure 17. Navigation to Patients Tab - Using the first example, key in the command into the Command Box as shown below.

Figure 18.deletepatientCommand in Command Box - Press Enter to run the command.
- The Result Box displays the success message shown in Figure 19 and the deleted patient can no longer be found in the list of patients in Covigent. The Patient List now hovers back to the first patient in the list and the Details Panel displays the information of the first patient.
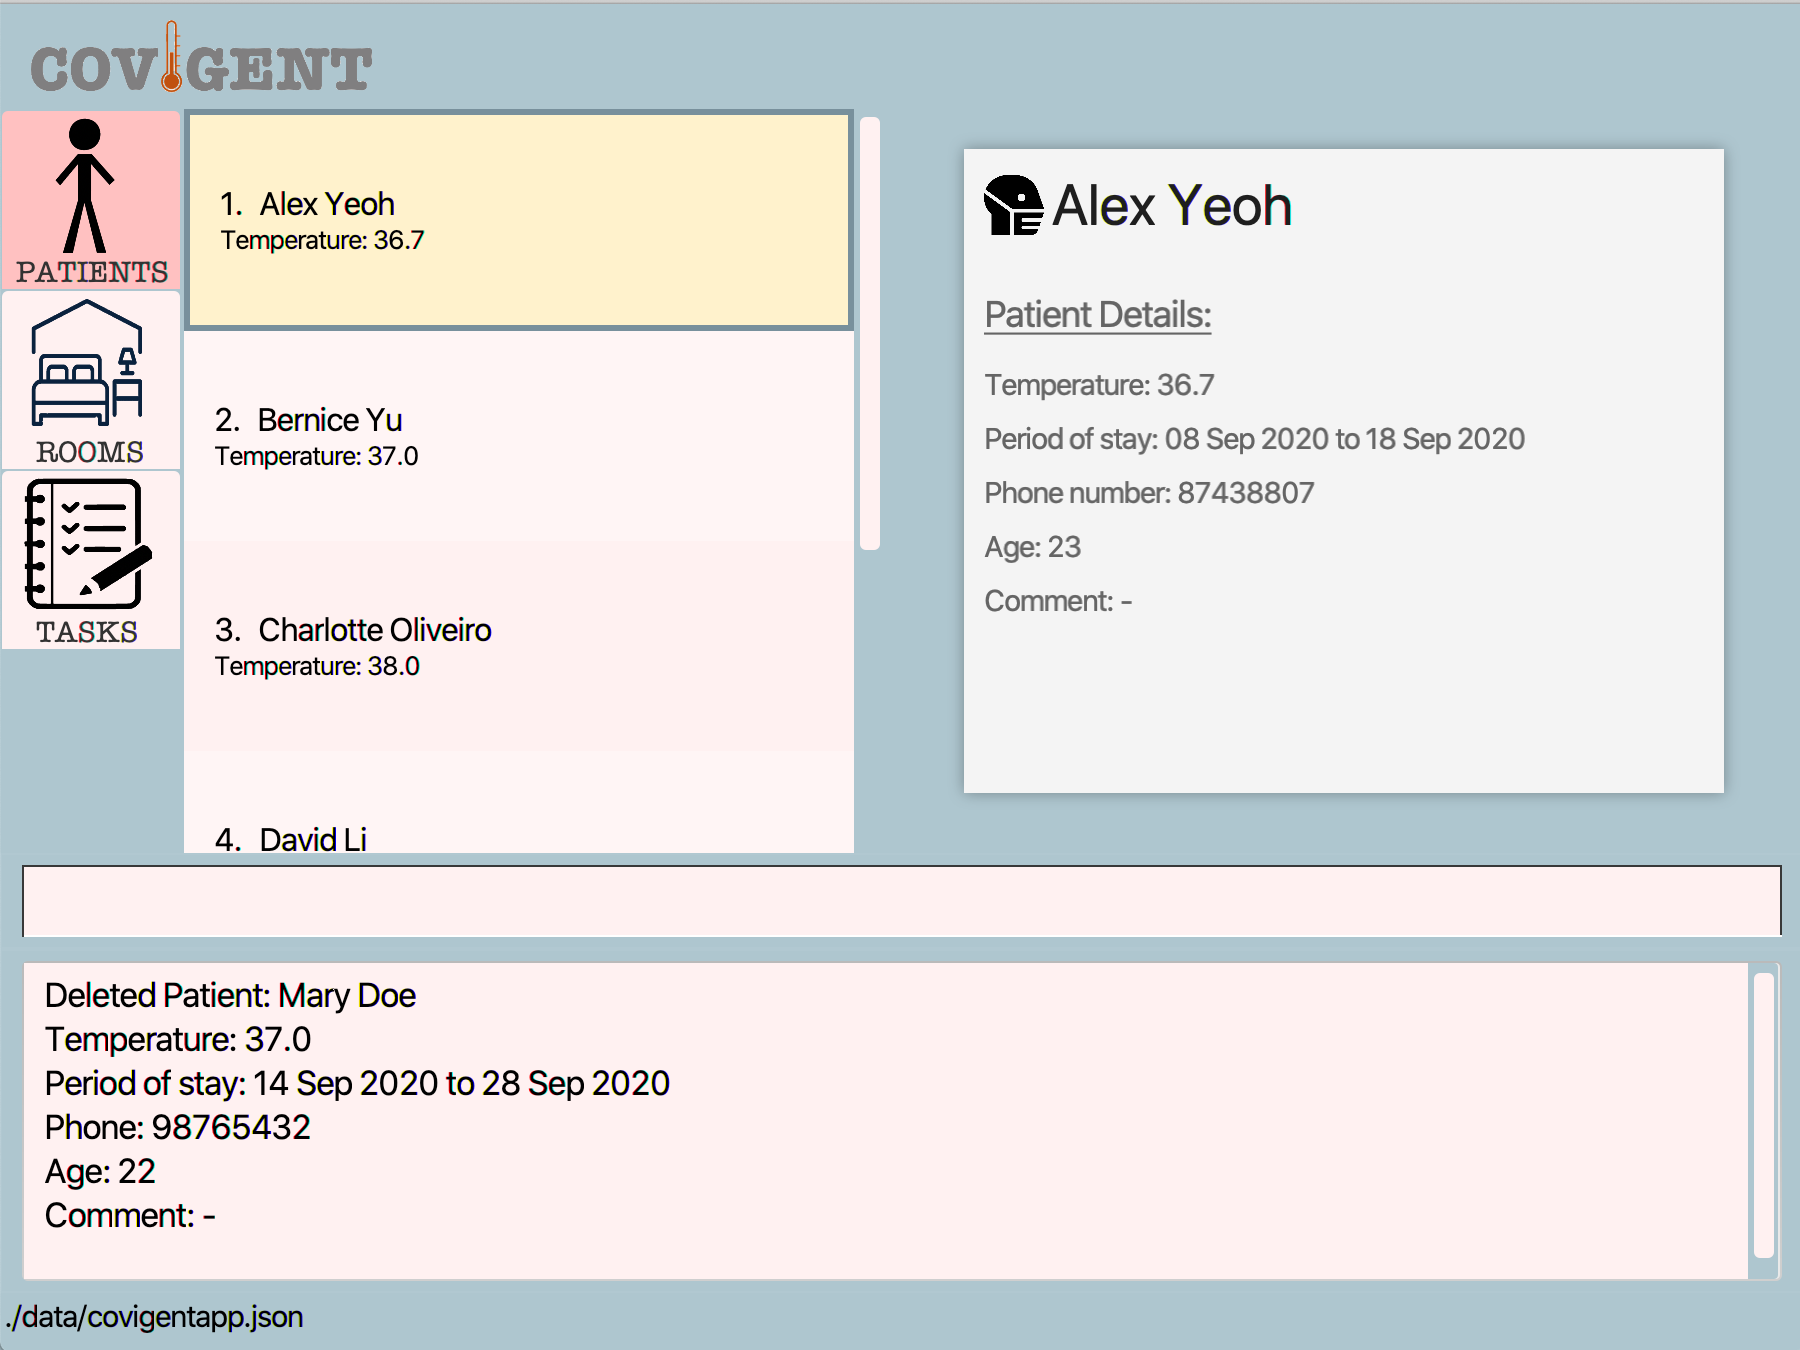
Figure 19. A Successful Execution ofdeletepatient - If you do not see the success message as shown in Figure 19, please repeat step 2 onwards.
Written by: Yun Qing
5.2.3 Edit Patient Details: editpatient
You can use this command to edit an existing patient’s details in Covigent.
Format: editpatient ORIGINAL_NAME [n/NEW_NAME] [t/TEMPERATURE] [d/PERIOD_OF_STAY] [p/PHONE_NUMBER] [a/AGE] [c/COMMENT]
| Field | Description |
|---|---|
ORIGINAL_NAME |
The name of the patient whom details are to be edited. It must match exactly with the name of the patient that was input into Covigent previously. It is case-insensitive. |
NEW_NAME |
The new name of the patient. The new name must not already exist within Covigent and the maximum number of characters allowed is 150. |
TEMPERATURE |
The new temperature of the patient. It must be keyed in to 1 decimal place (e.g. 37.0 instead of 37) and must be within the range 32.0 to 41.0 degree Celsius, both inclusive. |
PERIOD_OF_STAY |
The new period of stay of the patient. It must be in the format YYYYMMDD-YYYYMMDD. Both dates must be valid and the start date must be before or equals to the end date. |
PHONE_NUMBER |
The new phone number of the patient. The maximum number of digits allowed is 20. |
AGE |
The new age of the patient. Age should be between 0 (inclusive) and 120 (exclusive). |
COMMENT |
The new comments about the patient. |
![]() Important Information:
Important Information:
- At least one of the optional fields must be provided.
- Existing values will be updated to the input values.
Example(s):
-
editpatient john doe p/91234567The phone number of the patient named John Doe will be updated to 91234567. -
editpatient alex t/36.7 a/21 d/20200303-20200315The temperature, age and period of stay of the patient named Alex will be updated to 36.7, 21 and 20200303-20200315 respectively.
Step By Step Usage:
- Navigate to the Patients tab under the navigation bar as shown in Figure 20.

Figure 20. Navigation to Patients Tab - Using the first example, key in the command into the Command Box as shown below.

Figure 21.editpatientCommand in Command Box - Press Enter to run the command.
- The Result Box displays the success message shown in Figure 22 and the patient has been edited in Covigent.
- The details of the newly edited patient will be shown in the Details Panel.
Figure 22. A Successful Execution ofeditpatientCommand - If you do not see the success message as shown in Figure 11, please repeat step 2 onwards.
Written by: Ming De
5.2.4 Search Patients by Information: searchpatient
You can use this command to search patients that match the given criteria(name or a range of temperature) in Covigent.
Format: searchpatient [n/NAME] [tr/TEMPERATURE_RANGE]
| Field | Description |
|---|---|
NAME |
The full name or the sub-name of the patient you want to look for. If the patient’s name is “Alex Joe”, then you must enter “Alex”, “Joe” or “Alex Joe” to find him. You input is case-insensitive. |
TEMPERATURE_RANGE |
The temperature range that you want to look for. It is made up of two valid temperatures. A temperature must be keyed in to 1 decimal place (e.g. 37.0 instead of 37). The two temperature are linked using a dash “-“. The TEMPERATURE_RANGE is inclusive of start and end temperatures. tr/35.5-36.0 means a temperature range of 35.5-36.0 degree, celsius, both inclusive. |
![]() Important Information:
Important Information:
- Only one of the fields can be provided. If the field
n/nameis entered, you should not enter the fieldtr/TEMPERATURE_RANGE.
- The two temperature you enter for field
tr/TEMPERATURE_RANGEmust both be valid, if one of the temperature is invalid, the search function will fail.
Example(s):
-
searchpatient n/johnSearches patients with names containing john. -
searchpatient tr/36.5-36.7Searches patients within temperature range 36.5 to 36.7 degree celsius, both inclusive.
Step By Step Usage:
- Navigate to the Patients tab under the navigation bar as shown in Figure 23.

Figure 23. Navigation to Patients Tab - Before the search, this is what you see in the list of patient.
Figure 24. Patient List beforesearchpatientCommand - Using the second example, key in the command into the Command Box as shown below.
Figure 25.searchpatientCommand in Command Box - Press Enter to run the command.
- The Result Box displays the success message shown in Figure 26 and you can find the patients with temperatures in the inputted temperature range in Covigent.
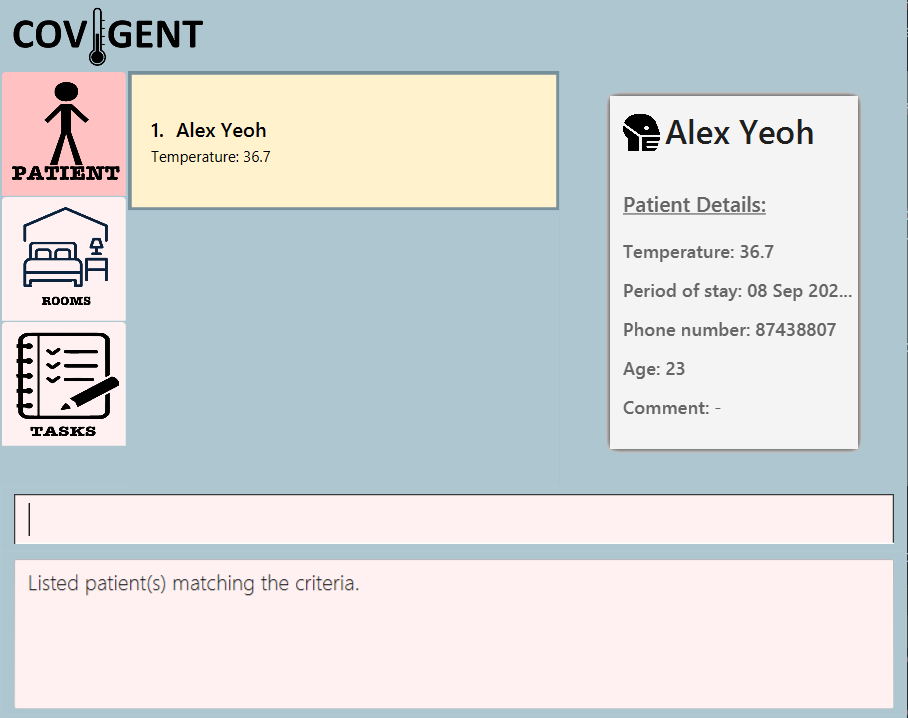
Figure 26. A Successful Execution ofsearchpatient
Written by: Wai Lok
5.2.5 List all Patients: listpatient
You can use this command to look at the list of all patients in the patient tab.
Format: listpatient
Example(s):
-
listpatientLists all patients that are present in Covigent.
Step By Step Usage:
- Navigate to the Patients tab under the navigation bar as shown in Figure 27.

Figure 27. Navigation to Patients Tab - Key in the command into the Command Box as shown below.

Figure 28.listpatientCommand in Command Box - Press Enter to run the command.
- The Result Box displays the sucess message shown in Figure 29 and you can find the full list of patient in Covigent.
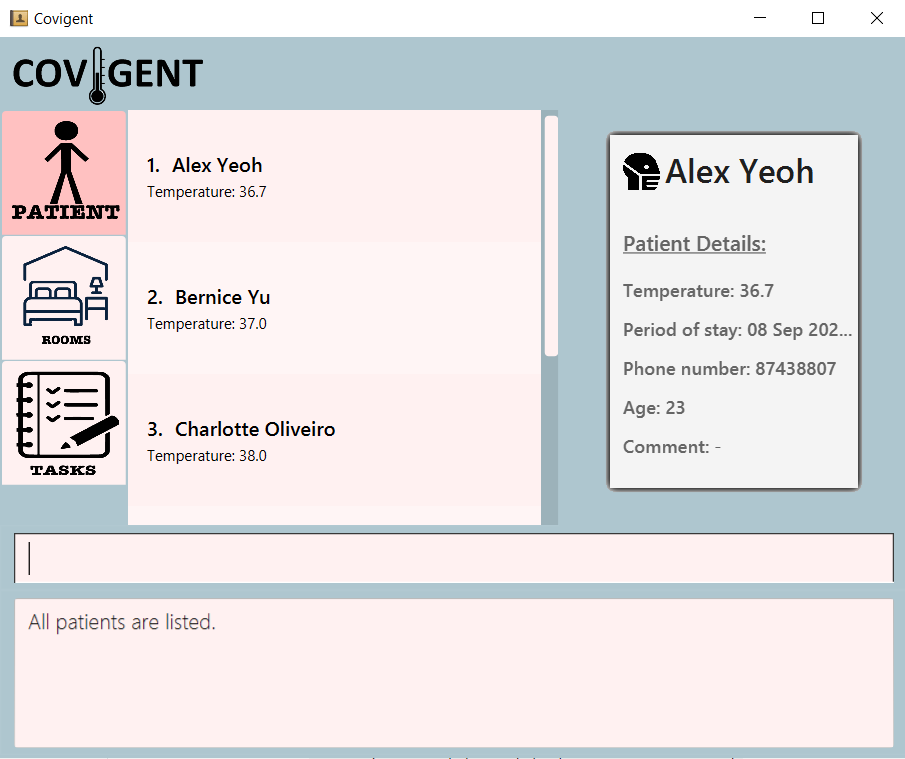
Figure 29. A Successful Execution oflistpatient
Written by: Wai Lok
5.3 Room
This section contains all the commands related to rooms. You can initialise, allocate, search and find the rooms which you need. If you want an overview of the rooms, you can list out all the rooms in Covigent. If you are unsure of how to interpret the command format, head back to Command Format before executing the commands!
5.3.1 Initialise Rooms in Hotel: initroom
You can use this command to initialise a number of rooms in the quarantine facility to the app, if there was data given previously, they would be stored.
Format: initroom NUMBER_OF_ROOMS
| Field | Description |
|---|---|
NUMBER_OF_ROOMS |
The number of rooms you wish to have in hotel |
![]() Important Information:
Important Information:
- The maximum number of rooms that can be defined is 500 as most boutique hotels have a maximum of 500 rooms.
- If suppose you
initroom xand x is already the number of rooms, no error would be seen to improve user experience. - If the number of rooms is less than the number of patients error is thrown when decreasing the number of existing rooms.
- Adds
NUMBER_OF_ROOMSrooms into the hotel system, if there were previously added information that information for respective rooms will still be there.
Example(s):
-
initroom 123. 123 rooms are initialised in Covigent. -
initroom 400. 400 rooms are initialised in Covigent.
Step By Step Usage:
- Navigate to the Rooms tab under the navigation bar as shown in Figure 30.
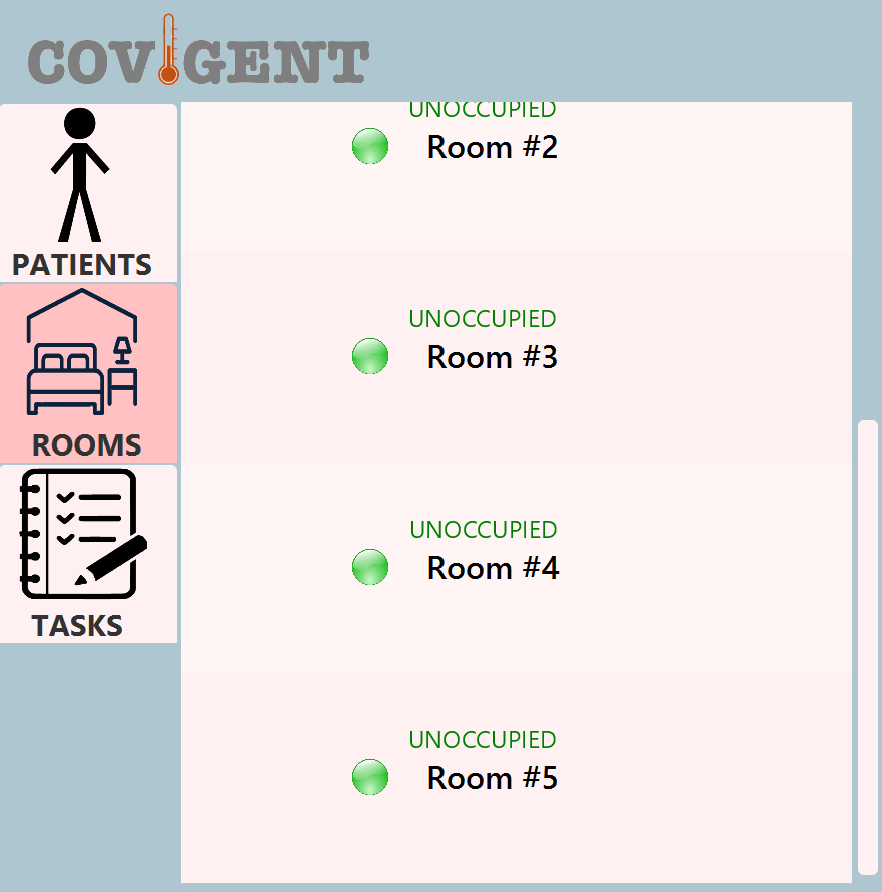
Figure 30. Navigation to Rooms Tab - Using the first example, key in the command into the Command Box as shown below.

Figure 31. Navigation to Rooms Tab - Press Enter to run the command.
- The Result Box shows a success message “Initialise the number of rooms to 400 rooms in the application.”.
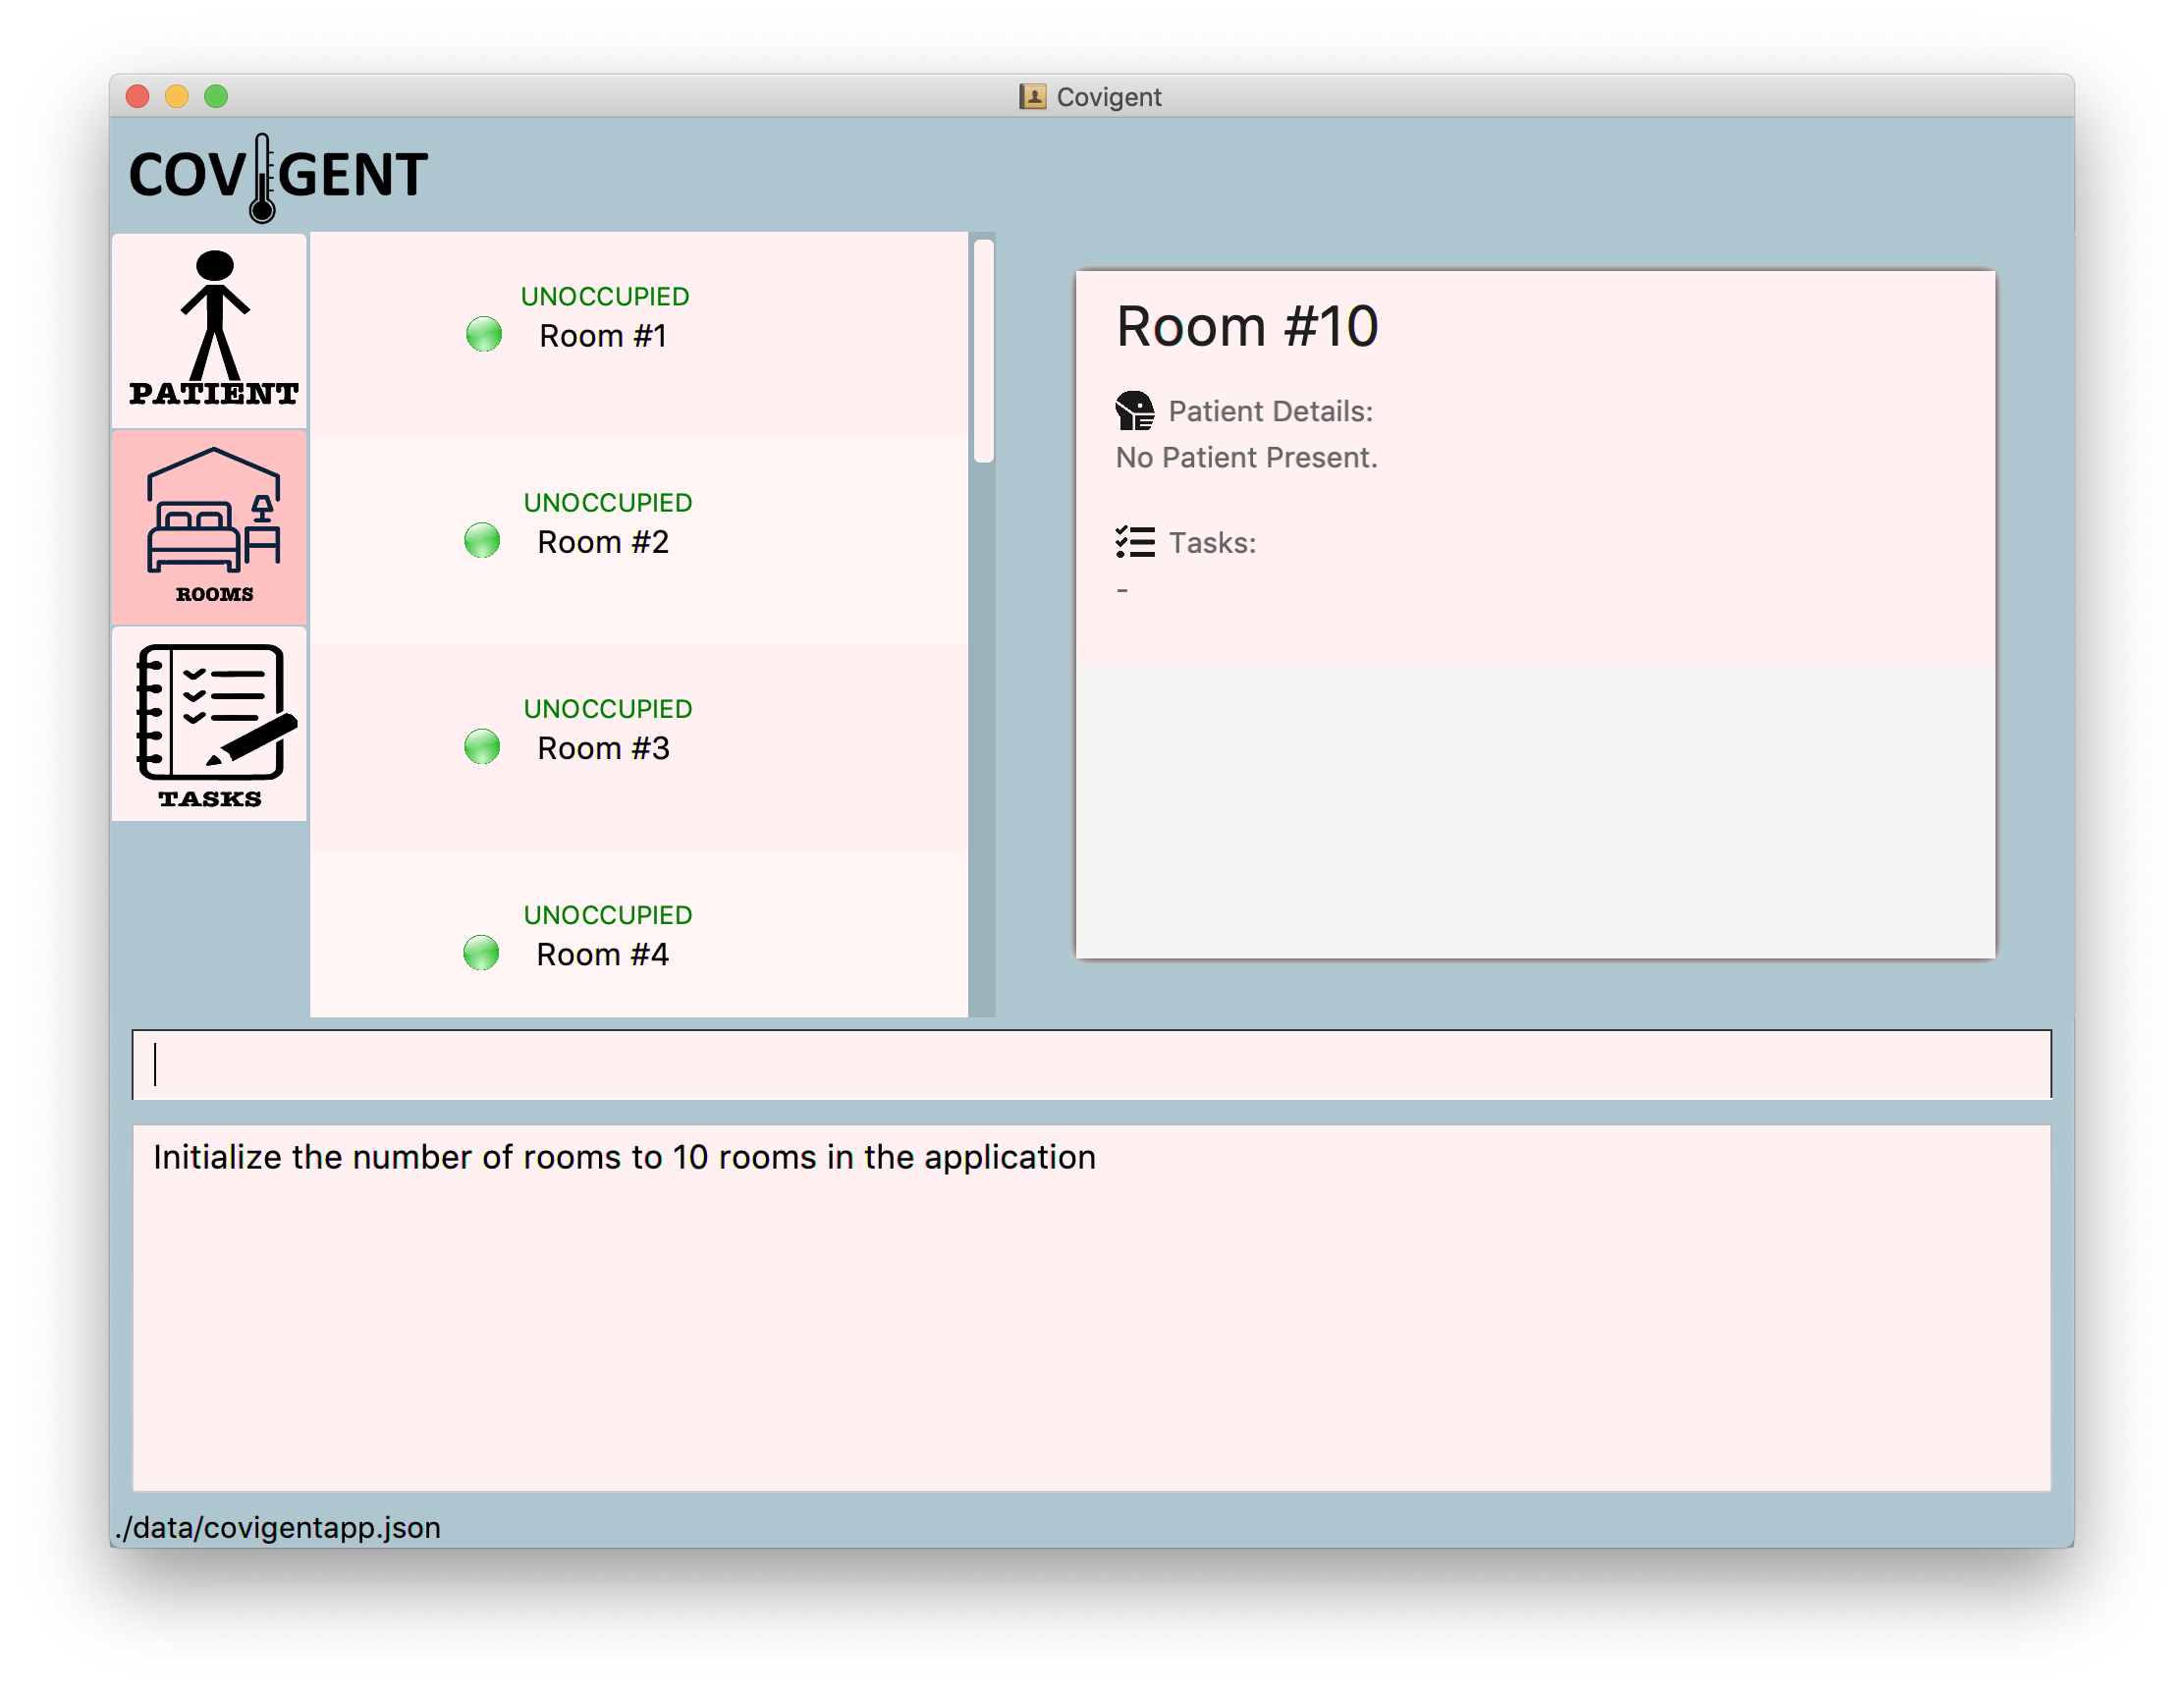
Figure 32. A Successful Execution ofinitroom
Written by: Noorul Azlina
5.3.2 Allocate Patient to Room: allocateroom
You can use this command to allocate a patient to a room.
Format: allocateroom ROOM_NUMBER n/PATIENT_NAME
| Field | Description |
|---|---|
ROOM_NUMBER |
The room number of the room of which the patient is to be allocated to. A room with the ROOM_NUMBER must already exist within Covigent. |
PATIENT_NAME |
The name of the patient to be allocated to the room. It is case-sensitive but must match exactly with the name of the patient that was input into Covigent previously. |
![]() Important Information:
Important Information:
- To remove a patient from the room, input the patient name as “-“. Refer to the example below for more clarity.
Example(s):
-
allocateroom 1 n/john doe. The patient named John Doe will be allocated to Room #1. -
allocateroom 1 n/-. The previous patient will be removed from Room #1.
Step By Step Usage:
- Navigate to the Rooms tab under the navigation bar as shown in Figure 33.

Figure 33. Navigation to Rooms Tab - Using the first example, key in the command into the Command Box as shown below.
Figure 34.allocateroomCommand in Command Box - Press Enter to run the command.
- The Result Box displays the sucess message shown in Figure 35 and the patient is allocated to the room.
The room with the newly allocated patient is shown in the room Details Panel.
Figure 35. A Successful Execution ofallocateroomfor Room Number - If you do not see the success message as shown in Figure 35, please repeat step 2 onwards.
Written by: Ming De
5.3.3 Search by Room Number: searchroom
You can use this command to search for the room details with the specified room number.
Format: searchroom r/ROOM_NUMBER
| Field | Description |
|---|---|
ROOM_NUMBER |
The room number of the room to be searched for, which is a positive integer. The room number should be present in the list of rooms in Covigent. |
Example(s):
-
searchroom r/6The room details of room number 6 will be searched.
Step By Step Usage:
- Navigate to the Rooms tab under the navigation bar as shown in Figure 36.

Figure 36. Navigation to Rooms Tab - Using the first example, key in the command into the Command Box as shown below.

Figure 37.searchroomCommand in Command Box - Press Enter to run the command.
- The Result Box displays the success message shown in Figure 38 and the room with the specified room number is shown in the room Details Panel.
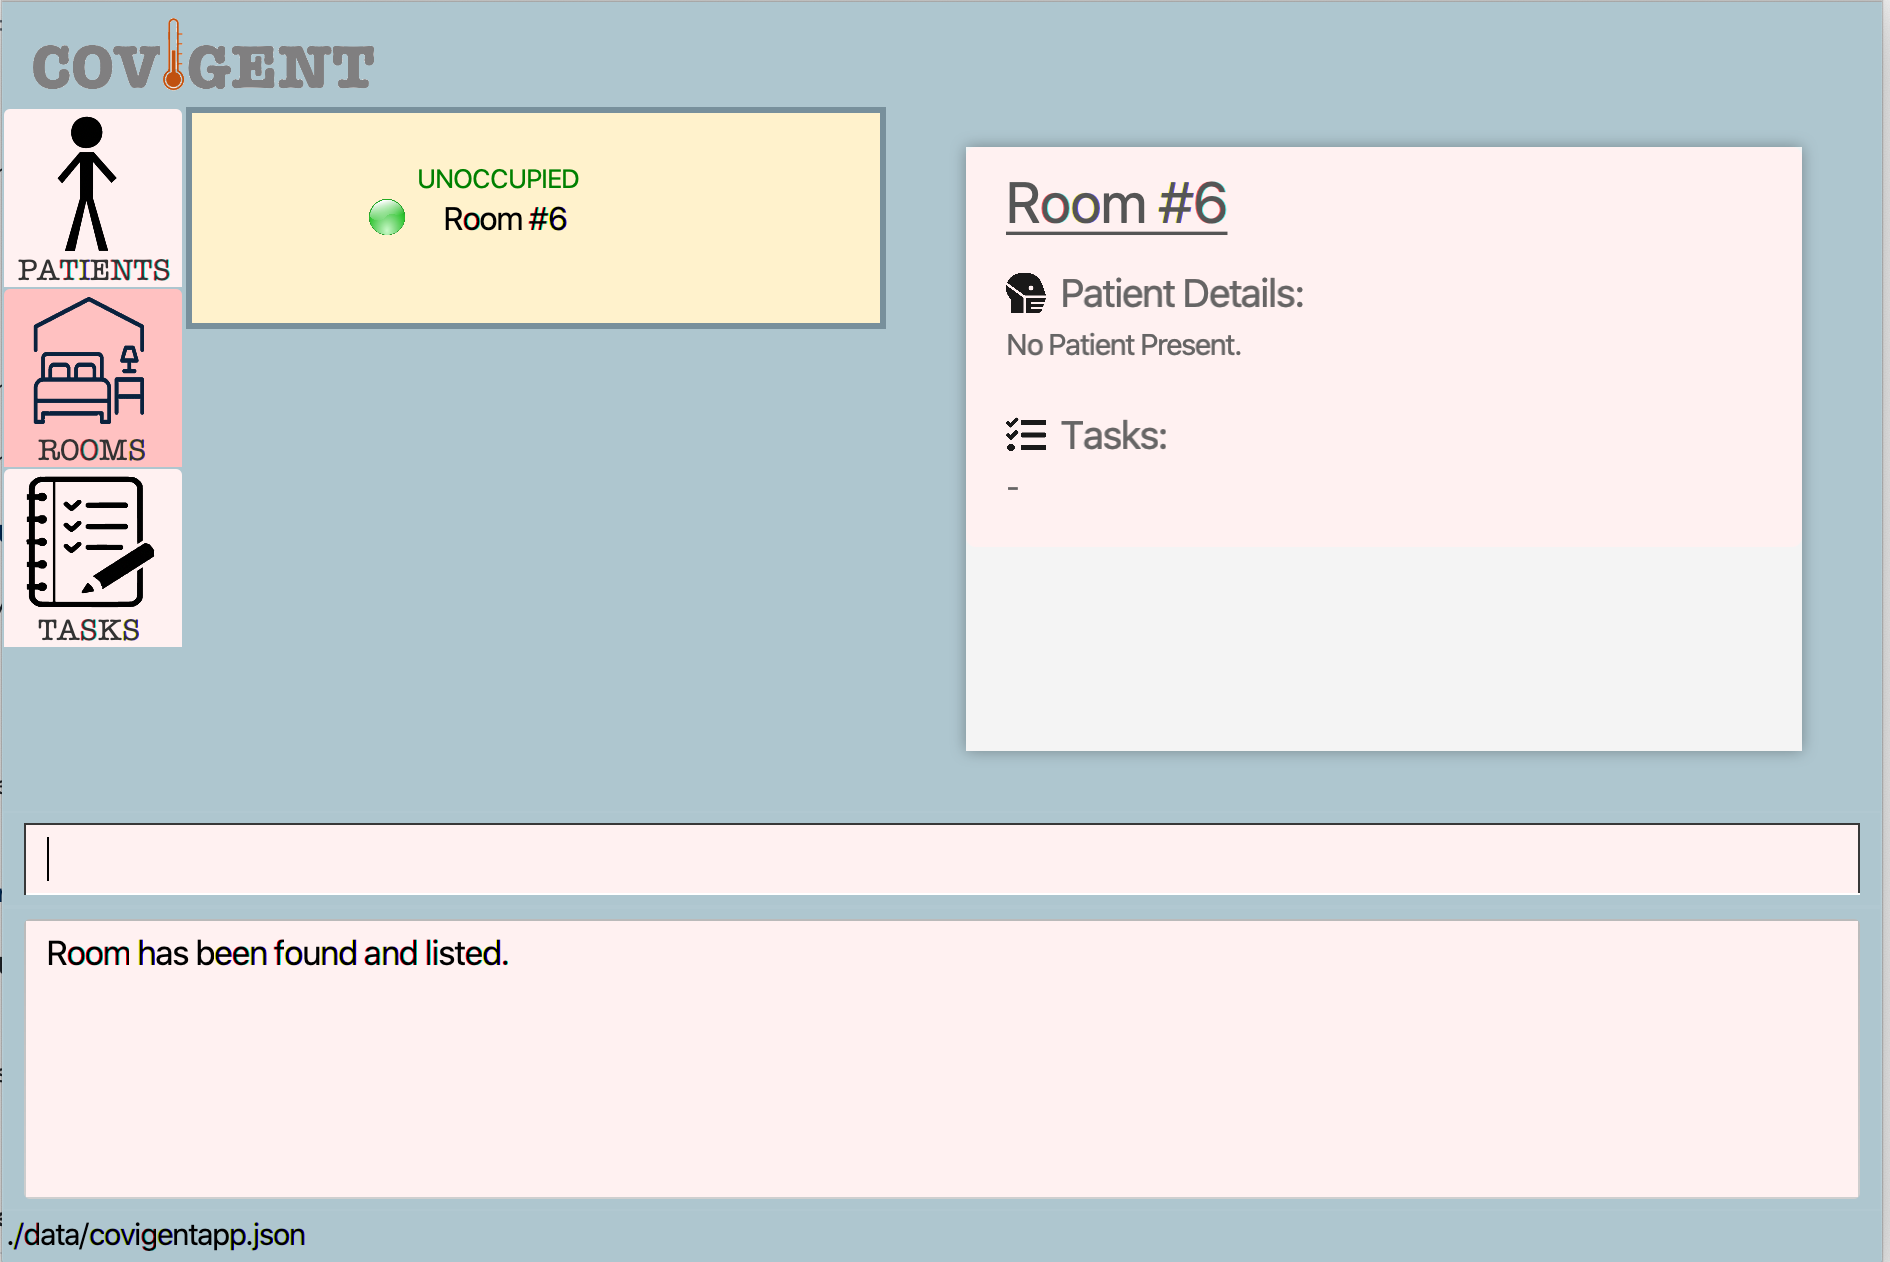
Figure 38. A Successful Execution ofsearchroomfor Room Number - If you do not see the success message as shown in Figure 38, please repeat step 2 onwards.
Written by: Yun Qing
5.3.4 Search for Room with Patient: searchroom
You can use this command to search for the room that the specified patient is residing in.
Format: searchroom n/NAME
| Field | Description |
|---|---|
NAME |
The name of the patient whose room you are looking for. It is case-insensitive and must match exactly with the name of the patient that was input into Covigent previously. |
Example(s):
-
searchroom n/Mary DoeThe room details of the room that Mary Doe resides in will be searched.
Step By Step Usage:
- Navigate to the Rooms tab under the navigation bar as shown in Figure 39.

Figure 39. Navigation to Rooms Tab - Using the first example, key in the command into the Command Box as shown below.

Figure 40.searchroomCommand in Command Box - Press Enter to run the command.
- The Result Box displays the success message shown in Figure 41 and the room that the specified patient resides in is shown in the room Details Panel.
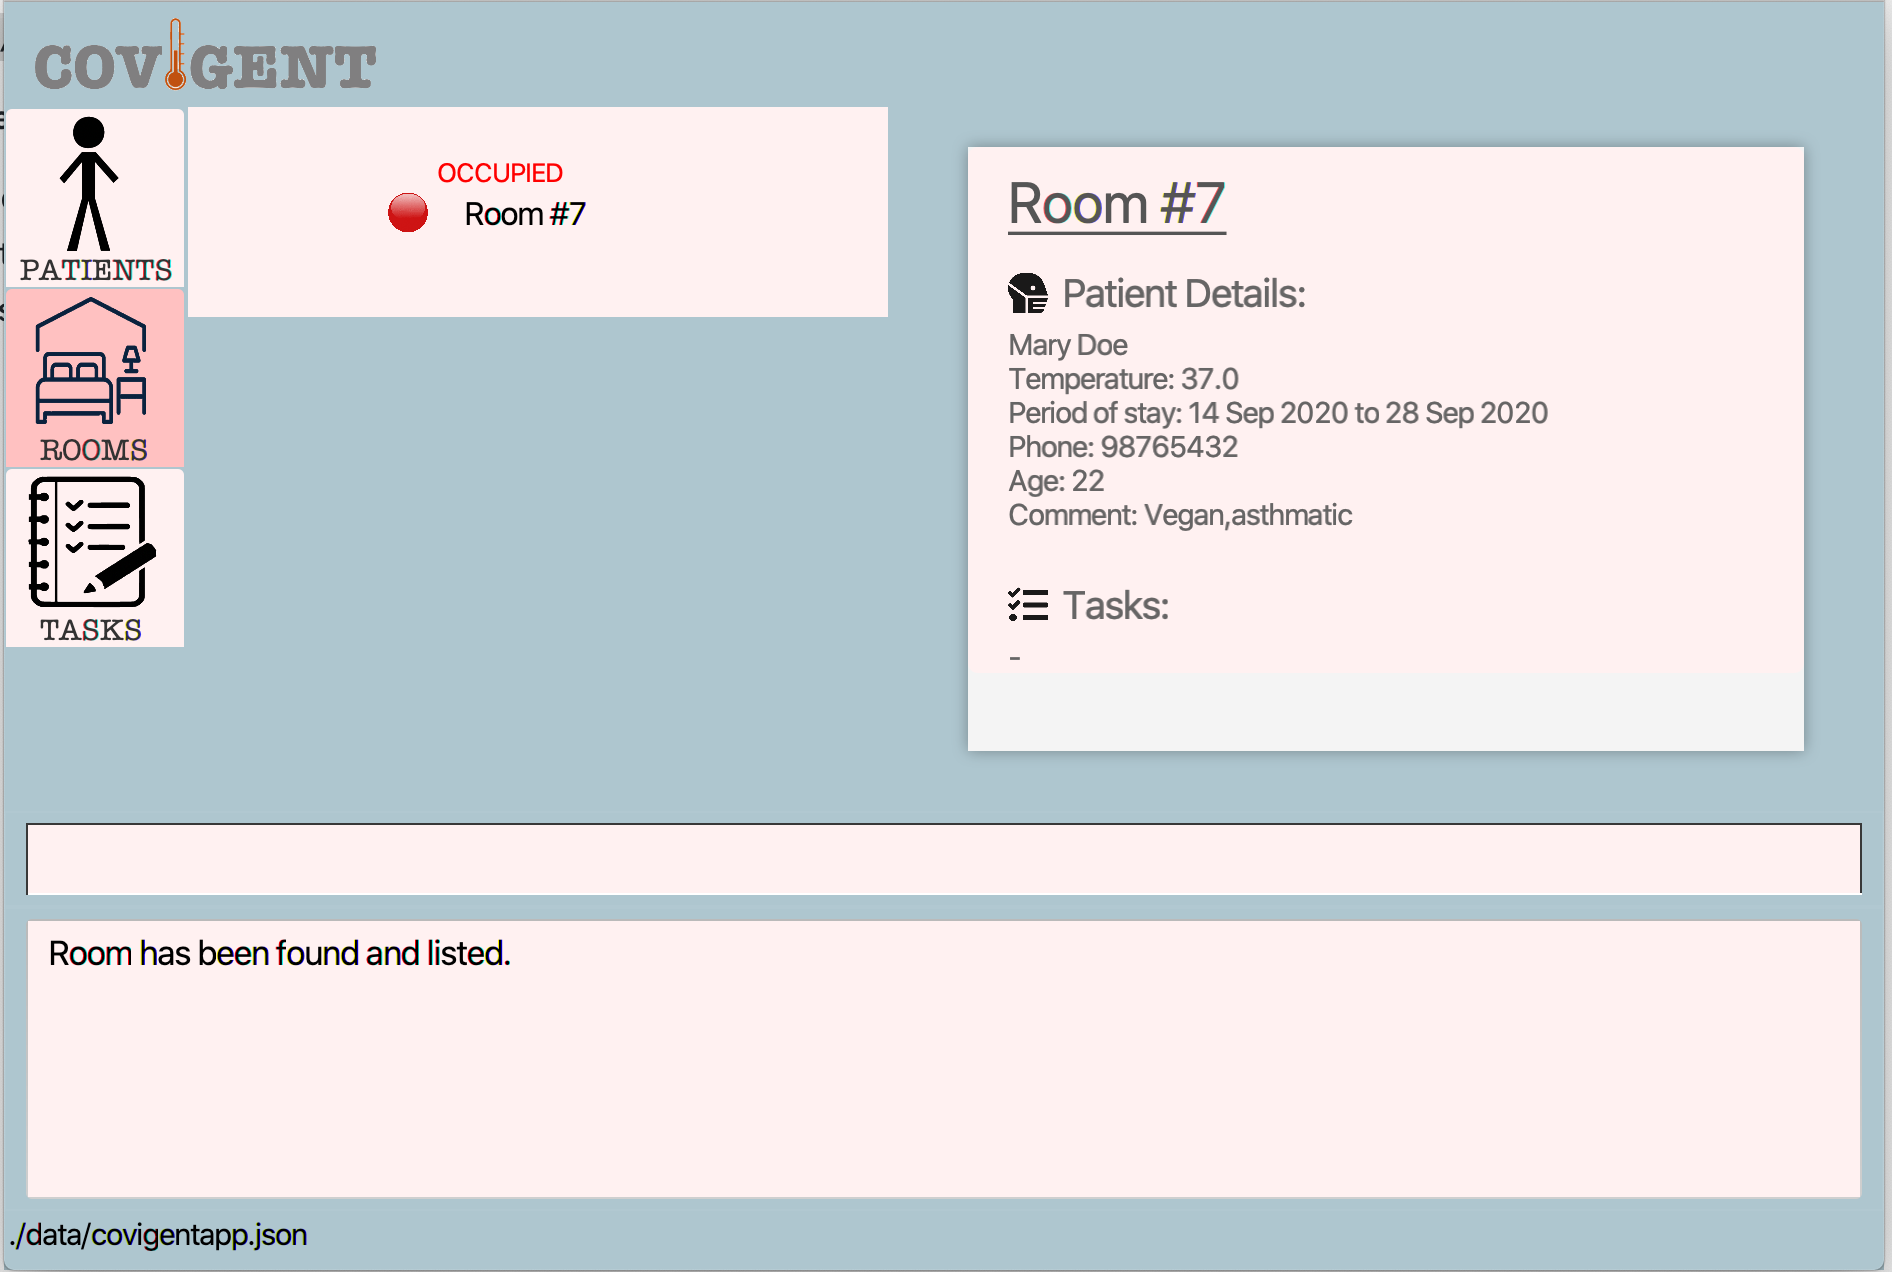
Figure 41. A Successful Execution ofsearchroomfor Patient - If you do not see the success message as shown in Figure 41, please repeat step 2 onwards.
Written by: Yun Qing
5.3.5 List the Current Rooms: listroom
You can use this command to list all the rooms in the hotel together with information of whether the room is occupied or not, provided there is at least one room defined
Format: listroom All the rooms in Covigent.
Example(s):
-
listroomall the rooms will be listed -
listroom abdcfbhfrall rooms will be listed -
listroom 21232198all rooms will be listed -
listroom 123ebhbh11all rooms will be listed
![]() Important Information:
Important Information:
- If there are no rooms, then no rooms will be mentioned and informs user to initialize rooms using the
initroomcommand. - You need at least one room for this command to work.
Step By Step Usage:
- Navigate to Rooms tab under the navigation bar as shown in Figure 42

Figure 42. Navigation to Rooms Tab - Next, type the command
listroomin the Command Box as shown below
Figure 43.listroomCommand in Command Box - Press Enter to run the command
- The Result Box shows a success message “All rooms are listed.”
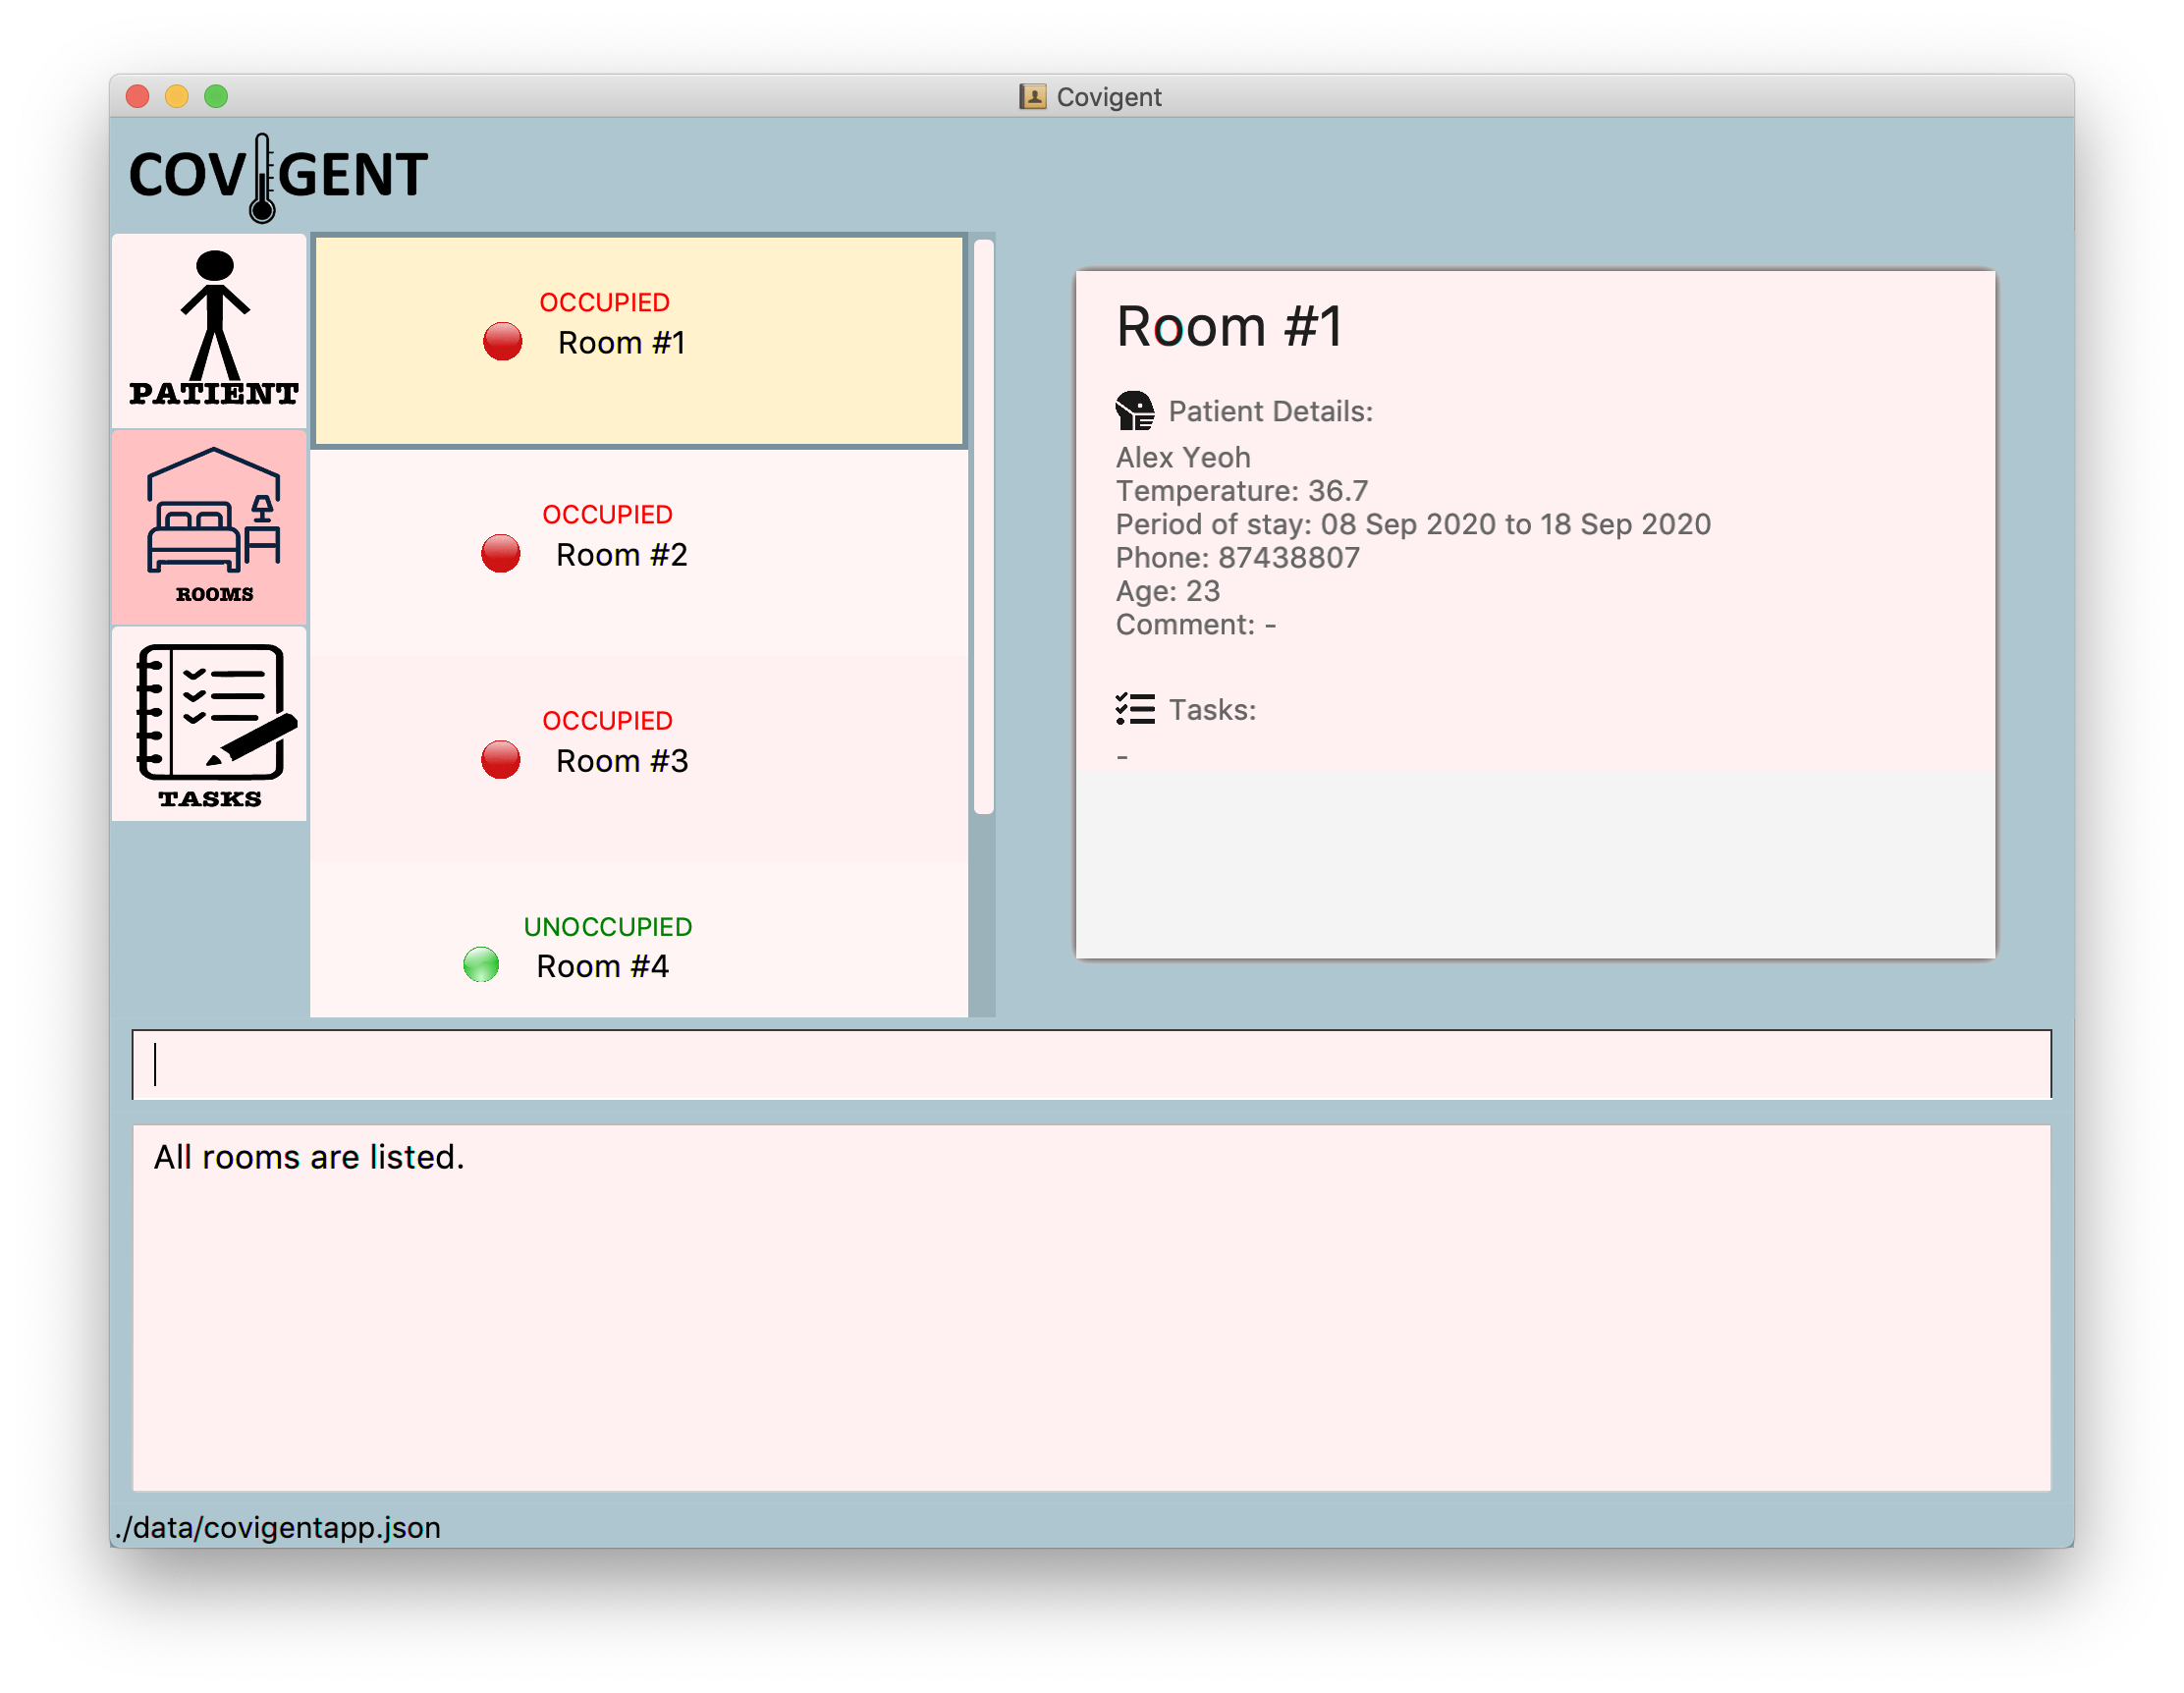
Figure 44. A Successful Execution oflistroom
Written by: Noorul Azlina
5.3.6 Find the First Free Room: findemptyroom
You can use this command to find the room with the lowest room number that is free for use.
Format: findemptyroom The unoccupied room in Covigent with the lowest room number will be displayed on UI.
Example(s):
-
findemptyroomgives room with the lowest room number -
findemptyroom 238405gives room with the lowest room number -
findemptyroom ahfbhrfgives room with the lowest room number -
findemptyroom hsbf835dfjgives room with the lowest room number
![]() Important Information:
Important Information:
- If there are no empty rooms then an error message informing hotel staff is mentioned.
Step By Step Usage:
- Navigate to Rooms tab under the navigation bar as shown in Figure 45.

Figure 45. Navigation to Rooms Tab - Next, type the command
findemptyroomin the Command Box as shown below
Figure 46.findemptyroomCommand in Command Box - Press Enter to run the command
- The Result Box shows a success message that “Room Number 4 is empty”
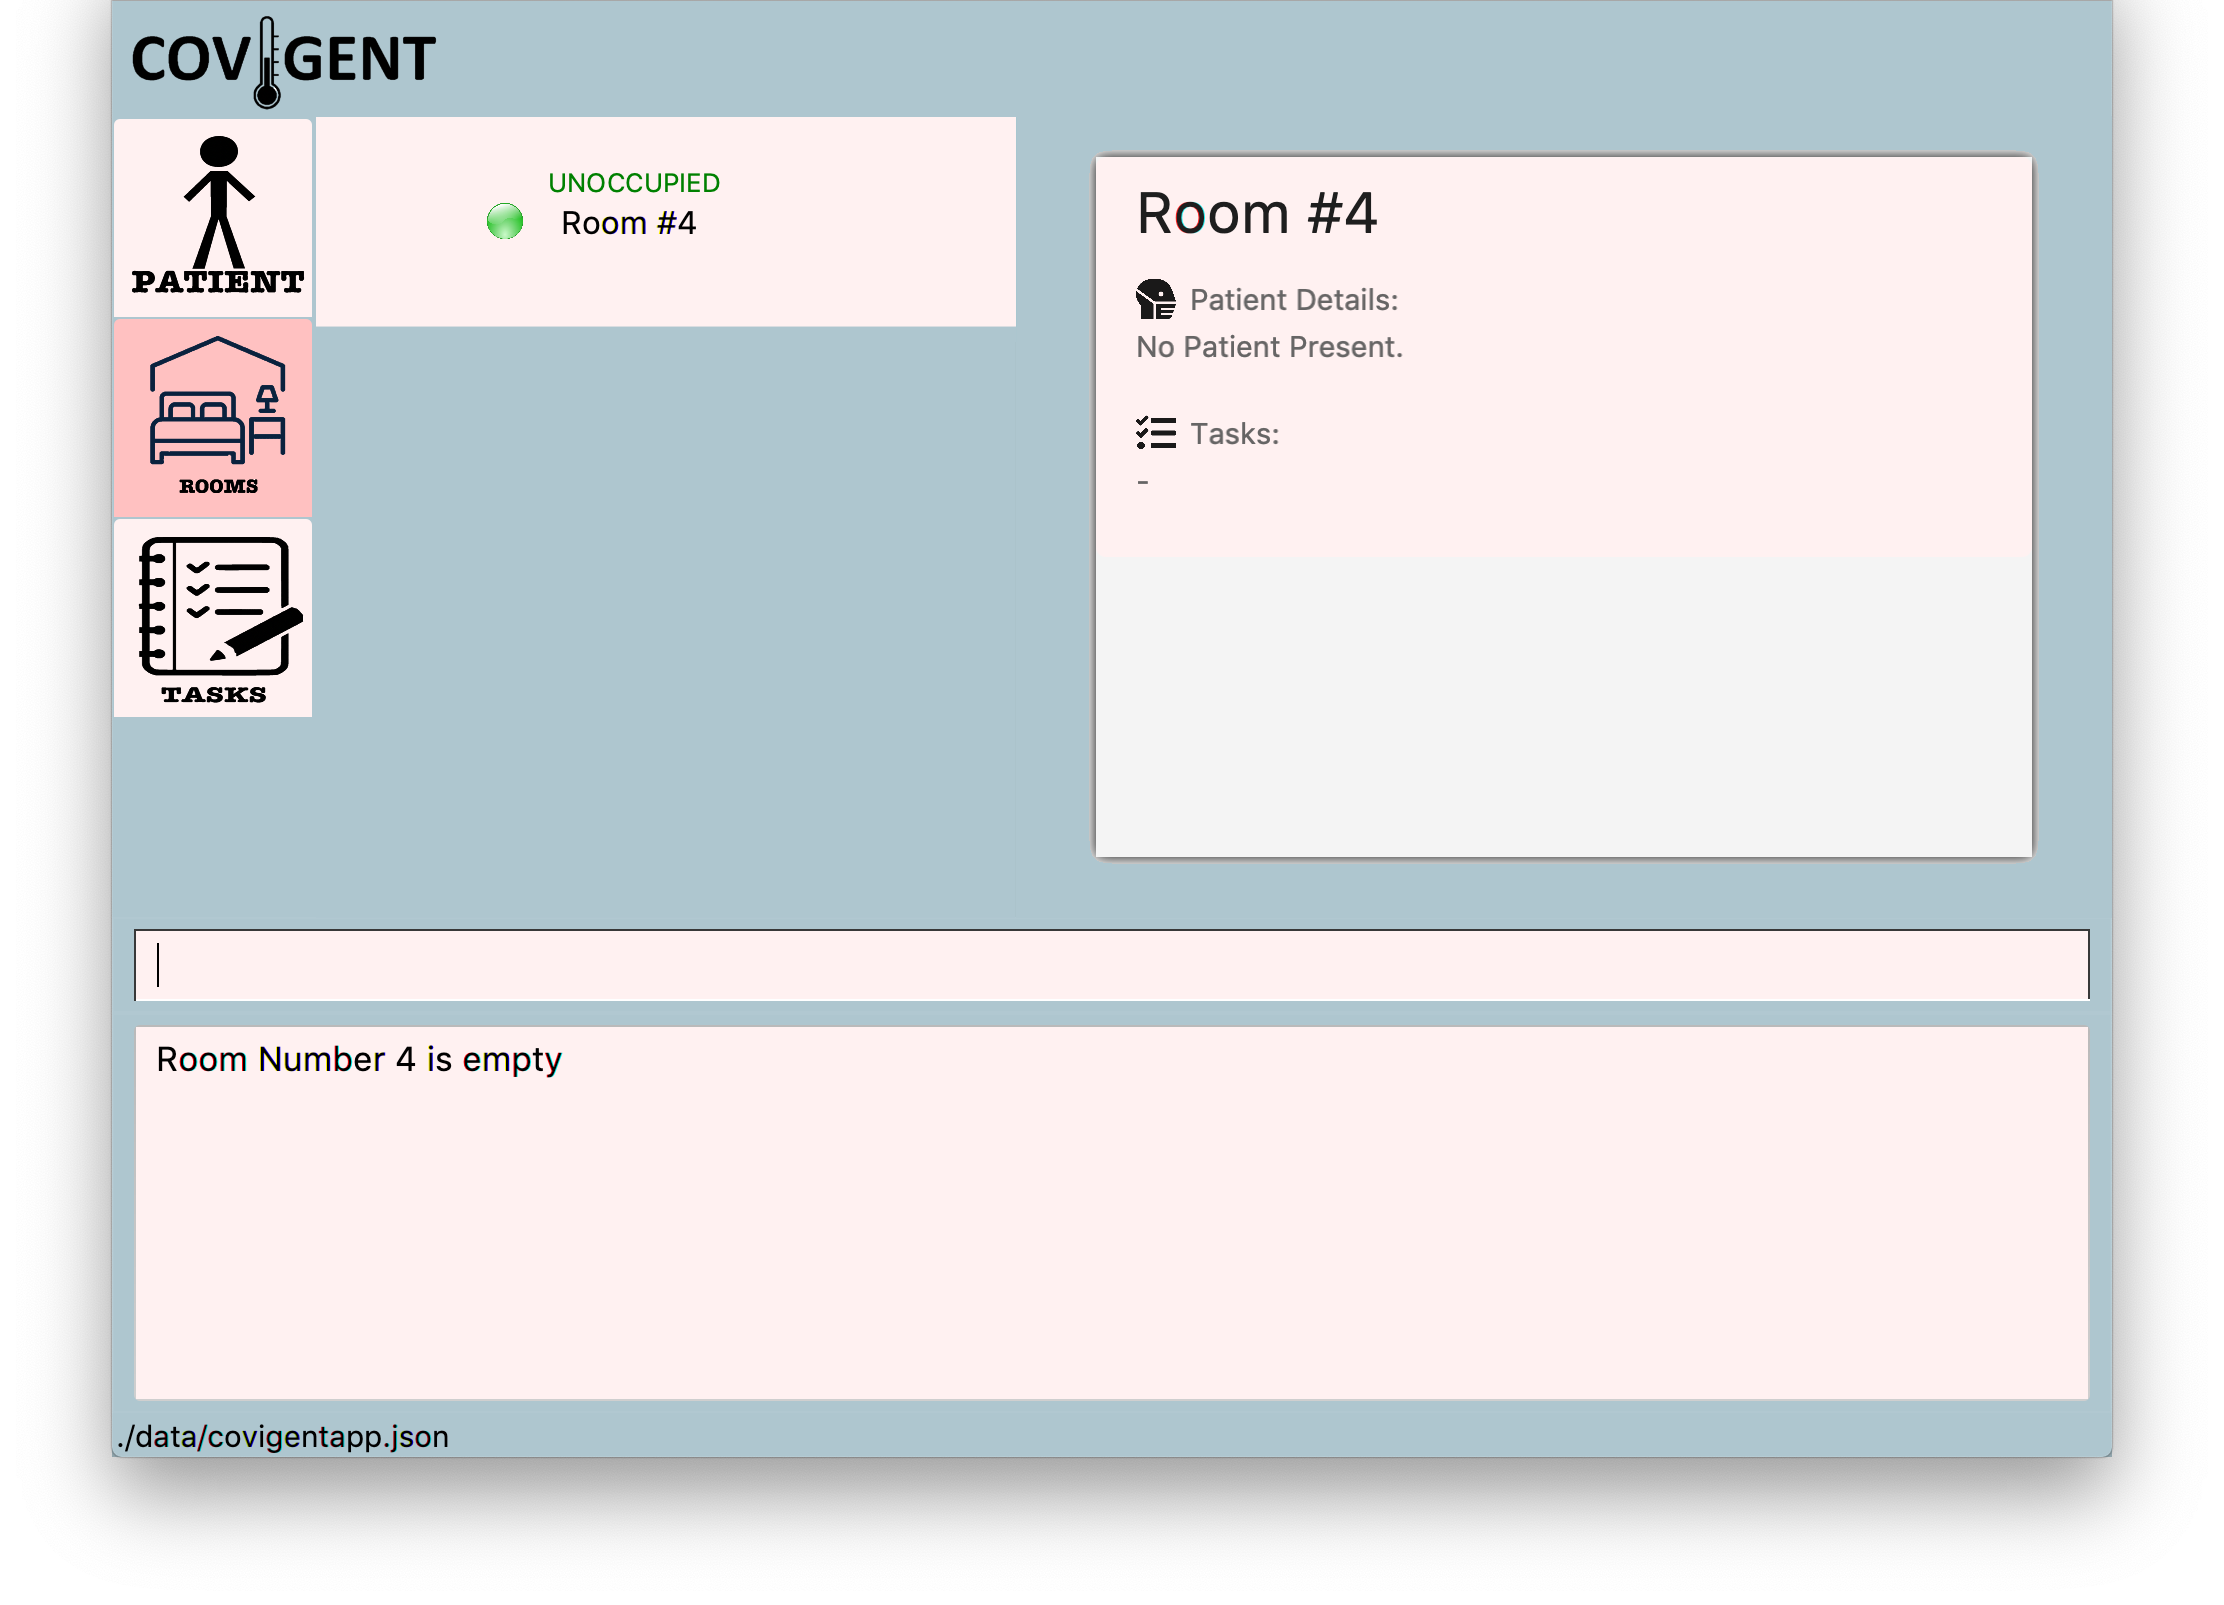
Figure 47. A Successful Execution offindemptyroom
Written by: Noorul Azlina
5.4 Task
This section contains all the commands related to tasks. You can add, delete, edit and search for a task in a room. If you want to see all the tasks, you can list out all the tasks in Covigent. If you are unsure of how to interpret the command format, head back to Command Format before executing the commands!
5.4.1 Add a Task to a Room: addtask
You can use this command to add a task to a room. The task has the following details: description and due date.
Format: addtask r/ROOM_NUMBER d/DESCRIPTION [dd/DUE_DATE]
| Field | Description |
|---|---|
ROOM_NUMBER |
The room number of the room to which you want to add the task. It refers to the number displayed beside each room under the list of rooms. An example of the room number highlighted in red: |
DESCRIPTION |
The description of the task. It must be between 1 and 4000 characters long. Note that empty inputs such as multiple spaces are considered 0 characters and are not allowed. The description can be related to the patient in the room, e.g. Call the patient; or related to the room, e.g. Restock the supplies in this room. |
DUE_DATE |
An optional field that is used to indicate by what date and time should the task be completed. It can in any of the following formats: i) YYYYMMDD, e.g. 20210131 ii) YYYYMMDD HHmm, e.g. 20210131 2359 iii) D/M/YYYY, e.g. 31/1/2021 or 31/01/2021 iv) D/M/YYYY HHmm, e.g. 31/1/2021 2359 or 31/01/2021 2359
|
![]() Important Information:
Important Information:
- After you add a task successfully, the task will appear in both the room you have added it to, and also in the Tasks tab.
-
DUE_DATEdefaults to-if you leave out the field, i.e. the task has no due date. - If you do not provide the time for a
DUE_DATE, it defaults to 0000 (12am).
Example(s):
-
addtask r/5 d/Running low on masks and needs to be restocked. dd/12/1/2021A task with description Running low on masks and needs to be restocked. and due date 12 Jan 2021 0000 is added to Room #5. -
addtask r/1 d/Remind patient to change bedsheets.A task with description Remind patient to change bedsheets. and no due date is added to Room #1.
Step By Step Usage:
- Navigate to the Rooms tab under the navigation bar as shown in Figure 48.

Figure 48. Navigation to Rooms Tab - For this example, the task will be added to Room #5. Please ensure there at least 5 rooms in Covigent, i.e. you can find Room #5 in the Rooms tab.
If you cannot find Room #5, do not worry. That means that the room has not been created yet. To create the rooms, please key in
initroom 5into the Command Box. For more details on creating room, refer to Section 5.3.1, “Initialise Rooms in Hotel”. - Key the command into the Command Box as shown below.

Figure 49.addtaskCommand in Command Box - Press Enter to run the command.
- The Result Box displays a success message. Click on Room #5 to view the newly added task. Refer to Figure 50 for the success message and to confirm that details of the task are displayed in the Details Panel.
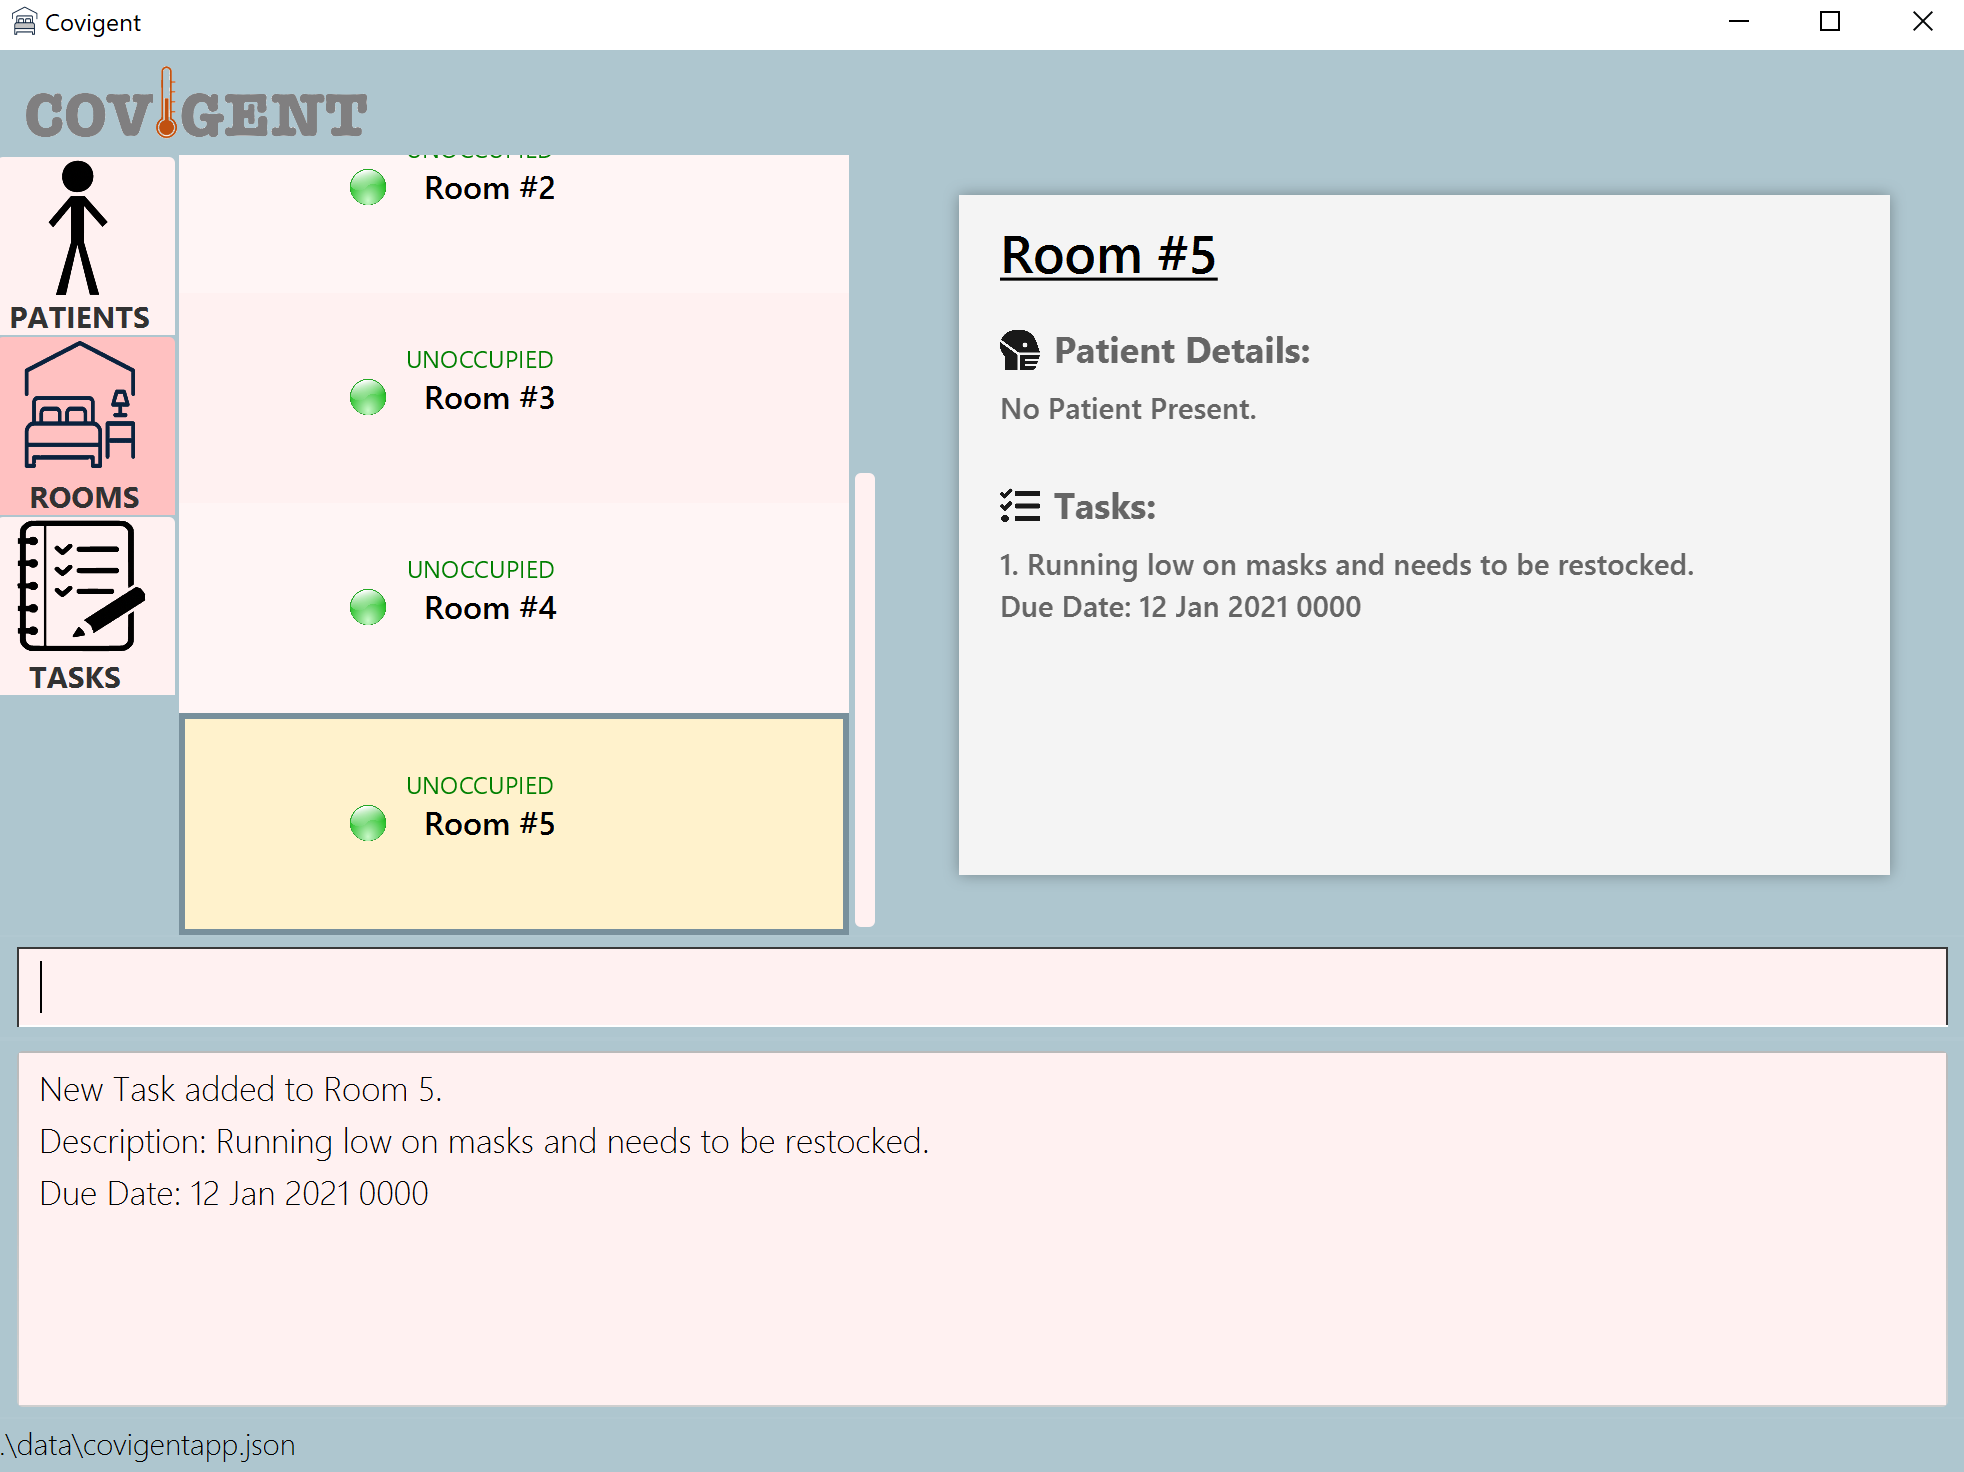
Figure 50. A Successful Execution ofaddtaskCommand - If you do not see the success message as shown in Figure 50, please check that there are at least 5 rooms in Covigent as per step 2, and that you have keyed in the command correctly as in step 3.
Written by: Yee Hong
5.4.2 Delete a Task from a Room: deletetask
You can use this command to delete an existing task from a room.
Format: deletetask r/ROOM_NUMBER t/TASK_NUMBER
| Field | Description |
|---|---|
ROOM_NUMBER |
The room number of the room from which you want to delete the task. It refers to the number displayed beside each room under the list of rooms. An example of the room number highlighted in red: |
TASK_NUMBER |
The task number of the task to be deleted. It refers to the number displayed beside each task in the Details Panel for rooms. An example of the task number highlighted in red: Alternatively, you may find the task number in the Tasks tab. Here is the task number of the same task, but found in the Tasks tab: |
![]() Important Information:
Important Information:
- After you delete a task successfully, the task will not only disappear from room it was in, but also from the Tasks tab.
- Once you delete a task, the
TASK_NUMBERof the remaining tasks changes accordingly. Figure 51 illustrates how Task 3 is updated to Task 2 after the original Task 2 is deleted.
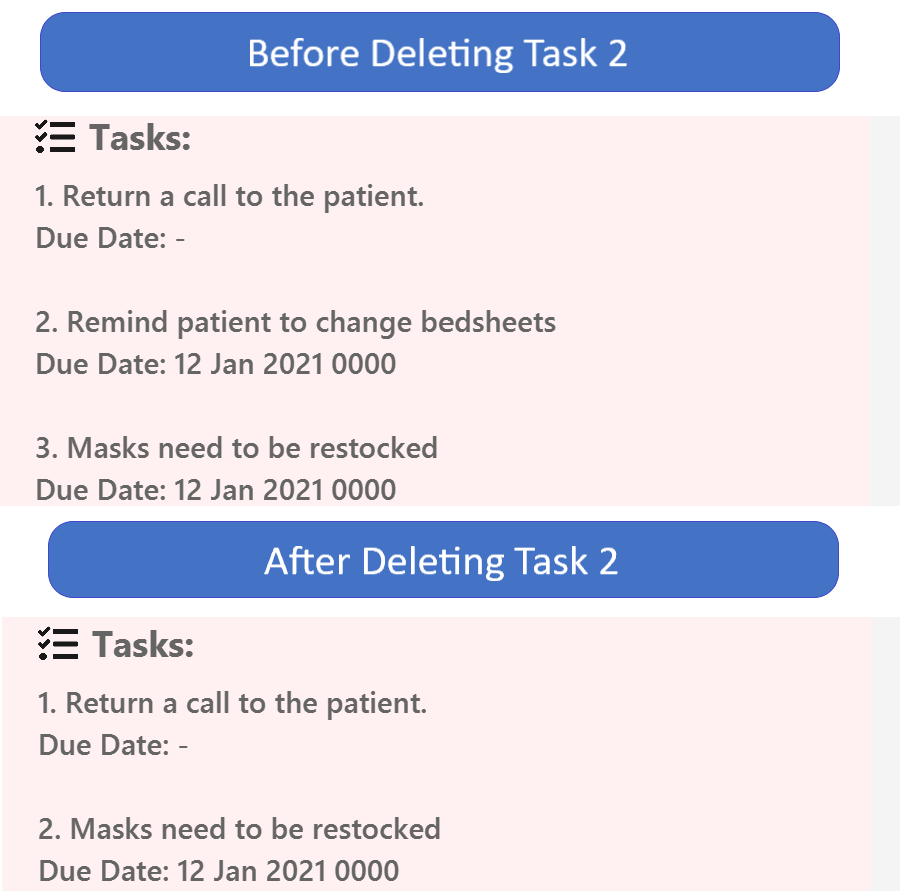
Figure 51. Task Number Changing after deletetask
Example(s):
-
deletetask r/5 t/1The first task (Task 1) of Room #5 is deleted.
Step By Step Usage:
- Navigate to the Rooms tab under the navigation bar as shown in Figure 52.

Figure 52. Navigation to Rooms Tab - For this example, Task 1 of Room #5 is deleted. Please replace the
5with theROOM_NUMBERof the room containing the task and the1with theTASK_NUMBERof the task that you want to delete. - Key the command into the Command Box as shown below, replacing
ROOM_NUMBERandTASK_NUMBERas necessary.
Figure 53.deletetaskCommand in Command Box - Press Enter to run the command.
- The Result Box displays a success message. You have successfully deleted Task 1 of Room #5 (see Figure 54).
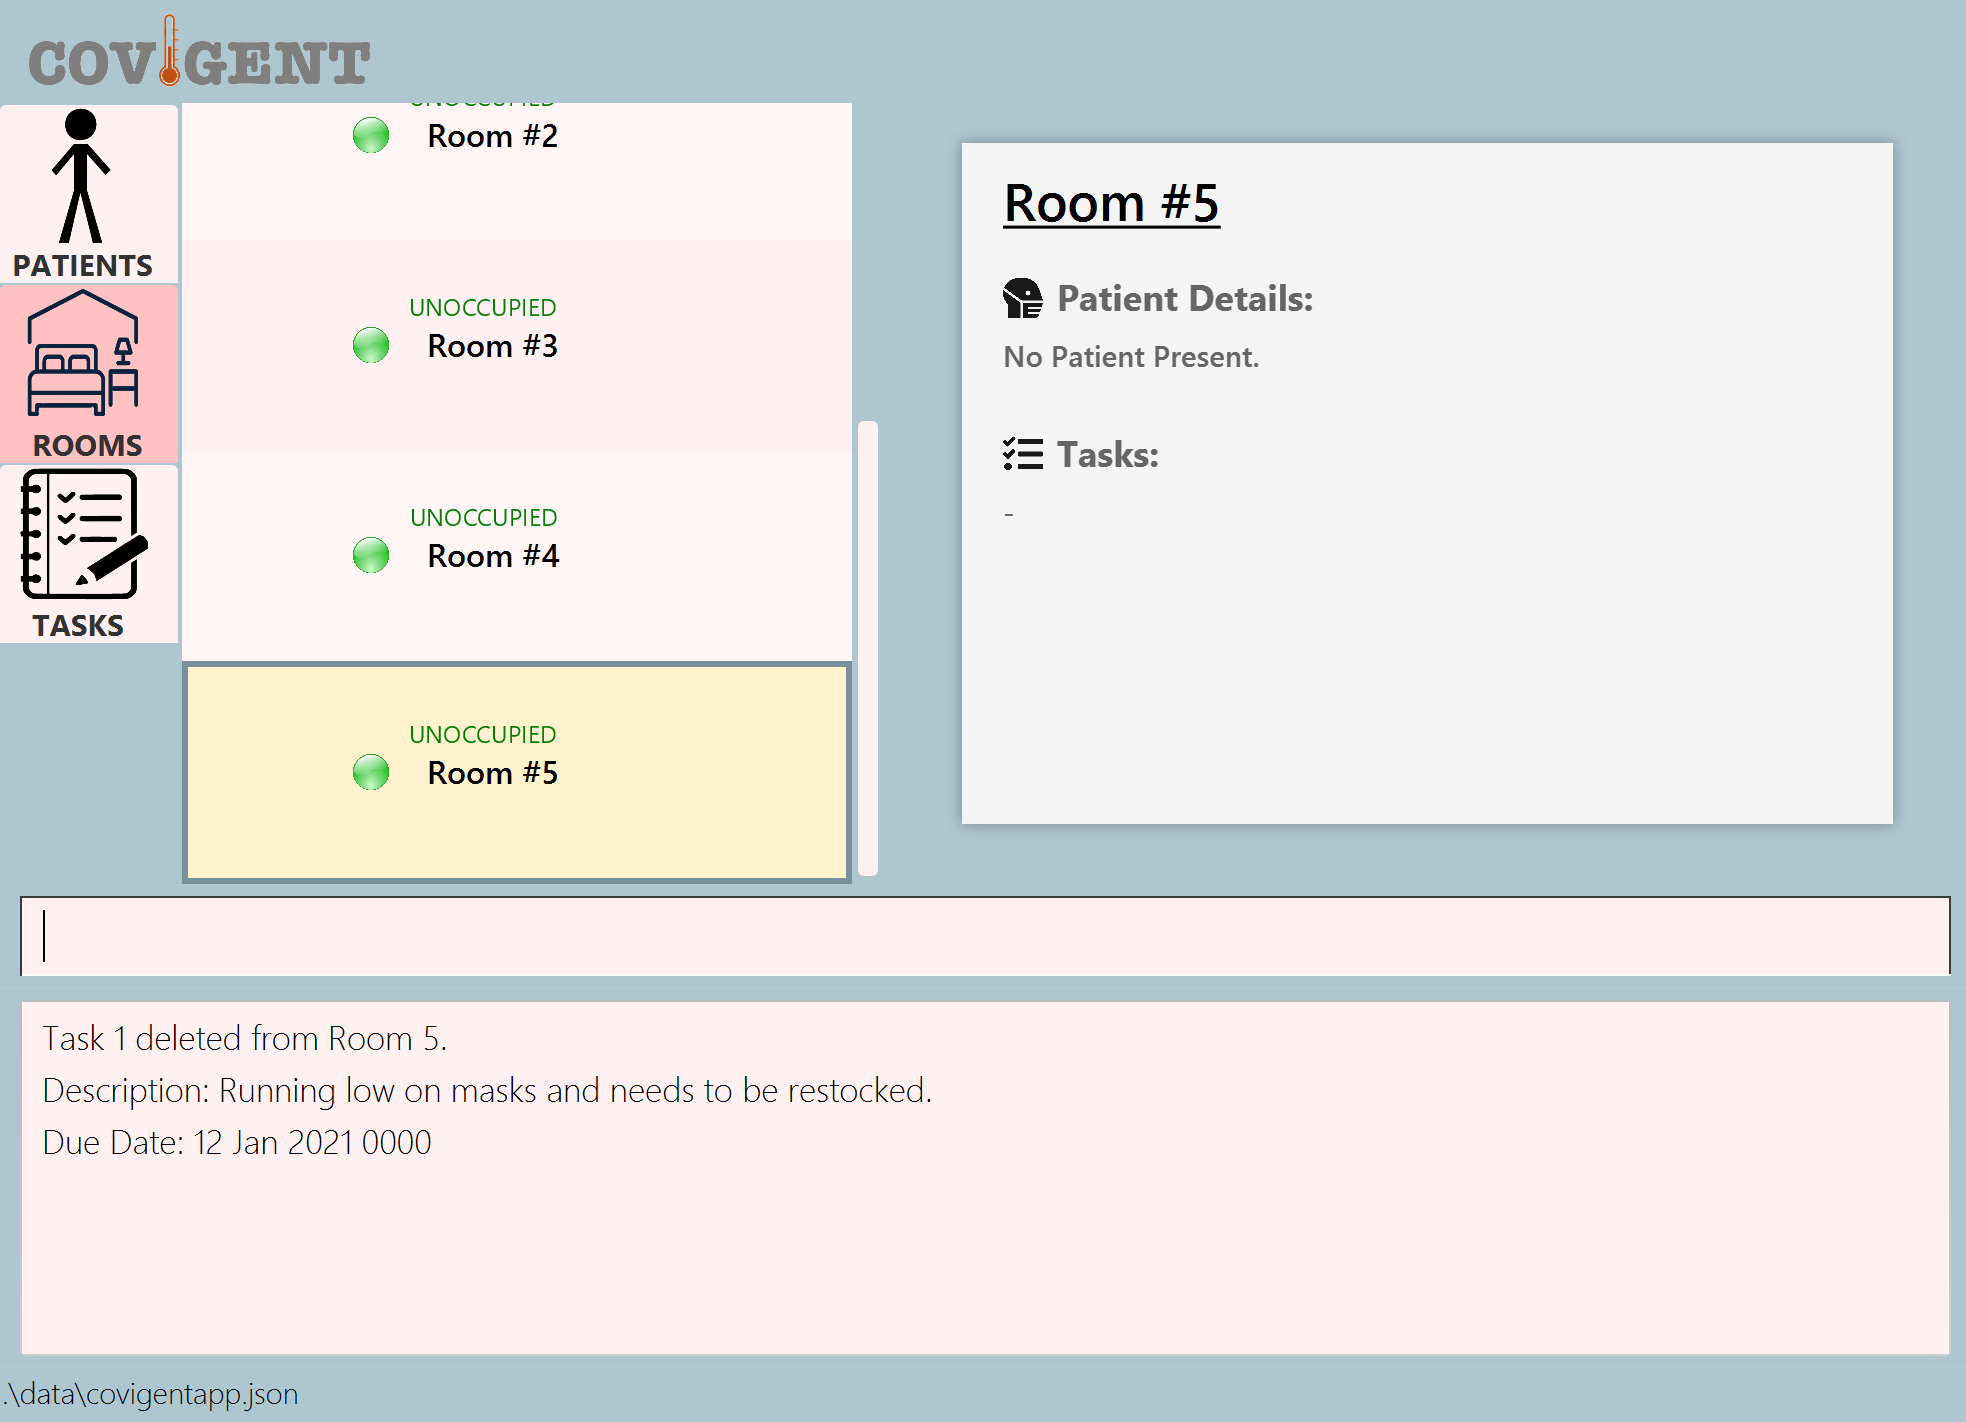
Figure 54. A Successful Execution ofdeletetaskCommand - If you do not see a success message similar to Figure 54, please check that you have entered the correct
ROOM_NUMBERandTASK_NUMBER.
Written by: Yee Hong
5.4.3 Edit Task Description or Due Date: edittask
You can use this command to edit the description or due date of an existing task in a room.
Format: edittask r/ROOM_NUMBER t/TASK_NUMBER [d/DESCRIPTION] [dd/DUE_DATE]
| Field | Description |
|---|---|
ROOM_NUMBER |
The room number of the room from which you want to edit the task. It refers to the number displayed beside each room under the list of rooms. An example of the room number highlighted in red: |
TASK_NUMBER |
The task number of the task to be edited. It refers to the number displayed beside each task in the Details Panel for rooms. An example of the task number highlighted in red: Alternatively, you may find the task number in the Tasks tab. Here is the task number of the same task, but found in the Tasks tab: |
DESCRIPTION |
The description of the task. It must be between 1 and 4000 characters long. Note that empty inputs such as multiple spaces are considered 0 characters and are not allowed. The description can be related to the patient in the room, e.g. Call the patient; or related to the room, e.g. Restock the supplies in this room. |
DUE_DATE |
An optional field that is used to indicate by what date and time should the task be completed. It can in any of the following formats: i) YYYYMMDD, e.g. 20210131 ii) YYYYMMDD HHmm, e.g. 20210131 2359 iii) D/M/YYYY, e.g. 31/1/2021 or 31/01/2021 iv) D/M/YYYY HHmm, e.g. 31/1/2021 2359 or 31/01/2021 2359
|
![]() Important Information:
Important Information:
- At least one of the optional fields must be provided.
- Existing values will be updated to the input values.
- A task will not be edited if there are no changes to its description or due date.
- If you do not provide the time for a
DUE_DATE, it defaults to 0000 (12am).
Example(s):
-
edittask r/5 t/1 d/Return a call to the patient. dd/12/1/2021 1500The description and due date of the first task (Task 1) in Room #5 are updated to Return a call to the patient. and 12 Jan 2021 1500 respectively. -
edittask r/2 t/2 dd/12/1/2021The due date for the second task (Task 2) of Room #2 is updated to 12 Jan 2021 0000. The description remains unchanged.
Step By Step Usage:
- Navigate to the Rooms tab under the navigation bar as shown in Figure 55.

Figure 55. Navigation to Rooms Tab - For this example, Task 1 of Room #5 is edited. Please replace the
5with theROOM_NUMBERof the room containing the task and the1with theTASK_NUMBERof the task that you want to edit. - Key the command into the Command Box as shown below, replacing
ROOM_NUMBER,TASK_NUMBER,DESCRIPTION, andDUE_DATEas necessary.
Figure 56.edittaskCommand to Edit Description and Due Date in Command Box - Press Enter to run the command.
- The Result Box displays a success message. Click on Room #5 to view the edited task. Refer to Figure 57 for the success message and to confirm that details of the edited task are displayed in the Details Panel.
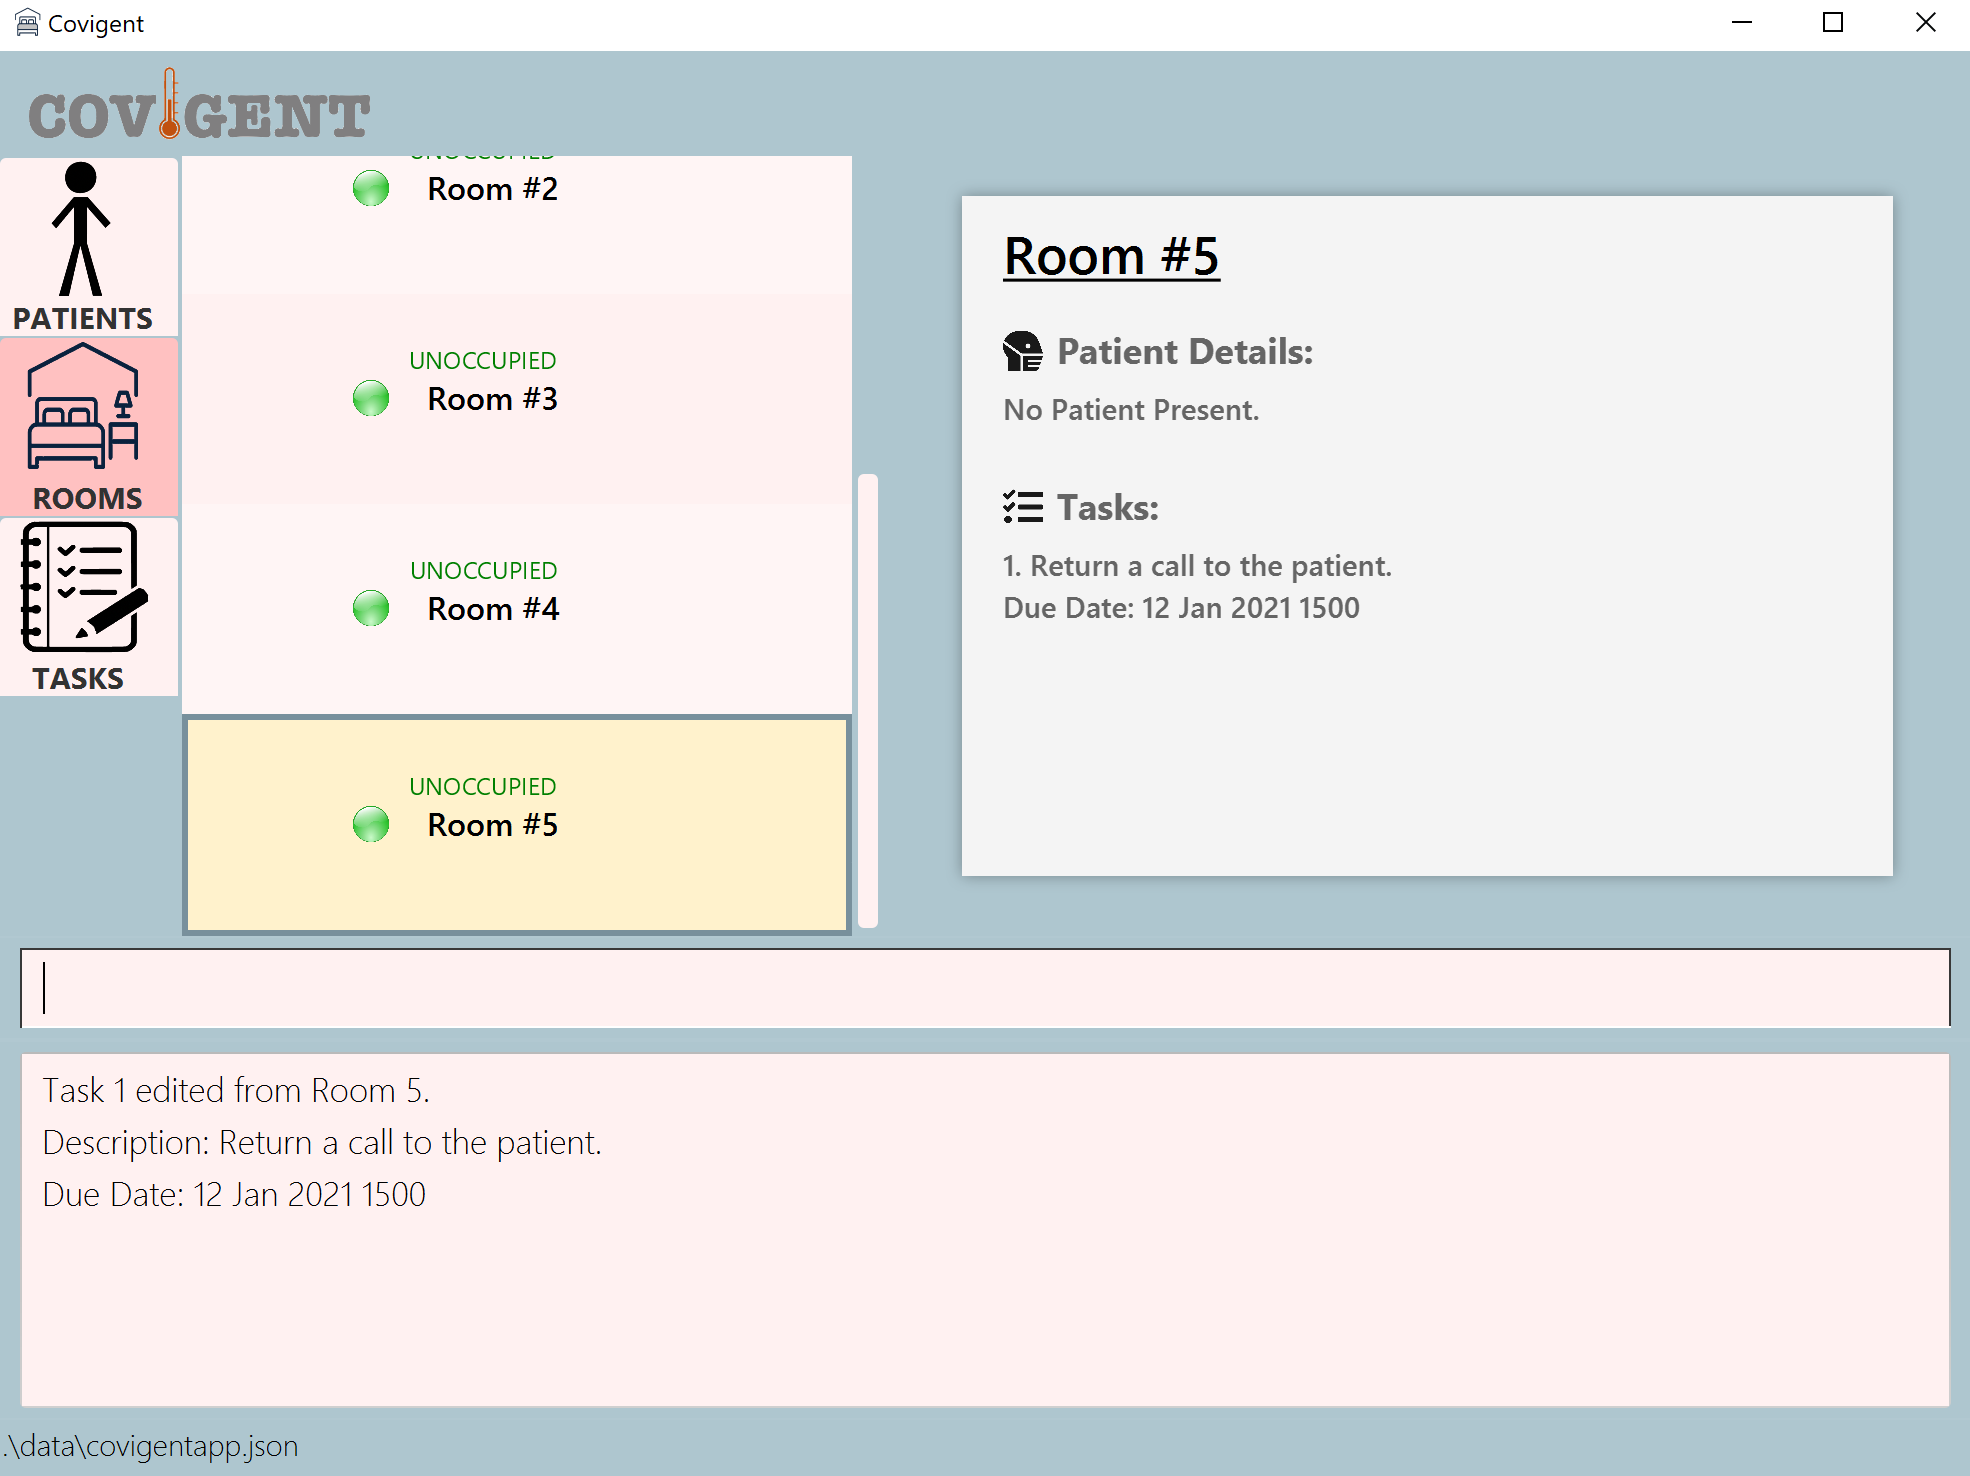
Figure 57. A Successful Execution ofedittaskCommand to Edit Description and Due Date - If you do not see a success message similar to Figure 57, please check that you have entered the correct
ROOM_NUMBERandTASK_NUMBER, and at least one of the optional fields.
Written by: Yee Hong
5.4.4 Remove Due Date from a Task: edittask
You can use this command to remove a due date from a task in a room.
Format: edittask r/ROOM_NUMBER t/TASK_NUMBER dd/-
| Field | Description |
|---|---|
ROOM_NUMBER |
The room number of the room from which you want to edit the task. It refers to the number displayed beside each room under the list of rooms. An example of the room number highlighted in red: |
TASK_NUMBER |
The task number of the task to be edited. It refers to the number displayed beside each task in the Details Panel for rooms. An example of the task number highlighted in red: Alternatively, you may find the task number in the Tasks tab. Here is the task number of the same task, but found in the Tasks tab: |
- |
A - indicates the removal of a due date. |
![]() Important Information:
Important Information:
- Existing values will be updated to the input values.
- The due date of a task cannot be removed if it does not originally have a due date.
- This is only one feature of the
edittaskcommand. Refer to the full command here.
Example(s):
-
edittask r/5 t/1 dd/-The due date of the first task (Task 1) in Room #5 is removed, i.e. set to-.
Step By Step Usage:
- Navigate to the Rooms tab under the navigation bar as shown in Figure 58.

Figure 58. Navigation to Rooms Tab - For this example, the due date of Task 1 of Room #5 is removed. Please replace the
5with theROOM_NUMBERof the room containing the task and the1with theTASK_NUMBERof the task from which you want to remove the due date. - Key the command into the Command Box as shown below, replacing
ROOM_NUMBER,TASK_NUMBERas necessary.
Figure 59.edittaskCommand to Remove Due Date in Command Box - Press Enter to run the command.
- The Result Box displays a success message. Click on Room #5 to view the edited task. Refer to Figure 57 for the success message and to confirm that details of the edited task are displayed in the Details Panel.
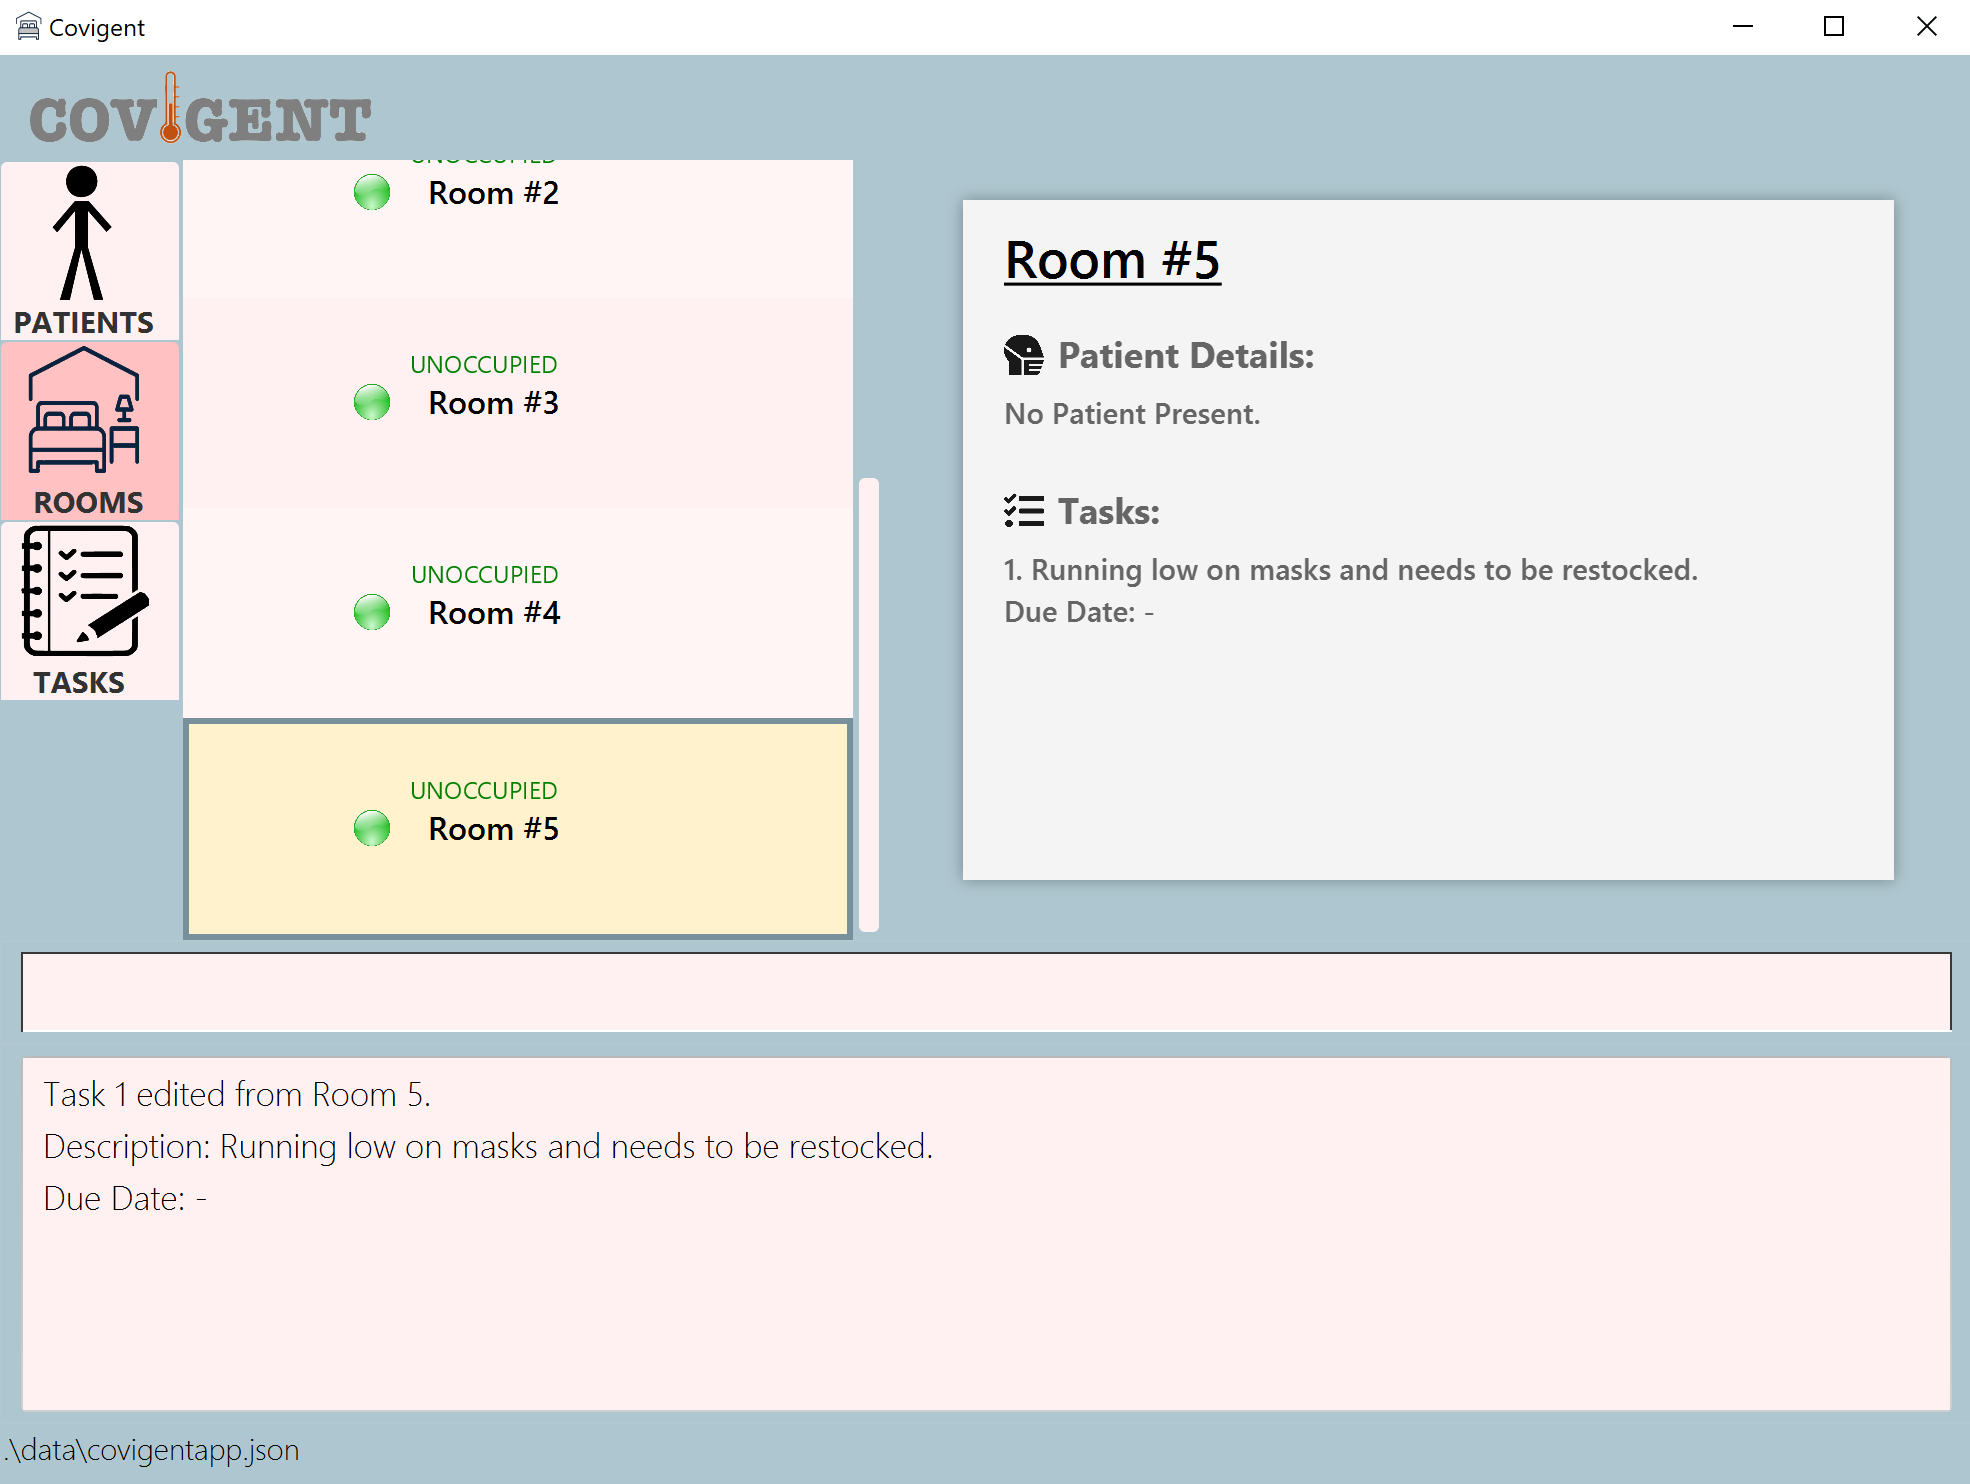
Figure 60. A Successful Execution ofedittaskCommand to Remove Due Date - If you do not see a success message similar to Figure 60, please check that you have entered the correct
ROOM_NUMBERandTASK_NUMBER, and that the task you want to edit has a due date.
Written by: Yee Hong
5.4.5 Search Tasks before a Given Date: searchtask
You can use this command to search all tasks before a date in Covigent.
Format: searchtask dd/DUE_DATE
| Field | Description |
|---|---|
DUE_DATE |
The due date you are looking for. It can in any of the following formats: i) YYYYMMDD, e.g. 20210131 ii) YYYYMMDD HHmm, e.g. 20210131 2359 iii) D/M/YYYY, e.g. 31/1/2021 or 31/01/2021 iv) D/M/YYYY HHmm, e.g. 31/1/2021 2359 or 31/01/2021 2359
|
![]() Important Information:
Important Information:
- If you do not provide the time for a
DUE_DATE, it defaults to 0000 (12am).
Example(s):
-
searchtask dd/12/1/2021Search all tasks before and including 12 January 2021 0000.
Step By Step Usage:
- Navigate to the Tasks tab under the navigation bar as shown in Figure 61.
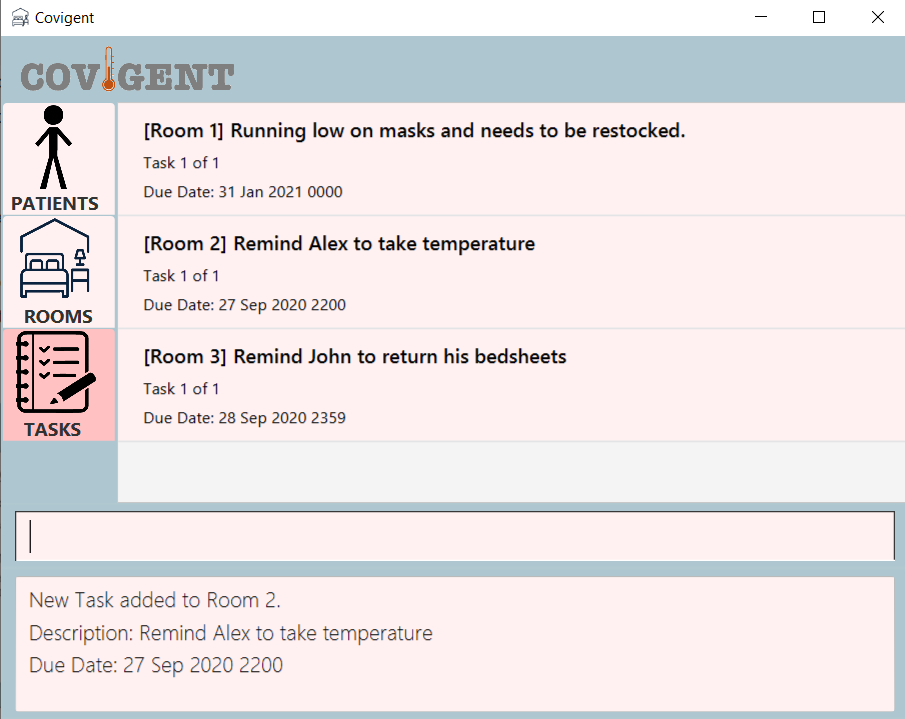
Figure 61. Navigation to Tasks Tab - Using the example, key in the command into the Command Box as shown below.

Figure 62.searchtaskCommand in Command Box - Press Enter to run the command.
- With reference to Figure 63, the Result Box displays the message, “Tasks before the due date found.”.
- Now you can find tasks before and including 12 Jan 2021 0000 can now be found in the list of tasks in Covigent.
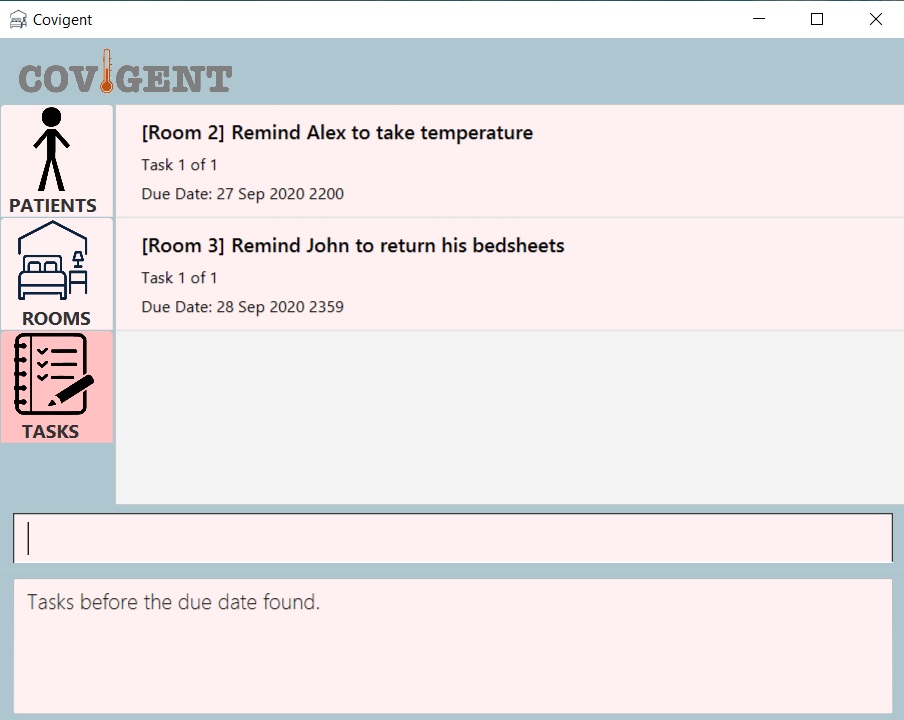
Figure 63. A Successful Execution ofsearchtask
Written by: Wai Lok
5.4.6 List all Tasks: listtask
You can use this command to look at the list of all tasks in the task tab.
Format: listtask
Example(s):
-
listtaskLists all tasks that are present in Covigent.
Step By Step Usage:
- Navigate to the Tasks tab under the navigation bar as shown in Figure 64.

Figure 64. Navigation to Tasks tab - Key in the command into the Command Box as shown below.

Figure 65.listtaskCommand in Command Box - Press Enter to run the command.
- Now you can find the full list of patient in Covigent.
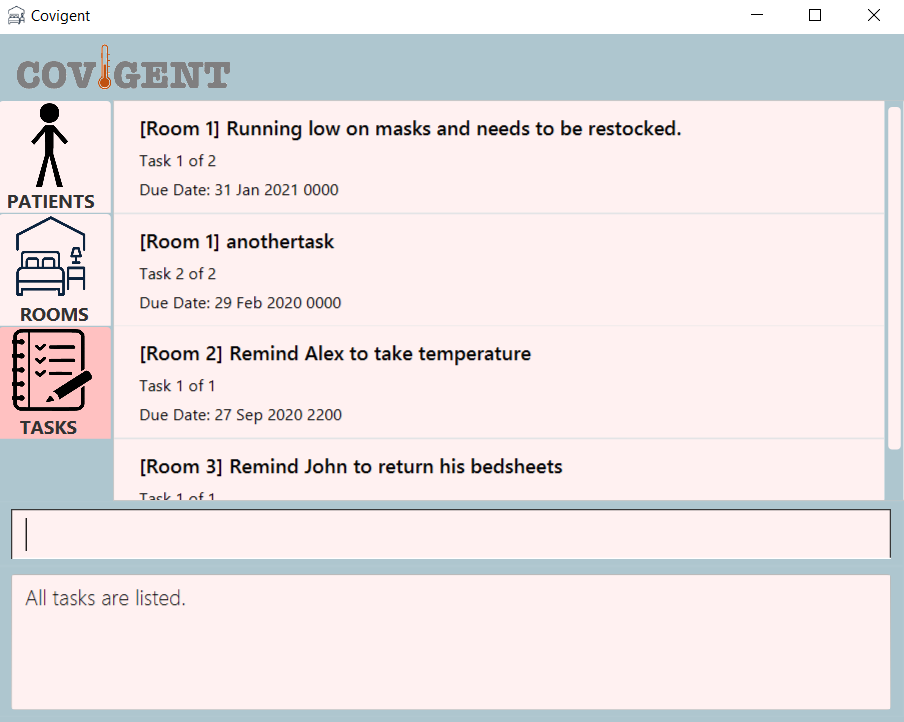
Figure 66. A Successful Execution oflisttask
Written by: Wai Lok
5.5 View help: help
If you encounter any issues using Covigent and need to access this user guide again, simply key in help into the Command Box.
Format: help
Step By Step Usage:
- Key in the command into the Command Box as shown below.

Figure 67.helpCommand in Command Box - Press Enter to run the command.
- The Result Box displays the message as shown in Figure 68.

Figure 68. Result Display Box - A new help window appears.

Figure 69. Help Window
Written by Yun Qing
5.6 Exit Covigent: exit
You can use this command to exit from Covigent.
Format: exit
Step By Step Usage:
- Key in the command into the Command Box as shown below.

Figure 70.exitCommand in Command Box - Press Enter to run the command.
- Covigent exits and closes.
Written by: MingDe
5.7 Autosave
Covigent data are saved in the hard disk automatically after any command that changes the data. There is no need to save manually.
6. Command Summary
This section provides a quick summary of the commands for Patient, Room, Task and General. For the detailed explanation of the usage of each command, head on to the Features section to find out more.
6.1 Patient
| Action | Format, Examples |
|---|---|
| Add Patient |
addpatient n/NAME t/TEMPERATURE d/PERIOD_OF_STAY p/PHONE_NUMBER a/AGE [c/COMMENT] e.g., addpatient n/Betsy Crowe t/36.5 d/20201001-20201014 p/91234567 a/19 c/Is asthmatic |
| Delete Patient |
deletepatient NAME e.g., deletepatient Mary Doe |
| Edit Patient |
editpatient NAME [n/NAME] [t/TEMPERATURE] [d/PERIOD_OF_STAY] [p/PHONE_NUMBER] [a/AGE] [c/COMMENT]e.g., editpatient James Lee t/36.5 |
| Search Patient |
searchpatient [n/NAME] [tr/TEMPERATURE_RANGE] e.g., searchpatient tr/36.5-36.7 |
| List Patients |
listpatient |
6.2 Room
| Action | Format, Examples |
|---|---|
| Initialise Room |
initroom NUMBER_OF_ROOMS e.g., initroom 123 |
| Allocate Patient to Room |
allocateroom ROOM_NUMBER n/NAME e.g., allocateroom 5 n/David Li |
| Search by Room Number |
searchroom r/ROOM_NUMBERe.g., searchroom r/15 |
| Search for Room with Patient |
searchroom n/NAMEe.g., searchroom n/Jane Doe |
| List Rooms |
listroom |
| Find Empty Room |
findemptyroom |
6.3 Task
| Action | Format, Examples |
|---|---|
| Add Task to Room |
addtask r/ROOM_NUMBER d/DESCRIPTION [dd/DUE_DATE] e.g., addtask d/Running low on masks and needs to be restocked. r/5 dd/12/1/2021 |
| Delete Task from Room |
deletetask r/ROOM_NUMBER t/TASK_NUMBER e.g., deletetask r/5 t/1 |
| Edit Task Description or Due Date |
edittask r/ROOM_NUMBER t/TASK_NUMBER [d/DESCRIPTION] [dd/DUE_DATE] e.g., edittask r/5 t/1 dd/12/1/2021 1500 |
| Remove Due Date from a Task |
edittask r/ROOM_NUMBER t/TASK_NUMBER dd/- e.g., edittask r/5 t/1 dd/- |
| Search Task |
searchtask dd/DUE_DATE e.g., searchtask dd/12/1/2021 |
| List Tasks |
listtask |
6.4 General
| Action | Format, Examples |
|---|---|
| Help | help |
| Exit | exit |
Written by: Yun Qing
7. FAQ
Q: Why does the output sometimes appear red and sometimes black?
A: If the command input is given in the wrong format, then the output is given in red. Also the correct format for the particular command is given.
    Example:<br />
    Invalid command format!
    Please give the number of digits in numbers
    Example: addRooms 200
Q: Will data be stored in the system after closing the app?
A: The data is stored in the hard disk and therefore would not be deleted even if you close the app
Q: How do I look at all the rooms and patient when only one is being displayed after commands such as findroom?
A: Use the command listroom for rooms and listpatient for patients.
Q: What should I do if nothing happens when I double click the Jar file?
A: Open Terminal(Mac)/Command Prompt(Windows) . Type cd [PATH TO DIRECTORY CONTAINING .JAR FILE] . Type java -jar covigent.jar to run the application.
Written by: Noorul Azlina